本文以打开一个Activity后,到Activity显示后,如何确认各个窗口的大小和位置。不涉及到窗口中的每个view的布局的情况。一个Activity包含了一个PhoneWindow(window),一个Window代表一个窗口。
Activity并不负责视图控制,只是控制其生命周期和处理事件,真正控制视图的是Window。但Window的添加和显示又与生命周期息息相关。
在android系统中,一个window界面上出来Activity显示的界面外,至少还可能有如下的元素:状态栏,导航栏和输入法窗口
Activity与Window第一次取得联系是ActivityThread的perfomLaunchActivity()调用Activity的attach()方法时,如下图:

在attach方法里,创建一个PhoneWindow对象,然后赋值给成员变量mWindow。因PhoneWindow继承自Window,接下来通过调用Window的setWindowManager,使得Window与WindowManager获得关联。
ActvityThread.performLaunchActivity
/** Core implementation of activity launch. */private Activity performLaunchActivity(ActivityClientRecord r, Intent customIntent) {ActivityInfo aInfo = r.activityInfo;if (r.packageInfo == null) {r.packageInfo = getPackageInfo(aInfo.applicationInfo, r.compatInfo,Context.CONTEXT_INCLUDE_CODE);}
ComponentName compOnent= r.intent.getComponent();if (compOnent== null) {compOnent= r.intent.resolveActivity(mInitialApplication.getPackageManager());r.intent.setComponent(component);}
if (r.activityInfo.targetActivity != null) {compOnent= new ComponentName(r.activityInfo.packageName,r.activityInfo.targetActivity);}
ContextImpl appCOntext= createBaseContextForActivity(r);Activity activity = null;try {java.lang.ClassLoader cl = appContext.getClassLoader();activity = mInstrumentation.newActivity(cl, component.getClassName(), r.intent);StrictMode.incrementExpectedActivityCount(activity.getClass());r.intent.setExtrasClassLoader(cl);r.intent.prepareToEnterProcess();if (r.state != null) {r.state.setClassLoader(cl);}} catch (Exception e) {if (!mInstrumentation.onException(activity, e)) {throw new RuntimeException("Unable to instantiate activity " + component+ ": " + e.toString(), e);}}
try {Application app = r.packageInfo.makeApplication(false, mInstrumentation);
if (localLOGV) Slog.v(TAG, "Performing launch of " + r);if (localLOGV) Slog.v(TAG, r + ": app=" + app+ ", appName=" + app.getPackageName()+ ", pkg=" + r.packageInfo.getPackageName()+ ", comp=" + r.intent.getComponent().toShortString()+ ", dir=" + r.packageInfo.getAppDir());
if (activity != null) {CharSequence title = r.activityInfo.loadLabel(appContext.getPackageManager());Configuration cOnfig= new Configuration(mCompatConfiguration);if (r.overrideConfig != null) {config.updateFrom(r.overrideConfig);}if (DEBUG_CONFIGURATION) Slog.v(TAG, "Launching activity "+ r.activityInfo.name + " with config " + config);Window window = null;if (r.mPendingRemoveWindow != null && r.mPreserveWindow) {window = r.mPendingRemoveWindow;r.mPendingRemoveWindow = null;r.mPendingRemoveWindowManager = null;}appContext.setOuterContext(activity);//调用Activity.attach方法来建立activity -window -windowmanager的联系activity.attach(appContext, this, getInstrumentation(), r.token,r.ident, app, r.intent, r.activityInfo, title, r.parent,r.embeddedID, r.lastNonConfigurationInstances, config,r.referrer, r.voiceInteractor, window, r.configCallback);
if (customIntent != null) {activity.mIntent = customIntent;}r.lastNOnConfigurationInstances= null;checkAndBlockForNetworkAccess();activity.mStartedActivity = false;int theme = r.activityInfo.getThemeResource();if (theme != 0) {activity.setTheme(theme);}
activity.mCalled = false;//设置activity的状态:onCreateif (r.isPersistable()) {mInstrumentation.callActivityOnCreate(activity, r.state, r.persistentState);} else {mInstrumentation.callActivityOnCreate(activity, r.state);}if (!activity.mCalled) {throw new SuperNotCalledException("Activity " + r.intent.getComponent().toShortString() +" did not call through to super.onCreate()");}r.activity = activity;}r.setState(ON_CREATE);
mActivities.put(r.token, r);
} catch (SuperNotCalledException e) {throw e;
} catch (Exception e) {if (!mInstrumentation.onException(activity, e)) {throw new RuntimeException("Unable to start activity " + component+ ": " + e.toString(), e);}}
return activity;}
Activity.attach
 @UnsupportedAppUsage
7703      final void attach(Context context, ActivityThread aThread,
7704              Instrumentation instr, IBinder token, int ident,
7705              Application application, Intent intent, ActivityInfo info,
7706              CharSequence title, Activity parent, String id,
7707              NonConfigurationInstances lastNonConfigurationInstances,
7708              Configuration config, String referrer, IVoiceInteractor voiceInteractor,
7709              Window window, ActivityConfigCallback activityConfigCallback, IBinder assistToken) {
7710          attachBaseContext(context);
7711
7712          mFragments.attachHost(null /*parent*/);
7713
7714          mWindow = new PhoneWindow(this, window, activityConfigCallback);//创建phoneWindow对象
7715          mWindow.setWindowControllerCallback(this);
7716          mWindow.setCallback(this);
7717          mWindow.setOnWindowDismissedCallback(this);
7718          mWindow.getLayoutInflater().setPrivateFactory(this);
7719          if (info.softInputMode != WindowManager.LayoutParams.SOFT_INPUT_STATE_UNSPECIFIED) {
7720              mWindow.setSoftInputMode(info.softInputMode);
7721          }
7722          if (info.uiOptions != 0) {
7723              mWindow.setUiOptions(info.uiOptions);
7724          }//UI线程
7725          mUiThread = Thread.currentThread();//建立window与WindowManager的关系
7750          mWindow.setWindowManager(
7751                  (WindowManager)context.getSystemService(Context.WINDOW_SERVICE),
7752                  mToken, mComponent.flattenToString(),
7753                  (info.flags & ActivityInfo.FLAG_HARDWARE_ACCELERATED) != 0);
7754          if (mParent != null) {
7755              mWindow.setContainer(mParent.getWindow());
7756          }
7757          mWindowManager = mWindow.getWindowManager();
7758          mCurrentCOnfig= config;
7759
7760          mWindow.setColorMode(info.colorMode);
7761
7762          setAutofillOptions(application.getAutofillOptions());
7763          setContentCaptureOptions(application.getContentCaptureOptions());
7764      }
Window.setWindowManger:
frameworks/base/core/java/android/view/Window.java
770 public void setWindowManager(WindowManager wm, IBinder appToken, String appName,
771 boolean hardwareAccelerated) {
772 mAppToken = appToken;
773 mAppName = appName;
774 mHardwareAccelerated = hardwareAccelerated;
775 if (wm == null) {
776 wm = (WindowManager)mContext.getSystemService(Context.WINDOW_SERVICE);
777 }
778 mWindowManager = ((WindowManagerImpl)wm).createLocalWindowManager(this);
779 }
WindowManager是个接口类,它的实现是在WindowManagerImpl。WindowManagerImpl的重要方法里实质的工作又是交由WindowManagerGlobal处理。两者属于代理者模式。WindowManagerGlobal用于创建、管理、删除ViewRoot。三者关系如下:

ActivityThread的perfomLaunchActivity在attach完成后,会调用Activity的onCreate方法。应用程序会在onCreate回调中调用setContentView为活动窗口添加布局。

Activity.setContentView
3325 public void setContentView(@LayoutRes int layoutResID) {
3326 getWindow().setContentView(layoutResID);
3327 initWindowDecorActionBar();
3328 }
这里的getWindow()方法获取的就是前面attach()方法中实例化的PhoneWindow对象。PhoneWindow类是Window的具体实现类。故接下来就是调用PhoneWindow的setContentView进行真正的操作。
PhoneWindow.setContenView
frameworks/base/core/java/com/android/internal/policy/PhoneWindow.java//是放置window具体内容的地方。它可以是mDecor,也可以是mDecor的子ViewViewGroup mContentParent;
422      @Override
423      public void setContentView(int layoutResID) {
424          // Note: FEATURE_CONTENT_TRANSITIONS may be set in the process of installing the window
425          // decor, when theme attributes and the like are crystalized. Do not check the feature
426          // before this happens.
427          if (mCOntentParent== null) {
428              installDecor();//首次调用mContentParent,调用installDecor方法来创建DecorView
429          } else if (!hasFeature(FEATURE_CONTENT_TRANSITIONS)) {
430              mContentParent.removeAllViews();//如果已经存在mContentParent,而且不需要动画,清除所有的view
431          }
432
433          if (hasFeature(FEATURE_CONTENT_TRANSITIONS)) {
434              final Scene newScene = Scene.getSceneForLayout(mContentParent, layoutResID,
435                      getContext());
436              transitionTo(newScene);
437          } else {//添加布局文件,添加到mContentParent,mContentParent是在installDecor中赋值的
438              mLayoutInflater.inflate(layoutResID, mContentParent);
439          }
440          mContentParent.requestApplyInsets();
441          final Callback cb = getCallback();
442          if (cb != null && !isDestroyed()) {
443              cb.onContentChanged();
444          }
445          mCOntentParentExplicitlySet= true;
446      }
上面代码的意义为:
首先第一个判断,如果mContentParent为空时,调用installDecor()。当mContentParent内容不是空,并且没有设置FEATURE_CONTENT_TRANSITIONS标志位时,则会调用removeAllViews()清空mContentParent内容。其中,FEATURE_CONTENT_TRANSITIONS标志位代表内容转换过渡动画,默认是false,可以在主体中通过属性windowContentTransitions进行设置。
第二个if判断,mContentParent获取后,如果设置了FEATURE_CONTENT_TRANSITIONS则添加Scene来过渡启动。否则调用mLayoutInflater.inflate(layoutResID, mContentParent)将应用程序Activity的布局文件通过LayoutInflater对象转换为View树,并且添加至mContentParent视图中。
PhoneWindow. installDecor
158 // This is the top-level view of the window, containing the window decor.
159 private DecorView mDecor;
2681 private void installDecor() {
2682 mForceDecorInstall = false;
2683 if (mDecor == null) {
2684 mDecor = generateDecor(-1);//1.当DecorView不存在时,通过调用generateDecor
2685 mDecor.setDescendantFocusability(ViewGroup.FOCUS_AFTER_DESCENDANTS);
2686 mDecor.setIsRootNamespace(true);
2687 if (!mInvalidatePanelMenuPosted && mInvalidatePanelMenuFeatures != 0) {
2688 mDecor.postOnAnimation(mInvalidatePanelMenuRunnable);
2689 }
2690 } else {
2691 mDecor.setWindow(this);//如果Decorview已经存在,将phonewindow与DecorView建立联系
2692 } //此时mDecor不为空,但是mContentParent为空
2693 if (mCOntentParent== null) {
2694 mCOntentParent= generateLayout(mDecor);//2.为DecorView绑定布局
2695 }
.......
2814 }
2815
2315 protected DecorView generateDecor(int featureId) {//获得应用的上下文
2319 Context context;
2320 if (mUseDecorContext) {
2321 Context applicatiOnContext= getContext().getApplicationContext();
2322 if (applicatiOnContext== null) {
2323 cOntext= getContext();
2324 } else {
2325 cOntext= new DecorContext(applicationContext, getContext());
2326 if (mTheme != -1) {
2327 context.setTheme(mTheme);
2328 }
2329 }
2330 } else {
2331 cOntext= getContext();
2332 }
2333 return new DecorView(context, featureId, this, getAttributes());
2334 }
至此mDecorView仅仅进行了实例化,并未加载布局,mContentParent也是空。调用generateLayout进行为decorview加载布局并实例化mContentParent。
mCOntentParent= generateLayout(mDecor);//2.为DecorView绑定布局
protected ViewGroup generateLayout(DecorView decor) {//获得window的主题,依据不同的样式设置不同的feature
2339 TypedArray a = getWindowStyle();
2350 //是否为悬浮窗口
2351 mIsFloating = a.getBoolean(R.styleable.Window_windowIsFloating, false);
2352 int flagsToUpdate = (FLAG_LAYOUT_IN_SCREEN|FLAG_LAYOUT_INSET_DECOR)
2353 & (~getForcedWindowFlags());
2354 if (mIsFloating) {
2355 setLayout(WRAP_CONTENT, WRAP_CONTENT);
2356 setFlags(0, flagsToUpdate);
2357 } else {
2358 setFlags(FLAG_LAYOUT_IN_SCREEN|FLAG_LAYOUT_INSET_DECOR, flagsToUpdate);
2359 }
2360 //是否需要设置title和actionbar
2361 if (a.getBoolean(R.styleable.Window_windowNoTitle, false)) {
2362 requestFeature(FEATURE_NO_TITLE);
2363 } else if (a.getBoolean(R.styleable.Window_windowActionBar, false)) {
2364 // Don't allow an action bar if there is no title.
2365 requestFeature(FEATURE_ACTION_BAR);
2366 }
2367 //是否需要设置actionbar overlay
2368 if (a.getBoolean(R.styleable.Window_windowActionBarOverlay, false)) {
2369 requestFeature(FEATURE_ACTION_BAR_OVERLAY);
2370 }//window是否为全屏模式
2380 if (a.getBoolean(R.styleable.Window_windowFullscreen, false)) {
2381 setFlags(FLAG_FULLSCREEN, FLAG_FULLSCREEN & (~getForcedWindowFlags()));
2382 }
2383 //依据style设置statusbar的透明属性 flag
2384 if (a.getBoolean(R.styleable.Window_windowTranslucentStatus,
2385 false)) {
2386 setFlags(FLAG_TRANSLUCENT_STATUS, FLAG_TRANSLUCENT_STATUS
2387 & (~getForcedWindowFlags()));
2388 }
2389 //依据Window_windowTranslucentNavigation属性,设置natvigation flag
2390 if (a.getBoolean(R.styleable.Window_windowTranslucentNavigation,
2391 false)) {
2392 setFlags(FLAG_TRANSLUCENT_NAVIGATION, FLAG_TRANSLUCENT_NAVIGATION
2393 & (~getForcedWindowFlags()));
2394 }
2395
2396 if (a.getBoolean(R.styleable.Window_windowOverscan, false)) {
2397 setFlags(FLAG_LAYOUT_IN_OVERSCAN, FLAG_LAYOUT_IN_OVERSCAN&(~getForcedWindowFlags()));
2398 }
2399 //设置是否需要设置wallpaper
2400 if (a.getBoolean(R.styleable.Window_windowShowWallpaper, false)) {
2401 setFlags(FLAG_SHOW_WALLPAPER, FLAG_SHOW_WALLPAPER&(~getForcedWindowFlags()));
2402 }
2403
2404 if (a.getBoolean(R.styleable.Window_windowEnableSplitTouch,
2405 getContext().getApplicationInfo().targetSdkVersion
2406 >= android.os.Build.VERSION_CODES.HONEYCOMB)) {
2407 setFlags(FLAG_SPLIT_TOUCH, FLAG_SPLIT_TOUCH&(~getForcedWindowFlags()));
2408 }
2409 ........
2442
2443 final Context cOntext= getContext();
2444 final int targetSdk = context.getApplicationInfo().targetSdkVersion;
2445 final boolean targetPreHOneycomb= targetSdk
2450 R.bool.target_honeycomb_needs_options_menu);
2451 final boolean noActiOnBar= !hasFeature(FEATURE_ACTION_BAR) || hasFeature(FEATURE_NO_TITLE);
2452 //设置是否需要menukey
2453 if (targetPreHoneycomb || (targetPreIcs && targetHcNeedsOptions && noActionBar)) {
2454 setNeedsMenuKey(WindowManager.LayoutParams.NEEDS_MENU_SET_TRUE);
2455 } else {
2456 setNeedsMenuKey(WindowManager.LayoutParams.NEEDS_MENU_SET_FALSE);
2457 }
2458 //设置statusbar 的颜色
2459 if (!mForcedStatusBarColor) {
2460 mStatusBarColor = a.getColor(R.styleable.Window_statusBarColor, 0xFF000000);
2461 }
2462 if (!mForcedNavigationBarColor) {
2463 mNavigatiOnBarColor= a.getColor(R.styleable.Window_navigationBarColor, 0xFF000000);
2464 mNavigatiOnBarDividerColor= a.getColor(R.styleable.Window_navigationBarDividerColor,
2465 0x00000000);
2466 }
2473
2474 WindowManager.LayoutParams params = getAttributes();
2475 //是否绘制statusbar 和navigationbar的背景
2478 if (!mIsFloating) {
2479 if (!targetPreL && a.getBoolean(
2480 R.styleable.Window_windowDrawsSystemBarBackgrounds,
2481 false)) {
2482 setFlags(FLAG_DRAWS_SYSTEM_BAR_BACKGROUNDS,
2483 FLAG_DRAWS_SYSTEM_BAR_BACKGROUNDS & ~getForcedWindowFlags());
2484 }
2485 if (mDecor.mForceWindowDrawsBarBackgrounds) {
2486 params.privateFlags |= PRIVATE_FLAG_FORCE_DRAW_BAR_BACKGROUNDS;
2487 }
2488 }//是否将statusbar 和navigationBar绘制为明亮主题
2489 if (a.getBoolean(R.styleable.Window_windowLightStatusBar, false)) {
2490 decor.setSystemUiVisibility(
2491 decor.getSystemUiVisibility() | View.SYSTEM_UI_FLAG_LIGHT_STATUS_BAR);
2492 }
2493 if (a.getBoolean(R.styleable.Window_windowLightNavigationBar, false)) {
2494 decor.setSystemUiVisibility(
2495 decor.getSystemUiVisibility() | View.SYSTEM_UI_FLAG_LIGHT_NAVIGATION_BAR);
2496 }//当前模式是否为刘海屏模式,获得刘海屏的模式
2497 if (a.hasValue(R.styleable.Window_windowLayoutInDisplayCutoutMode)) {
2498 int mode = a.getInt(R.styleable.Window_windowLayoutInDisplayCutoutMode, -1);
2499 if (mode
2501 throw new UnsupportedOperationException("Unknown windowLayoutInDisplayCutoutMode: "
2502 + a.getString(R.styleable.Window_windowLayoutInDisplayCutoutMode));
2503 }
2504 params.layoutInDisplayCutoutMode = mode;
2505 }
2506 //当前是否为输入法模式
2516 if (!hasSoftInputMode()) {
2517 params.softInputMode = a.getInt(
2518 R.styleable.Window_windowSoftInputMode,
2519 params.softInputMode);
2520 }
2521 //设置窗口的FLAG_DIM_BEHIND
2522 if (a.getBoolean(R.styleable.Window_backgroundDimEnabled,
2523 mIsFloating)) {
2524 /* All dialogs should have the window dimmed */
2525 if ((getForcedWindowFlags()&WindowManager.LayoutParams.FLAG_DIM_BEHIND) == 0) {
2526 params.flags |= WindowManager.LayoutParams.FLAG_DIM_BEHIND;
2527 }
2528 if (!haveDimAmount()) {
2529 params.dimAmount = a.getFloat(
2530 android.R.styleable.Window_backgroundDimAmount, 0.5f);
2531 }
2532 }
2533 //设置窗口的动画
2534 if (params.windowAnimatiOns== 0) {
2535 params.windowAnimatiOns= a.getResourceId(
2536 R.styleable.Window_windowAnimationStyle, 0);
2537 }
2538
2562
2563 // Inflate the window decor.
2564 //根据不同的feature,获得不同的布局
2565 int layoutResource;
2566 int features = getLocalFeatures();
2567 // System.out.println("Features: 0x" + Integer.toHexString(features));
2568 if ((features & (1 <
2570 setCloseOnSwipeEnabled(true);
2571 } else if ((features & ((1 <
2626 mDecor.startChanging();//另启动一个线程 BackdropFrameRenderer来加载相关的资源,包括画statusbar和nav
2627 mDecor.onResourcesLoaded(mLayoutInflater, layoutResource);
2628 //获得ViewGroup :contentParent
2629 。。。。。
2671 mDecor.finishChanging();
2672
2673 return contentParent;
2674 }
generateLayout主要执行的功能为:
1、 首先是获取window主题,根据不同的主题样式设置不同feature flag,如有无TitleBar,有无ActionBar,是否float window,是否全屏,是否是Progress Window……等等。
2、 接下来再判断不同的feartures,调用onResourcesLoaded装载不同的布局文件。例如,如果Window主题是NO_TITLE,decorview就装载R.layout.screen_simple布局,这个布局中只包含mContentParent,此时mDecor就等同于mContentParent。如果包含其它装饰视图,mContentParent就是mDecor的子元素。这里就解释了上面的一段疑问:mContentParent可以是mDecor,也可以是mDecor的子View。
3、 最后获取mContentParent并返回。从代码看mContentParent就是mDecor布局中ID为ID_ANDROID_CONTENT 的控件。
DecorView、mContentParent、mContentRoot(等同于decorview)关系图如下:


上节onCreate阶段是DecorView、mContentParent的创建,真正的显示过程就要调用ActivityThead的handleResumeActivity方法了。
@Overridepublic void handleResumeActivity(IBinder token, boolean finalStateRequest, boolean isForward,String reason) {//执行应用的on_resume的状态final ActivityClientRecord r = performResumeActivity(token, finalStateRequest, reason);if (r == null) {// We didn't actually resume the activity, so skipping any follow-up actions.return;}
final Activity a = r.activity;
......if (r.window == null && !a.mFinished && willBeVisible) {r.window = r.activity.getWindow();//获得phonewindowView decor = r.window.getDecorView();//获得DecorViewdecor.setVisibility(View.INVISIBLE);//Decorview开始为不可见的状态ViewManager wm = a.getWindowManager();WindowManager.LayoutParams l = r.window.getAttributes();a.mDecor = decor;l.type = WindowManager.LayoutParams.TYPE_BASE_APPLICATION;l.softInputMode |= forwardBit;if (r.mPreserveWindow) {a.mWindowAdded = true;r.mPreserveWindow = false;// Normally the ViewRoot sets up callbacks with the Activity// in addView->ViewRootImpl#setView. If we are instead reusing// the decor view we have to notify the view root that the// callbacks may have changed.ViewRootImpl impl = decor.getViewRootImpl();if (impl != null) {impl.notifyChildRebuilt();}}if (a.mVisibleFromClient) {if (!a.mWindowAdded) {a.mWindowAdded = true;wm.addView(decor, l);} else {// The activity will get a callback for this {@link LayoutParams} change// earlier. However, at that time the decor will not be set (this is set// in this method), so no action will be taken. This call ensures the// callback occurs with the decor set.a.onWindowAttributesChanged(l);}}
// If the window has already been added, but during resume// we started another activity, then don't yet make the// window visible.} else if (!willBeVisible) {if (localLOGV) Slog.v(TAG, "Launch " + r + " mStartedActivity set");r.hideForNow = true;}
.........
r.activity.mVisibleFromServer = true;mNumVisibleActivities++;//当Activity可见后,Decorview设置为可见的状态if (r.activity.mVisibleFromClient) {r.activity.makeVisible();}}
r.nextIdle = mNewActivities;mNewActivities = r;if (localLOGV) Slog.v(TAG, "Scheduling idle handler for " + r);Looper.myQueue().addIdleHandler(new Idler());
在ActivityThread的handleResumeActivity方法中,我们只关注三个过程
1、performResumeActivity():performResumeActivity中会调用activity的performResume,performResume中会调用onResume,然后进入Activity的onResume生命周期中。
2、wm.addView():调用ViewManager的addView将DecorView和LayoutParams添加到窗口上,并启动绘制流程。
3、activity.makeVisible():设置DecorView可见,将DecorView显示出来
ViewRootImplpublic void setView(View view, WindowManager.LayoutParams attrs, View panelParentView) {synchronized (this) {if (mView == null) {mView = view;//将DecorView赋值给mView//监听Display的变化,当屏幕被点亮或者变暗,或者改变分辨率mAttachInfo.mDisplayState = mDisplay.getState();mDisplayManager.registerDisplayListener(mDisplayListener, mHandler);
mViewLayoutDirectiOnInitial= mView.getRawLayoutDirection();mFallbackEventHandler.setView(view);mWindowAttributes.copyFrom(attrs);if (mWindowAttributes.packageName == null) {mWindowAttributes.packageName = mBasePackageName;}attrs = mWindowAttributes;setTag();
if (DEBUG_KEEP_SCREEN_ON && (mClientWindowLayoutFlags& WindowManager.LayoutParams.FLAG_KEEP_SCREEN_ON) != 0&& (attrs.flags&WindowManager.LayoutParams.FLAG_KEEP_SCREEN_ON) == 0) {Slog.d(mTag, "setView: FLAG_KEEP_SCREEN_ON changed from true to false!");}// Keep track of the actual window flags supplied by the client.mClientWindowLayoutFlags = attrs.flags;
setAccessibilityFocus(null, null);
}
boolean restore = false;if (mTranslator != null) {mSurface.setCompatibilityTranslator(mTranslator);restore = true;attrs.backup();mTranslator.translateWindowLayout(attrs);}if (DEBUG_LAYOUT) Log.d(mTag, "WindowLayout in setView:" + attrs);
mAdded = true;int res; /* = WindowManagerImpl.ADD_OKAY; */
// Schedule the first layout -before- adding to the window// manager, to make sure we do the relayout before receiving// any other events from the system.//请求relayout与绘制界面requestLayout();if ((mWindowAttributes.inputFeatures& WindowManager.LayoutParams.INPUT_FEATURE_NO_INPUT_CHANNEL) == 0) {mInputChannel = new InputChannel();}mForceDecorViewVisibility = (mWindowAttributes.privateFlags& PRIVATE_FLAG_FORCE_DECOR_VIEW_VISIBILITY) != 0;try {mOrigWindowType = mWindowAttributes.type;mAttachInfo.mRecomputeGlobalAttributes = true;collectViewAttributes();//调用wms来添加窗口res = mWindowSession.addToDisplay(mWindow, mSeq, mWindowAttributes,getHostVisibility(), mDisplay.getDisplayId(), mWinFrame,mAttachInfo.mContentInsets, mAttachInfo.mStableInsets,mAttachInfo.mOutsets, mAttachInfo.mDisplayCutout, mInputChannel);} catch (RemoteException e) {mAdded = false;mView = null;mAttachInfo.mRootView = null;mInputChannel = null;mFallbackEventHandler.setView(null);unscheduleTraversals();setAccessibilityFocus(null, null);throw new RuntimeException("Adding window failed", e);} finally {if (restore) {attrs.restore();}}//处理输入事件if (mInputChannel != null) {if (mInputQueueCallback != null) {mInputQueue = new InputQueue();mInputQueueCallback.onInputQueueCreated(mInputQueue);}mInputEventReceiver = new WindowInputEventReceiver(mInputChannel,Looper.myLooper());}......// Set up the input pipeline.CharSequence counterSuffix = attrs.getTitle();mSyntheticInputStage = new SyntheticInputStage();InputStage viewPostImeStage = new ViewPostImeInputStage(mSyntheticInputStage);InputStage nativePostImeStage = new NativePostImeInputStage(viewPostImeStage,"aq:native-post-ime:" + counterSuffix);InputStage earlyPostImeStage = new EarlyPostImeInputStage(nativePostImeStage);InputStage imeStage = new ImeInputStage(earlyPostImeStage,"aq:ime:" + counterSuffix);InputStage viewPreImeStage = new ViewPreImeInputStage(imeStage);InputStage nativePreImeStage = new NativePreImeInputStage(viewPreImeStage,"aq:native-pre-ime:" + counterSuffix);
mFirstInputStage = nativePreImeStage;mFirstPostImeInputStage = earlyPostImeStage;mPendingInputEventQueueLengthCounterName = "aq:pending:" + counterSuffix;}}}
从上述的方法可以看到ViewRootImpl的职责为:
1) WindowManager和DecorView之间连接纽带,更广一点可以说是Window和View之间的纽带。配合WindowManagerService来管理系统的应用程序窗口。
2)完成View的绘制过程,包括measure、layout、draw过程。
3)负责向View分发收到的event事件,如按键,触屏等事件。
1441      @Override
1442      public void requestLayout() {
1443          if (!mHandlingLayoutInLayoutRequest) {
1444              checkThread();//检查当前是否在主线程
1445              mLayoutRequested = true;//设置mLayoutRequested
1446              scheduleTraversals();//调用scheduleTraversals
1447          }
1448      }
1712      @UnsupportedAppUsage
1713      void scheduleTraversals() {
1714          if (!mTraversalScheduled) {//同一帧内不会被多次调用
1715              mTraversalScheduled = true;//拦截同步message
1716              mTraversalBarrier = mHandler.getLooper().getQueue().postSyncBarrier();//mChoreographer回调,执行绘制操作
1717              mChoreographer.postCallback(
1718                      Choreographer.CALLBACK_TRAVERSAL, mTraversalRunnable, null);
1719              if (!mUnbufferedInputDispatch) {
1720                  scheduleConsumeBatchedInput();
1721              }
1722              notifyRendererOfFramePending();
1723              pokeDrawLockIfNeeded();
1724          }
1725      }
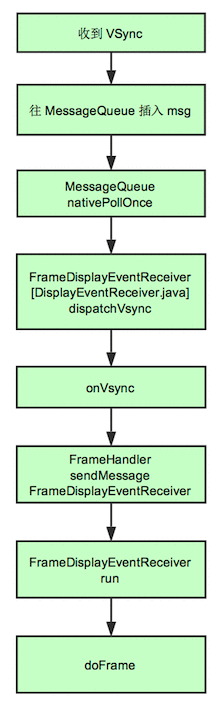
调用到了mChoreographer.postCallback。 Choreographer主要作用是与Vsync配合协调动画,输入和绘制的时间,它从显示子系统接收定时脉冲(例如垂直同步),然后安排渲染下一个frame的一部分工作。大致流程如下图,分别 是请求 VSync 和 收到 VSync的过程。
postCallback的调用顺序如下:

Choreographer.java
private void postCallbackDelayedInternal(int callbackType,
Object action, Object token, long delayMillis) {
if (DEBUG_FRAMES) {
Log.d(TAG, "PostCallback: type=" + callbackType
+ ", action=" + action + ", token=" + token
+ ", delayMillis=" + delayMillis);
}
synchronized (mLock) {
//当前时间
final long now = SystemClock.uptimeMillis();
//回调执行时间,为当前时间加上延迟时间
final long dueTime = now + delayMillis;
//obtainCallbackLocked(long dueTime, Object action, Object token)这个方法将传入的三个参数
//转换为callbackRecord,然后callbackQueue根据类型将CallbackRecord添加在链条上
mCallbackQueues[callbackType].addCallbackLocked(dueTime, action, token);
//根据时间判断
if (dueTime <= now) {
//如果delayMillis为0,立即执行
scheduleFrameLocked(now);
} else {
//如果时间未到,则发送一个MSG_DO_SCHEDULE_CALLBACK消息,等时间到了再处理,最终处理也是调 //用scheduleFrameLocked来处理
Message msg = mHandler.obtainMessage(MSG_DO_SCHEDULE_CALLBACK, action);
msg.arg1 = callbackType;
msg.setAsynchronous(true);
mHandler.sendMessageAtTime(msg, dueTime);
}
}
}
scheduleFrameLocked
// Enable/disable vsync for animations and drawing.private static final boolean USE_VSYNC = SystemProperties.getBoolean("debug.choreographer.vsync", true);private void scheduleFrameLocked(long now) {if (!mFrameScheduled) {mFrameScheduled = true;//判断是否使用了VSYNC,这个值取决与系统的属性if (USE_VSYNC) {if (DEBUG_FRAMES) {Log.d(TAG, "Scheduling next frame on vsync.");}
// If running on the Looper thread, then schedule the vsync immediately,// otherwise post a message to schedule the vsync from the UI thread// as soon as possible.if (isRunningOnLooperThreadLocked()) {//请求Vsync信号,最终会调用到native层,native层处理完成后,会触发 //FrameDisplayEventReceiver的onVsync,回调中最终也会调用到 void doFrame(long frameTimeNanos, int frame) ,这里只有等请求到vsync信号后,才继续执行后面的回调scheduleVsyncLocked();} else {//直接在UI线程发送一个MSG_DO_SCHEDULE_VSYNC消息,最终也是调用scheduleVsyncLockedMessage msg = mHandler.obtainMessage(MSG_DO_SCHEDULE_VSYNC);msg.setAsynchronous(true);mHandler.sendMessageAtFrontOfQueue(msg);}} else {final long nextFrameTime = Math.max(mLastFrameTimeNanos / TimeUtils.NANOS_PER_MS + sFrameDelay, now);if (DEBUG_FRAMES) {Log.d(TAG, "Scheduling next frame in " + (nextFrameTime - now) + " ms.");}//如果没有使用VSYNC,发送MSG_DO_FRAME消息,最终会调用到void doFrame(long frameTimeNanos, int frame)方法Message msg = mHandler.obtainMessage(MSG_DO_FRAME);msg.setAsynchronous(true);mHandler.sendMessageAtTime(msg, nextFrameTime);}}
接下来了解一下,请求Vysnc的过程
Choreographer.javaprivate void scheduleVsyncLocked() {mDisplayEventReceiver.scheduleVsync();}
DisplayEventReceiver.javapublic void scheduleVsync() {if (mReceiverPtr == 0) {Log.w(TAG, "Attempted to schedule a vertical sync pulse but the display event "+ "receiver has already been disposed.");} else {//通过JNI调用到native的方法nativeScheduleVsync(mReceiverPtr);}}
mDisplayEventReceiver对应的是FrameDisplayEventReceiver,它继承自DisplayEventReceiver,主要是用来接收同步脉冲信号VSYNC.scheduleVsync()方法通过底层nativeScheduleVsync向SurfaceFlinger服务注册 ,即在下一次脉冲接收后会调用DisplayEventReceiver的dispatchVsync()方法这里类似于防阅者模式,但是每次调用nativeScheduleVsync的方法有且只有一次dispatchVsync。
注意:这里涉及到SurfaceFlinger,而应用与SurfaceFlinger建立连接的前提是创建SurfaceSession,上次分析了SurfaceSession是在addwindow的时候创建的。因此此时虽然先调用了requestLayout方法,但是此时无法接收到VSYNC信号。就无法调用到Callbacks,因此此时会先执行mWindowSession.addToDisplay的相关逻辑。等接受到VSync后,继续执行下面的逻辑。
接收到VSync的信号逻辑顺序为:
当底层向应用发送VSYNC信号,java层通过dispatchVsync()接收,最后回调在FrameDisplayEventReceiver的onVsync
private final class FrameDisplayEventReceiver extends DisplayEventReceiverimplements Runnable {private boolean mHavePendingVsync;private long mTimestampNanos;private int mFrame;
@Overridepublic void onVsync(long timestampNanos, int builtInDisplayId, int frame) {//自动忽略处理默认屏显示的VSYNCif (builtInDisplayId != SurfaceControl.BUILT_IN_DISPLAY_ID_MAIN) {Log.d(TAG, "Received vsync from secondary display, but we don't support "+ "this case yet. Choreographer needs a way to explicitly request "+ "vsync for a specific display to ensure it doesn't lose track "+ "of its scheduled vsync.");scheduleVsync();return;}
.......
mTimestampNanos = timestampNanos;mFrame = frame;//该消息的callback为当前对象FrameDislayEventReceiverMessage msg = Message.obtain(mHandler, this);msg.setAsynchronous(true);//mHandle为FrameHandlermHandler.sendMessageAtTime(msg, timestampNanos / TimeUtils.NANOS_PER_MS);}
@Overridepublic void run() {mHavePendingVsync = false;doFrame(mTimestampNanos, mFrame);}}
可见onVsync()是通过FrameHandler向主线程Looper发送了一个自带callback消息,callback为FrameDislayEventReceiver。当主线程Looper执行到该消息时,则调用FrameDislayEventReceiver的run方法,接着调用doFrame(疑问:Handler消息处理调用到run)?,打印msg
void doFrame(long frameTimeNanos, int frame) {final long startNanos;synchronized (mLock) {if (!mFrameScheduled) {return; //mFrameScheduled为false,直接返回}
long intendedFrameTimeNanos = frameTimeNanos;//原本计划的绘帧时间点startNanos = System.nanoTime();//保存起始时间//由于Vsync事件处理采用的是异步方式,因此这里计算消息发送与函数调用开始之间所花费的时间final long jitterNanos = startNanos - frameTimeNanos;//如果线程处理该消息的时间超过了屏幕刷新周期if (jitterNanos >= mFrameIntervalNanos) { //计算函数调用期间所错过的帧数final long skippedFrames = jitterNanos / mFrameIntervalNanos;//当掉帧个数超过30个,则输出相应的logif (skippedFrames >= SKIPPED_FRAME_WARNING_LIMIT) {Log.i(TAG, "Skipped " + skippedFrames + " frames! "+ "The application may be doing too much work on its main thread.");}final long lastFrameOffset = jitterNanos % mFrameIntervalNanos;//对齐帧的时间间隔frameTimeNanos = startNanos - lastFrameOffset;}//如果frameTimeNanos小于一个屏幕刷新周期,则重新请求vSync信号if (frameTimeNanos
.....mFrameInfo.setVsync(intendedFrameTimeNanos, frameTimeNanos);mFrameScheduled = false;mLastFrameTimeNanos = frameTimeNanos;}
try {Trace.traceBegin(Trace.TRACE_TAG_VIEW, "Choreographer#doFrame");AnimationUtils.lockAnimationClock(frameTimeNanos / TimeUtils.NANOS_PER_MS);
mFrameInfo.markInputHandlingStart();//分别回调CALLBACK_INPUT,CALLBACK_ANIMATION,CALLBACK_TRAVERSAL,CALLBACK_COMMIT,doCallbacks(Choreographer.CALLBACK_INPUT, frameTimeNanos);
mFrameInfo.markAnimationsStart();doCallbacks(Choreographer.CALLBACK_ANIMATION, frameTimeNanos);
mFrameInfo.markPerformTraversalsStart();doCallbacks(Choreographer.CALLBACK_TRAVERSAL, frameTimeNanos);
doCallbacks(Choreographer.CALLBACK_COMMIT, frameTimeNanos);} finally {AnimationUtils.unlockAnimationClock();Trace.traceEnd(Trace.TRACE_TAG_VIEW);}......}
当Vysnc事件到来时,顺序执行4种事件对应CallbackQueue队列中注册的回调
  void doCallbacks(int callbackType, long frameTimeNanos) {CallbackRecord callbacks;synchronized (mLock) {final long now = System.nanoTime();//从指定类型的CallbackQueues队列中查找执行时间到的callbackscallbacks = mCallbackQueues[callbackType].extractDueCallbacksLocked(now / TimeUtils.NANOS_PER_MS);if (callbacks == null) {return;}mCallbacksRunning = true;
.......try {Trace.traceBegin(Trace.TRACE_TAG_VIEW, CALLBACK_TRACE_TITLES[callbackType]);//由于callbackQueue是按照先后顺序来排序的,因此遍历执行所有时间到的CallbackRecordfor (CallbackRecord c = callbacks; c != null; c = c.next) {c.run(frameTimeNanos);}} finally {synchronized (mLock) {mCallbacksRunning = false;do {final CallbackRecord next = callbacks.next;recycleCallbackLocked(callbacks);callbacks = next;} while (callbacks != null);}Trace.traceEnd(Trace.TRACE_TAG_VIEW);}}
按照时间顺序先后执行callbacks的run方法
private static final class CallbackRecord {public CallbackRecord next;public long dueTime;public Object action; // Runnable or FrameCallbackpublic Object token;
public void run(long frameTimeNanos) {if (token == FRAME_CALLBACK_TOKEN) {((FrameCallback)action).doFrame(frameTimeNanos);} else {((Runnable)action).run();}}}
接着回到viewRootImpl调用到scheduleTraversals
   void scheduleTraversals() {if (!mTraversalScheduled) {mTraversalScheduled = true;mTraversalBarrier = mHandler.getLooper().getQueue().postSyncBarrier();mChoreographer.postCallback(Choreographer.CALLBACK_TRAVERSAL, mTraversalRunnable, null);......}
}
看到对应的runnable为mTraversalRunnable
ViewRootImpl.java
final class TraversalRunnable implements Runnable {@Overridepublic void run() {doTraversal();}}final TraversalRunnable mTraversalRunnable = new TraversalRunnable();
run方法调用,所以doTraversal被执行,doTraversal中调用performTraversals开启View的测量、布局、绘制三大流程。
void doTraversal() {if (mTraversalScheduled) {mTraversalScheduled = false;mHandler.getLooper().getQueue().removeSyncBarrier(mTraversalBarrier);
if (mProfile) {Debug.startMethodTracing("ViewAncestor");}
performTraversals();
if (mProfile) {Debug.stopMethodTracing();mProfile = false;}}}
简单总结一下调用Choreographer的postCallback方法:
1.首先Choreographer支持四种类型的事件:输入,绘制,动画,提交
2.当调用postCallback方法后再对应需要的同步Vsync再SF进行注册,等待回调
3.当Choreographer监听到底层的Vsync信号后,一旦接收到回调信号,则通过doFrame统一对java层4种类型事件进行回调


 京公网安备 11010802041100号 | 京ICP备19059560号-4 | PHP1.CN 第一PHP社区 版权所有