下载代码 仅供参考.瓦片服务是我们自己搭的服务器,参考geoserver。
import io
import math
import multiprocessing
import time
import urllib.request as ur
from threading import Thread
import traceback
import PIL.Image as pil
from pathlib import Pathfrom numpy.lib.type_check import imag
import sys
# from PIL import Image
# import Image
import cv2
import numpy as np
from osgeo import gdal, osr
from tools import *
# from tqdm import tqdm, trange# -----------------------------------------------------------# ---------------------------------------------------------
class Downloader(Thread):# multiple threads downloaderdef __init__(self, index, count, urls, datas):# index represents the number of threads# count represents the total number of threads# urls represents the list of URLs nedd to be downloaded# datas represents the list of data need to be returned.super().__init__()self.urls &#61; urlsself.datas &#61; datasself.index &#61; indexself.count &#61; countdef download(self, url):print("下载图片地址",url,)HEADERS &#61; {&#39;User-Agent&#39;: &#39;Mozilla/5.0 (Windows NT 10.0; Win64; x64) AppleWebKit/537.36 (KHTML, like Gecko) Chrome/88.0.4324.150 Safari/537.36 Edg/88.0.705.68&#39;}header &#61; ur.Request(url, headers&#61;HEADERS)err &#61; 1while err <11:try:data &#61; ur.urlopen(header, timeout&#61;10).read()except:traceback.print_exc()print("下载错误 重新下载...")err &#43;&#61; 1else:img &#61; cv2.imdecode(np.frombuffer(data, np.uint8), cv2.IMREAD_COLOR)print("最小像素点", np.min(img))if np.min(img) &#61;&#61; 255:print(f"图片是空白的,开始重新下载第{err}次")err &#43;&#61; 1else:return dataraise Exception("网络连接异常.")def run(self):for i, url in enumerate(self.urls):print("下载任务", i, "/", len(self.urls))tile_x, tile_y, z &#61; url.split("&xyz&#61;")[1].split(",")# lon, lat &#61; tile2lonlat(tile_x, tile_y, z)# 如果i除线程总数1取余 不等于 第几个线程 总是0if i % self.count !&#61; self.index:print("warning!!!跳过该url&#xff0c;记录一下", url)continueself.datas[str(tile_x)&#43;"_"&#43;str(tile_y)] &#61; self.download(url)# ---------------------------------------------------------# ---------------------------------------------------------
def getExtent(x1, y1, x2, y2, z, source&#61;"Google China"):pos1x, pos1y &#61; wgs_to_tile(x1, y1, z)pos2x, pos2y &#61; wgs_to_tile(x2, y2, z)Xframe &#61; pixls_to_mercator({"LT": (pos1x, pos1y), "RT": (pos2x, pos1y), "LB": (pos1x, pos2y), "RB": (pos2x, pos2y), "z": z})for i in ["LT", "LB", "RT", "RB"]:Xframe[i] &#61; mercator_to_wgs(*Xframe[i])if source &#61;&#61; "Google":passelif source &#61;&#61; "ZKLF":passelif source &#61;&#61; "Google China":for i in ["LT", "LB", "RT", "RB"]:Xframe[i] &#61; gcj_to_wgs(*Xframe[i])else:raise Exception("Invalid argument: source.")return Xframedef saveTiff(r, g, b, gt, filePath):fname_out &#61; filePathdriver &#61; gdal.GetDriverByName(&#39;GTiff&#39;)# Create a 3-band datasetdset_output &#61; driver.Create(fname_out, r.shape[1], r.shape[0], 3, gdal.GDT_Byte)dset_output.SetGeoTransform(gt)try:proj &#61; osr.SpatialReference()proj.ImportFromEPSG(4326)dset_output.SetSpatialRef(proj)except:print("Error: Coordinate system setting failed")dset_output.GetRasterBand(1).WriteArray(r)dset_output.GetRasterBand(2).WriteArray(g)dset_output.GetRasterBand(3).WriteArray(b)dset_output.FlushCache()dset_output &#61; Noneprint("Image Saved tif图片生成成功")# ---------------------------------------------------------# ---------------------------------------------------------
MAP_URLS &#61; {"onwer_server": "http://ip:port/geoserver/ows?service&#61;WMS&version&#61;1.3.0&transparent&#61;true&request&#61;GetMap&layers&#61;{style}&width&#61;256&height&#61;256&srs&#61;EPSG%3A3857&format&#61;image/png&bbox&#61;{bbox}&xyz&#61;{xyz}","Google": "http://mts0.googleapis.com/vt?lyrs&#61;{style}&x&#61;{x}&y&#61;{y}&z&#61;{z}","Google China": "http://mt2.google.cn/vt/lyrs&#61;{style}&hl&#61;zh-CN&gl&#61;CN&src&#61;app&x&#61;{x}&y&#61;{y}&z&#61;{z}&s&#61;Galile"}def get_url(source, x, y, z, style):  #if source &#61;&#61; &#39;Google China&#39;:url &#61; MAP_URLS["Google China"].format(x&#61;x, y&#61;y, z&#61;z, style&#61;style)elif source &#61;&#61; &#39;Google&#39;:url &#61; MAP_URLS["Google"].format(x&#61;x, y&#61;y, z&#61;z, style&#61;style)elif source &#61;&#61; "onwer_server":min_xy_list &#61; tile2lonlat(x, y &#43; 1, z)max_xy_list &#61; tile2lonlat(x &#43; 1, y, z)print("min_xy_list:", min_xy_list)print("max_xy_list:", max_xy_list)lng_min, lat_min &#61; min_xy_list[0], min_xy_list[1]lng_max, lat_max &#61; max_xy_list[0], max_xy_list[1]# gcj02转wgs84# lng_min, lat_min &#61; GCJ02_to_WGS84(min_xy_list[0], min_xy_list[1])lng_min, lat_min &#61; WGS84_to_WebMercator(lng_min, lat_min)# lng_max, lat_max &#61; GCJ02_to_WGS84(max_xy_list[0], max_xy_list[1])lng_max, lat_max &#61; WGS84_to_WebMercator(lng_max, lat_max)bbox &#61; ",".join([str(lng_min), str(lat_min), str(lng_max), str(lat_max)])xyz &#61; ",".join([str(x), str(y), str(z)])url &#61; MAP_URLS["ZKLF"].format(bbox&#61;bbox, style&#61;style, xyz&#61;xyz)else:raise Exception("Unknown Map Source ! ")return urldef get_urls(x1, y1, x2, y2, z, source, style):"""&#64;description  :左上角x1,y1右下角x2,y2---------&#64;param  :-------&#64;Returns  :-------"""pos1x, pos1y &#61; wgs_to_tile(x1, y1, z)  # 左上角的瓦片图坐标pos2x, pos2y &#61; wgs_to_tile(x2, y2, z)print("pos1x, pos1y:", pos1x, pos1y)print("pos2x, pos2y:", pos2x, pos2y)lenx &#61; abs(pos2x - pos1x) &#43; 1leny &#61; abs(pos2y - pos1y) &#43; 1print("Total tiles number&#xff1a;{x} X {y}".format(x&#61;lenx, y&#61;leny))print("pos1y, pos1y &#43; leny:", pos1y, pos1y &#43; leny)print("pos1x, pos1x &#43; lenx:", pos1x, pos1x &#43; lenx)urls &#61; [get_url(source, i, j, z, style) for j in range(pos1y, pos1y &#43; leny) for i in range(pos1x, pos1x &#43; lenx)]return urls# ---------------------------------------------------------# ---------------------------------------------------------
def merge_tiles(datas, x1, y1, x2, y2, z):pos1x, pos1y &#61; wgs_to_tile(x1, y1, z)pos2x, pos2y &#61; wgs_to_tile(x2, y2, z)lenx &#61; pos2x - pos1x &#43; 1leny &#61; pos2y - pos1y &#43; 1outpic &#61; pil.new(&#39;RGBA&#39;, (lenx * 256, leny * 256))for i, data in enumerate(datas):picio &#61; io.BytesIO(data)small_pic &#61; pil.open(picio)y, x &#61; i // lenx, i % lenxoutpic.paste(small_pic, (x * 256, y * 256))print(&#39;Tiles merge completed&#39;)return outpicdef download_tiles(urls, multi&#61;1):url_len &#61; len(urls)# datas &#61; [None] * url_lendatas &#61; dict()if multi <1 or multi > 20 or not isinstance(multi, int):raise Exception("multi of Downloader shuold be int and between 1 to 20.")tasks &#61; [Downloader(i, multi, urls, datas) for i in range(multi)]for i in tasks:i.start()for i in tasks:i.join()return datas# ---------------------------------------------------------# ---------------------------------------------------------
def main(left, top, right, bottom, zoom, filePath, style&#61;&#39;s&#39;, server&#61;"Google China", zone_id&#61;""):"""Download images based on spatial extent.East longitude is positive and west longitude is negative.North latitude is positive, south latitude is negative.Parameters----------left, top : left-top coordinate, for example (100.361,38.866)right, bottom : right-bottom coordinatez : zoomfilePath : File path for storing results, TIFF formatstyle : m for map; s for satellite; y for satellite with label; t for terrain; p for terrain with label; h for label;source : Google China (default) or Google"""# ---------------------------------------------------------# Get the urls of all tiles in the extenturls &#61; get_urls(left, top, right, bottom, zoom, server, style)print("瓦片图总数:", len(urls))# Group URLs based on the number of CPU cores to achieve roughly equal amounts of tasksurls_group &#61; [urls[i:i &#43; math.ceil(len(urls) / 2)] for i inrange(0, len(urls), math.ceil(len(urls) / 2))]# urls_group &#61; [urls[i:i &#43; math.ceil(len(urls) / multiprocessing.cpu_count())] for i in#               range(0, len(urls), math.ceil(len(urls) / multiprocessing.cpu_count()))]print(urls_group)# return False# Each set of URLs corresponds to a process for downloading tile mapsprint(&#39;Tiles downloading......瓦片图下载中&#39;)# results &#61; []pool &#61; multiprocessing.Pool(2)# pool &#61; multiprocessing.Pool(multiprocessing.cpu_count())print("cpu_count:", multiprocessing.cpu_count())print("pool", pool)results &#61; pool.map(download_tiles, urls_group)pool.close()pool.join()# print("results:", type(results[0]))image_number &#61; 1for res in results:for key in res.keys():print(f"开始保存第{image_number}张图片")print("image_name:", key)x &#61; str(key).split("_")[0]y &#61; str(key).split("_")[1]parent_dir &#61; Path(f"D:\\tiles\\{zone_id}\\tiles\\{zoom}\\{x}")  # 父级目录if not parent_dir.exists():parent_dir.mkdir(exist_ok&#61;True, parents&#61;True)with open(f"D:\\tiles\\{zone_id}\\tiles\\{zoom}\\{x}\\{y}.png", "wb") as f:# print(_)print("sys.getsizeof(res[key]):", sys.getsizeof(res[key]))f.write(res[key])image_number &#43;&#61; 1# print(res.get())# result &#61; [x for j in results for x in j]print(&#39;Tiles download complete 瓦片图 下载成功&#39;)#     # break# Combine downloaded tile maps into one map# outpic &#61; merge_tiles(result, left, top, right, bottom, zoom)# outpic &#61; outpic.convert(&#39;RGB&#39;)# r, g, b &#61; cv2.split(np.array(outpic))# # Get the spatial information of the four corners of the merged map and use it for outputting# extent &#61; getExtent(left, top, right, bottom, zoom, server)# gt &#61; (extent[&#39;LT&#39;][0], (extent[&#39;RB&#39;][0] - extent[&#39;LT&#39;][0]) / r.shape[1], 0, extent[&#39;LT&#39;][1], 0,#       (extent[&#39;RB&#39;][1] - extent[&#39;LT&#39;][1]) / r.shape[0])# saveTiff(r, g, b, gt, filePath)# ---------------------------------------------------------
if __name__ &#61;&#61; &#39;__main__&#39;:from sqls import select_zone_infoimport jsonstart_time &#61; time.time()zone_id &#61; "1547212382202232832"# main(118.901, 32.066,118.934, 32.109, 18, r&#39;.\Temp\test.tif&#39;, server&#61;"Google China")# main(100.361, 38.866, 100.386, 38.839, 18, r&#39;.\Temp\test.tif&#39;, server&#61;"Google China")# main(97.376955,37.133309,97.4074156,37.118448, 5, r&#39;.\Temp\test-one.tif&#39;, server&#61;"onwer_server", style&#61;"onwer_server_AREA:onwer_server_super_hd")# path &#61; [{"lng": 118.909207, "lat": 32.081909}, {"lng": 118.912005, "lat": 32.081703}, {"lng": 118.911776, "lat": 32.081512}, {"lng": 118.909180, "lat": 32.080421}]left_top_x, left_top_y, right_buttom_x, right_buttom_y &#61; get_zone_gps_max(zone_id)# print(float(left_top[0]), float(left_top[1]), float(right_buttom[0]), float(right_buttom[1]))for zoom in range(18, 19):parent_dir &#61; Path(f"D:\\tiles\\{zone_id}\\tiles\\{zoom}")  # 父级目录if not parent_dir.exists():parent_dir.mkdir(exist_ok&#61;True, parents&#61;True)if 1:main(float(left_top_x),float(left_top_y),float(right_buttom_x),float(right_buttom_y), zoom, r&#39;.\\Temp\\test-one.tif&#39;, server&#61;"onwer_server", style&#61;"onwer_server_AREA:onwer_server_super_hd", zone_id&#61;zone_id)#main(97.376955,37.133309,97.376955,37.133309, 19, r&#39;.\Temp\test-one.tif&#39;, server&#61;"Google China")end_time &#61; time.time()print(&#39;lasted a total of {:.2f} seconds&#39;.format(end_time - start_time))
2.合并瓦片图 谷歌的瓦片图长这样.瓦片图是金字塔类型的&#xff0c;这里就不多做解释了.

合并代码 就是创建一个大的画布&#xff0c;然后把下载好的瓦片图一张张的贴上去&#xff0c;没有难度
import glob
import re
from PIL import Imagefiles &#61; glob.glob(&#39;D:\\tiles\\1547212382202232832\\tiles\\17\\*\\*.png&#39;)
# print(re.findall(r"\d&#43;", files[0])[-2:])
# print(tuple(int(i) for i in re.findall(r"\d&#43;", files[0])[-2:]))
files.sort(key&#61;lambda x: tuple(int(i) for i in re.findall(r"\d&#43;", x)[-2:]))
# print(files)
imagefiles &#61; {}
for item in files:match &#61; re.findall(r&#39;\d&#43;&#39;, item)# print(match[-2])pre &#61; int(match[-2])if not imagefiles.get(pre):imagefiles[pre] &#61; []imagefiles[pre].append(item)imagefiles &#61; sorted(zip(imagefiles.keys(), imagefiles.values()))
print(imagefiles)
total_width &#61; len(imagefiles) * 256
total_height &#61; len(imagefiles[0][1]) * 256new_image &#61; Image.new(&#39;RGB&#39;, (total_width, total_height))x_offset &#61; 0
for item in imagefiles:y_offset &#61; 0# print(item[1])images &#61; map(Image.open, item[1])# print(list(images))for subitem in images:new_image.paste(subitem, (x_offset, y_offset))y_offset &#43;&#61; subitem.size[0]_x &#61; subitem.size[0]# print(list(images))x_offset &#43;&#61; _xnew_image.save(&#39;merge.jpg&#39;, quality&#61;90)
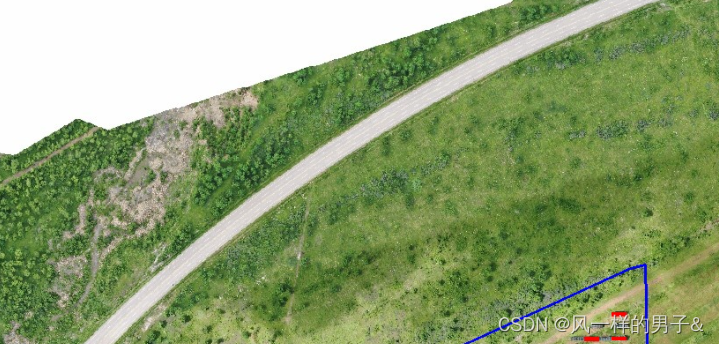
3.在合并好的瓦片图上绘制我们的mark点和多边形。
思路&#xff1a;首先我们合并好的瓦片图上只有像素一个计量单位&#xff0c;如果要化gps点上去的话&#xff0c;就要找到一个全局的参考坐标。最好的参考坐标就是左上角第一块瓦片。找到左上角的点坐标。因为切出来的瓦片像素是我们自定义的&#xff0c;我用的是256*256,同时可以获取到瓦片的实际长度和宽度(就是bbox参数/墨卡托投影),由此我们可以算出单位像素对应的实际长度(单位是米)。 接下来我们只需要找到左上角第一块瓦片的左上角的点坐标即可。 通过左上角瓦片图的gps可以算出对应的瓦片图坐标&#xff0c;根据瓦片图坐标既可以算出 瓦片的左下角坐标和右上角坐标&#xff0c;既得左上角坐标。再转成墨卡托投影即可作为全局的参考坐标了。 ps:瓦片的范围用最小外接矩形来算。
def get_zone_gps_max(zone_id):path_info &#61; select_zone_info(zone_id)path &#61; json.loads(path_info[0]["path"])path &#61; [list(WGS84_to_WebMercator(_["lng"], _["lat"])) for _ in path]print(path)# left_top, right_buttom &#61; get_maxarea_box(path)min_x, max_x, min_y, max_y &#61; get_maxarea_box(path)print("右下→左下→左上→右上:", min_x, max_x, min_y, max_y)left_top_x, left_top_y &#61; WebMercator_to_WGS84(min_x, max_y)right_buttom_x, right_buttom_y &#61; WebMercator_to_WGS84(max_x, min_y)return (float(left_top_x), float(left_top_y), float(right_buttom_x), float(right_buttom_y))def get_first_tile_poi(zone_id, z&#61;17):"""&#64;description :获取第一块瓦片图的坐标---------&#64;param :-------&#64;Returns :左下角和右上角-------"""left_top_x, left_top_y, right_buttom_x, right_buttom_y &#61; get_zone_gps_max(zone_id)pos1x, pos1y &#61; wgs_to_tile(left_top_x, left_top_y, z) # 左上角的瓦片图坐标min_xy_list &#61; tile2lonlat(pos1x, pos1y &#43; 1, z)max_xy_list &#61; tile2lonlat(pos1x &#43; 1, pos1y, z)lng_min, lat_min &#61; min_xy_list[0], min_xy_list[1]lng_max, lat_max &#61; max_xy_list[0], max_xy_list[1]# gcj02转wgs84# lng_min, lat_min &#61; GCJ02_to_WGS84(min_xy_list[0], min_xy_list[1])lng_min, lat_min &#61; WGS84_to_WebMercator(lng_min, lat_min)# lng_max, lat_max &#61; GCJ02_to_WGS84(max_xy_list[0], max_xy_list[1])lng_max, lat_max &#61; WGS84_to_WebMercator(lng_max, lat_max)bbox &#61; [lng_min, lat_min, lng_max, lat_max]return bbox
有疑问或者错误的地方 可以留言讨论 互相学习


 京公网安备 11010802041100号 | 京ICP备19059560号-4 | PHP1.CN 第一PHP社区 版权所有