java代码生成
使用idea的插件codehelper.generator进行代码生成,可以根据entity,生成对应的
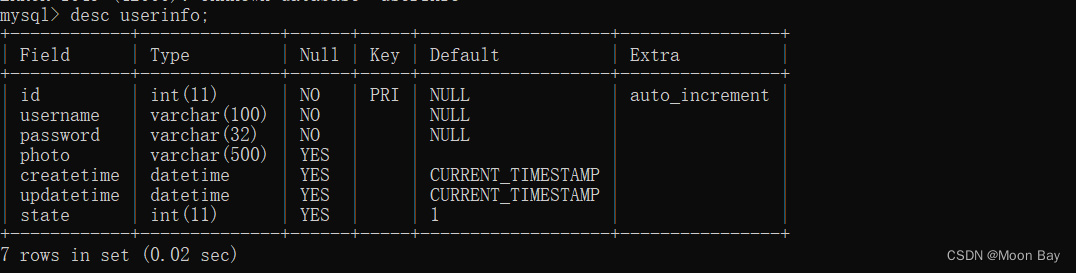
1、建表sql语句
2、dao.java文件
3、dao.xml文件
4、service.java文件
同时这个插件还能在new了entity之后生成所有的set方法
多次生成,不会影响自己手动添加的代码
安装
安装插件codehelper.generator

案例
@Data
@AllArgsConstructor
@NoArgsConstructor
public class UserEntity {
  @Id
  private Integer id;

  private String name;

  /**
   * 1启用,0停用
   */
  private Integer state;

  private String remark;
  @DateTimeFormat(pattern = "yyyy-MM-dd HH:mm:ss")
  @JsonFormat(pattern = "yyyy-MM-dd HH:mm:ss")
  private Date addtime;
  @DateTimeFormat(pattern = "yyyy-MM-dd HH:mm:ss")
  @JsonFormat(pattern = "yyyy-MM-dd HH:mm:ss")
  private Date stoptime;
}
生成set
UserEntity user=new UserEntity();
//new了之后在下一行:点击tool--codeHelper--GenAllSetter

生成代码
点击tool--codeHelper--tox Boxes--在弹窗中输入entity,多个使用'|'分隔,就会在当前文件夹生成代码

sql
-- auto Generated on 2020-01-14 12:49:57
-- DROP TABLE IF EXISTS `user_entity`;
CREATE TABLE user_entity(
  `id` INTEGER(20) UNSIGNED NOT NULL AUTO_INCREMENT COMMENT 'id',
  `name` VARCHAR(50) NOT NULL DEFAULT '' COMMENT 'name',
  `state` INTEGER(12) NOT NULL DEFAULT -1 COMMENT '1启用,0停用',
  `remark` VARCHAR(50) NOT NULL DEFAULT '' COMMENT 'remark',
  `addtime` DATETIME NOT NULL DEFAULT '1000-01-01 00:00:00' COMMENT 'addtime',
  `stoptime` DATETIME NOT NULL DEFAULT '1000-01-01 00:00:00' COMMENT 'stoptime',
  PRIMARY KEY (`id`)
)ENGINE=InnoDB DEFAULT CHARSET=utf8mb4 COMMENT 'user_entity';
dao
package com.demo1.invoice.entity.user;
import org.apache.ibatis.annotations.Param;
import java.util.List;
import com.demo1.invoice.entity.user.UserEntity;

public interface UserEntityDao {

  int insert(@Param("pojo") UserEntity pojo);
  int insertList(@Param("pojos") List pojo);
  List select(@Param("pojo") UserEntity pojo);
  int update(@Param("pojo") UserEntity pojo);
}
xml
<&#63;xml version="1.0" encoding="UTF-8" &#63;>id, name, state, remark, addtime, stoptime INSERT INTO user_entity VALUES id, name, state, remark, addtime, stoptime, #{pojo.id}, #{pojo.name}, #{pojo.state}, #{pojo.remark}, #{pojo.addtime}, #{pojo.stoptime}, INSERT INTO user_entity( )VALUES ( #{pojo.id}, #{pojo.name}, #{pojo.state}, #{pojo.remark}, #{pojo.addtime}, #{pojo.stoptime} ) UPDATE user_entity WHERE id = #{pojo.id} id = #{pojo.id}, name = #{pojo.name}, state = #{pojo.state}, remark = #{pojo.remark}, addtime = #{pojo.addtime}, stoptime = #{pojo.stoptime} DELETE FROM user_entity where id = #{id}
service
import org.springframework.stereotype.Service;
import javax.annotation.Resource;
import java.util.List;
import com.demo1.invoice.entity.user.UserEntity;
import com.demo1.invoice.entity.user.UserEntityDao;

@Service
public class UserEntityService {

  @Resource
  private UserEntityDao userEntityDao;

  public int insert(UserEntity pojo){
    return userEntityDao.insert(pojo);
  }

  public int insertList(List pojos){
    return userEntityDao.insertList(pojos);
  }

  public List select(UserEntity pojo){
    return userEntityDao.select(pojo);
  }

  public int update(UserEntity pojo){
    return userEntityDao.update(pojo);
  }

}
补充知识:IDEA 新建junit单元测试
1. 新建test目录
在src同级目录下新建test文件夹,右键test文件夹设置为Test Source Root

2. 创建测试类
选中要创建单元测试的实现类,并将焦点放在编辑器中(鼠标在编辑器中点击一下),菜单栏选择Navigate----Test(Mac快捷键:Cmd+shift+t):

选择创建新的测试:

选中要测试的方法,以及生成@Before:

这样之后就会在test下新建一个测试类:

3. 测试函数介绍
测试类中包含两个函数:
@Before
public void setUp() throws Exception
这个是测试方法执行前执行的函数,假如在测试方法中需要使用该类中的成员变量,那么可以在该函数中定义该成员变量。
@Test
public void findUserById() throws Exception
这个便是测试函数。点击编辑器左列的小工具即可发起测试。

以上这篇使用idea插件进行java代码生成的操作就是小编分享给大家的全部内容了,希望能给大家一个参考,也希望大家多多支持。


 京公网安备 11010802041100号 | 京ICP备19059560号-4 | PHP1.CN 第一PHP社区 版权所有