keepalived高可用
keepalived是什么?
Keepalived 软件起初是专为LVS负载均衡软件设计的,用来管理并监控LVS集群系统中各个服务节点的状态,后来又加入了可以实现高可用的VRRP功能。因此,Keepalived除了能够管理LVS软件外,还可以作为其他服务(例如:Nginx、Haproxy、MySQL等)的高可用解决方案软件。
Keepalived软件主要是通过VRRP协议实现高可用功能的。VRRP是Virtual Router RedundancyProtocol(虚拟路由器冗余协议)的缩写,VRRP出现的目的就是为了解决静态路由单点故障问题的,它能够保证当个别节点宕机时,整个网络可以不间断地运行。
所以,Keepalived 一方面具有配置管理LVS的功能,同时还具有对LVS下面节点进行健康检查的功能,另一方面也可实现系统网络服务的高可用功能。
Keepalived官网:http://www.keepalived.org/
Keepalived的重要功能
keepalived 有三个重要的功能,分别是:
-
管理LVS负载均衡软件
-
实现LVS集群节点的健康检查
-
作为系统网络服务的高可用性
keepalived高可用故障转移的原理
Keepalived 高可用服务之间的故障切换转移,是通过 VRRP (Virtual Router Redundancy Protocol ,虚拟路由器冗余协议)来实现的。
在 Keepalived 服务正常工作时,主 Master 节点会不断地向备节点发送(多播的方式)心跳消息,用以告诉备 Backup 节点自己还活看,当主 Master 节点发生故障时,就无法发送心跳消息,备节点也就因此无法继续检测到来自主 Master 节点的心跳了,于是调用自身的接管程序,接管主 Master 节点的 IP 资源及服务。而当主 Master 节点恢复时,备 Backup 节点又会释放主节点故障时自身接管的IP资源及服务,恢复到原来的备用角色。
keepalived原理
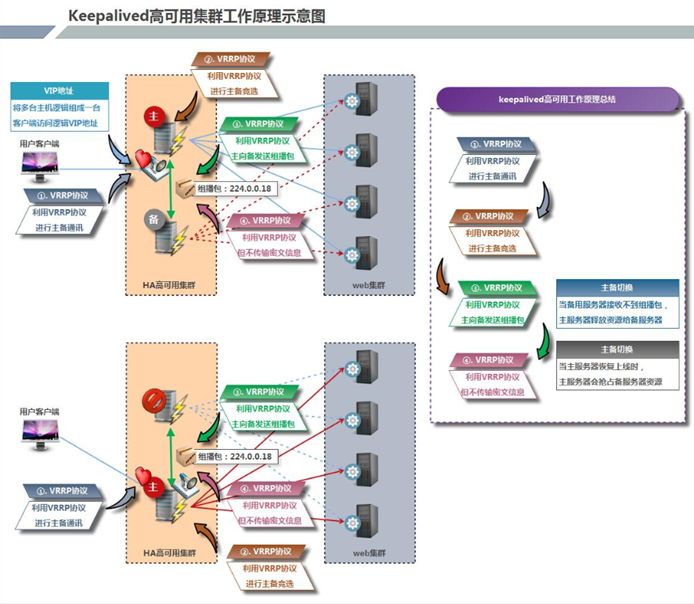
Keepalived高可用对之间是通过VRRP通信的,因此,我们从 VRRP开始了解起:
- VRRP,全称 Virtual Router Redundancy Protocol,中文名为虚拟路由冗余协议,VRRP的出现是为了解决静态路由的单点故障。
- VRRP是通过一种竟选协议机制来将路由任务交给某台 VRRP路由器的。
- VRRP用 IP多播的方式(默认多播地址(224.0.0.18))实现高可用对之间通信。
- 工作时主节点发包,备节点接包,当备节点接收不到主节点发的数据包的时候,就启动接管程序接管主节点的资源。备节点可以有多个,通过优先级竞选,但一般 Keepalived系统运维工作中都是一对。
- VRRP使用了加密协议加密数据,但Keepalived官方目前还是推荐用明文的方式配置认证类型和密码。
介绍完 VRRP,接下来我再介绍一下 Keepalived服务的工作原理:
Keepalived高可用是通过 VRRP 进行通信的, VRRP是通过竞选机制来确定主备的,主的优先级高于备,因此,工作时主会优先获得所有的资源,备节点处于等待状态,当主挂了的时候,备节点就会接管主节点的资源,然后顶替主节点对外提供服务。
在 Keepalived 服务之间,只有作为主的服务器会一直发送 VRRP 广播包,告诉备它还活着,此时备不会枪占主,当主不可用时,即备监听不到主发送的广播包时,就会启动相关服务接管资源,保证业务的连续性.接管速度最快可以小于1秒。
演示:
实验环境:
| 主机名 | 系统 | IP | VIP |
|---|---|---|---|
| lxmaster.example.com | Red Hat Enterprise Linux release 8.2 | 192.168.100.110/24 | 192.168.100.200/32 |
| lxbackup.example.com | Red Hat Enterprise Linux release 8.2 | 192.168.100.120/24 |
配置IP
#Master主节点
[root@lxmaster ~]# nmcli
eth0: 已连接 到 eth0
        "VMware VMXNET3"
        ethernet (vmxnet3), 00:0C:29:E7:7F:F3, 硬件, mtu 1500
        ip4 默认
        inet4 192.168.100.110/24
        route4 192.168.100.0/24
        route4 0.0.0.0/0
        inet6 fe80::20c:29ff:fee7:7ff3/64
        route6 fe80::/64
        route6 ff00::/8
#backup备份节点
[root@lxbackup ~]# nmcli
ens160: 已连接 到 ens160
        "VMware VMXNET3"
        ethernet (vmxnet3), 00:0C:29:88:DC:C6, 硬件, mtu 1500
        ip4 默认
        inet4 192.168.100.120/24
        route4 192.168.100.0/24
        route4 0.0.0.0/0
        inet6 fe80::20c:29ff:fe88:dcc6/64
        route6 fe80::/64
        route6 ff00::/8
关闭防火墙
#Master主节点
[root@lxmaster ~]# systemctl stop firewalld.service
[root@lxmaster ~]# systemctl disable firewalld.service
Removed /etc/systemd/system/multi-user.target.wants/firewalld.service.
Removed /etc/systemd/system/dbus-org.fedoraproject.FirewallD1.service.
[root@lxmaster ~]# vim /etc/selinux/
[root@lxmaster ~]# vim /etc/selinux/config
...
SELINUX=disabled
...
#backup备份节点
[root@lxbackup ~]# systemctl stop firewalld.service
[root@lxbackup ~]# systemctl disable firewalld.service
Removed /etc/systemd/system/multi-user.target.wants/firewalld.service.
Removed /etc/systemd/system/dbus-org.fedoraproject.FirewallD1.service.
[root@lxbackup ~]# vim /etc/selinux/config
...
SELINUX=disabled
...
安装keeppalived
#Mster主节点
[root@lxmaster ~]# yum -y install vim wget gcc gcc-c++
[root@lxmaster ~]# yum -y install keepalived
#backup节点
[root@lxbackup ~]# yum -y install vim wget gcc gcc-c++
[root@lxbackup ~]# yum -y install keepalived
安装nginx
#Master主节点
[root@lxmaster ~]# yum -y install nginx
[root@lxmaster ~]# echo " master node" > /usr/share/nginx/html/index.html
[root@lxmaster ~]# systemctl restart nginx.service
[root@lxmaster ~]# systemctl enable nginx.service
Created symlink /etc/systemd/system/multi-user.target.wants/nginx.service → /usr/lib/systemd/system/nginx.service.
#backup节点
[root@lxbackup ~]# yum -y install nginx
[root@lxbackup ~]# echo "backup node" > /usr/share/nginx/html/index.html
[root@lxbackup ~]# systemctl enable --now nginx.service
Created symlink /etc/systemd/system/multi-user.target.wants/nginx.service → /usr/lib/systemd/system/nginx.service.
测试
#Master主节点
[root@lxmaster ~]# curl localhost
master node
#backup节点
[root@lxbackup ~]# curl localhost
backup node
配置keepalived
#Master主节点
[root@lxmaster ~]# cd /etc/keepalived/
[root@lxmaster keepalived]# cp keepalived.conf keepalived.conf.bak
[root@lxmaster keepalived]# vim keepalived.conf
! Configuration File for keepalived

global_defs {
	router id lx01
}

vrrp_instance VI_1 {
    state MASTER
    interface eth0
    virtual_router_id 51
    priority 100
    advert_int 1
    authentication {
        auth_type PASS
        auth_pass 1111
    }
    virtual_ipaddress {
    		192.168.100.200
	}
}

virtual_server 192.168.100.200 80 {
    delay_loop 6
    lb_algo rr
    lb_kind DR
    persistence_timeout 50
    protocol TCP

    real_server 192.168.100.110 80 {
        weight 1
	TCP_CHECK{
		connect_port 80
		connect_timeout 3
		nb_get_retry 3
		delay_before_retry 3

    }
}

    real_server 192.168.200.3 1358 {
        weight 1
	TCP_CHECK {
	    connect_port 80
            connect_timeout 3
            nb_get_retry 3
            delay_before_retry 3
		}
	}
}
#重启keepalived
[root@lxmaster keepalived]# systemctl restart keepalived.service
[root@lxmaster keepalived]# systemctl enable keepalived.service
Created symlink /etc/systemd/system/multi-user.target.wants/keepalived.service → /usr/lib/systemd/system/keepalived.service.

#backup备份节点
[root@lxbackup ~]# cd /etc/keepalived/
[root@lxbackup keepalived]# cp keepalived.conf keepalived.conf.bak
[root@lxbackup keepalived]# vim keepalived.conf
! Configuration File for keepalived
global_defs {
   router_id lx02
}

vrrp_instance VI_1 {
    state BACKUP
    interface ens160
    virtual_router_id 51
    priority 90
    advert_int 1
    authentication {
        auth_type PASS
        auth_pass 1111
    }
    virtual_ipaddress {
        192.168.100.200
    }
}
virtual_server 192.168.100.200 80 {
    delay_loop 6
    lb_algo rr
    lb_kind DR
    persistence_timeout 50
    protocol TCP

    real_server 192.168.100.110 80 {
        weight 1
        TCP_CHECK {
	    connect_port 80
            connect_timeout 3
	    nb_get_retry 3
            delay_before_retry 3
        }
    }


    real_server 192.168.100.120 80 {
        weight 1
        TCP_CHECK {
	    connect_port 80
            connect_timeout 3
            nb_get_retry 3
            delay_before_retry 3
        }
    }
}
[root@lxbackup keepalived]# systemctl restart keepalived.service
[root@lxbackup keepalived]# systemctl enable keepalived.service
Created symlink /etc/systemd/system/multi-user.target.wants/keepalived.service → /usr/lib/systemd/system/keepalived.service.
在master中配置VIP
[root@lxmaster ~]# vim /etc/sysconfig/network-scripts/ifcfg-eth0
...
IPADDR1=192.168.100.200
PREFIX1=32
[root@lxmaster ~]# systemctl restart NetworkManager
[root@lxmaster ~]# nmcli connection up eth0
连接已成功激活(D-Bus 活动路径:/org/freedesktop/NetworkManager/ActiveConnection/4)
[root@lxmaster ~]# ip a
...
eth0:  mtu 1500 qdisc fq_codel state UP group default qlen 1000
    link/ether 00:0c:29:e7:7f:f3 brd ff:ff:ff:ff:ff:ff
    inet 192.168.100.110/24 brd 192.168.100.255 scope global noprefixroute eth0
       valid_lft forever preferred_lft forever
    inet 192.168.100.200/32 scope global noprefixroute eth0
       valid_lft forever preferred_lft forever
...
编写脚本
#Master主节点
[root@lxmaster scripts]# vim check.sh
#!/bin/bash
nginx_status=`ps -ef | grep -v "grep" | grep "nginx" | wc -l`
if [ $nginx_status -lt 1 ];then
        systemctl stop keepalived
fi
[root@lxmaster scripts]# vim notify.sh
#!/bin/bash
VIP=$2
sendmail () {
	subject="${VIP}"s server keepalived state is translate"
	cOntent="`date +"%F %T"`: `hostname`"s state change to master"
	echo $content | mail -s "$subject" abc@163.com
}
case "$1" in
  master)
	nginx_status=$(ps -ef|grep -Ev "grep|$0"|grep "nginx"|wc -l)
	if [ $nginx_status -lt 1 ];then
		systemctl start nginx
	fi
	sendmail
;;
   backup)
	nginx_status=$(ps -ef|grep -Ev "grep|$0"|grep "nginx"|wc -l)
	if [ $nginx_status -gt 0 ];then
		systemctl stop nginx
	fi
;;
*)
	echo "Usage:$0 master|backup VIP"
;;
esac
[root@lxmaster scripts]# chmod +x check.sh
[root@lxmaster scripts]# chmod +x notify.sh
再次配置keepalived
#Master主节点
[root@lxmaster scripts]# vim /etc/keepalived/keepalived.conf
! Configuration File for keepalived

global_defs {
	router id lx01
}

vrrp_script nginx_check {
    script "/scripts/check.sh"
    interval 10
    weight -20
}

vrrp_instance VI_1 {
    state MASTER
    interface eth0
    virtual_router_id 51
    priority 100
    advert_int 1
    authentication {
        auth_type PASS
        auth_pass 1111
    }
    virtual_ipaddress {
    		192.168.100.200
	}
track_script{
	nginx_check
	}
notify_master "/scripts/notify.sh master 192.168.100.200"
notify_backup "/scripts/notify.sh backup 192.168.100.200"
}

virtual_server 192.168.100.200 80 {
    delay_loop 6
    lb_algo rr
    lb_kind DR
    persistence_timeout 50
    protocol TCP

    real_server 192.168.100.110 80 {
        weight 1
	TCP_CHECK{
		connect_port 80
		connect_timeout 3
		nb_get_retry 3
		delay_before_retry 3

    }
}

    real_server 192.168.200.3 1358 {
        weight 1
	TCP_CHECK {
	    connect_port 80
            connect_timeout 3
            nb_get_retry 3
            delay_before_retry 3
		}
	}
}
[root@lxmaster scripts]# systemctl restart keepalived.service

#backup节点
[root@lxbackup ~]# vim /etc/keepalived/keepalived.conf
! Configuration File for keepalived
global_defs {
   router_id lx02
}
vrrp_script nginx_check {
    script "/scripts/check.sh"
    interval 10
    weight -20
}
vrrp_instance VI_1 {
    state BACKUP
    interface ens160
    virtual_router_id 51
    priority 90
    advert_int 1
    authentication {
        auth_type PASS
        auth_pass 1111
    }
    virtual_ipaddress {
        192.168.100.200
    }
	notify_master "/scripts/notify.sh master 192.168.100.200"
	notify_backup "/scripts/notify.sh backup 192.168.100.200"
}
virtual_server 192.168.100.200 80 {
    delay_loop 6
    lb_algo rr
    lb_kind DR
    persistence_timeout 50
    protocol TCP

    real_server 192.168.100.110 80 {
        weight 1
        TCP_CHECK {
	    connect_port 80
            connect_timeout 3
	    nb_get_retry 3
            delay_before_retry 3
        }
    }


    real_server 192.168.100.120 80 {
        weight 1
        TCP_CHECK {
	    connect_port 80
            connect_timeout 3
            nb_get_retry 3
            delay_before_retry 3
        }
    }
}
[root@lxbackup ~]# systemctl restart keepalived.service
模拟故障
[root@lxmaster ~]# systemctl restart nginx.service
[root@lxmaster ~]# systemctl enable nginx
#此时查看备份节点80端口暂未开启
[root@lxbackup ~]# ss -tanl
State                Recv-Q                Send-Q                               Local Address:Port                               Peer Address:Port
LISTEN               0                     128                                        0.0.0.0:22                                      0.0.0.0:*
LISTEN               0                     5                                        127.0.0.1:631                                     0.0.0.0:*
LISTEN               0                     128                                           [::]:22                                         [::]:*
LISTEN               0                     5                                            [::1]:631                                        [::]:*

[root@lxmaster ~]# systemctl stop nginx.service
[root@lxmaster ~]# systemctl restart keepalived.service
#再次查看备份节点80端口已开启
[root@lxbackup ~]# ss -tanl
State                Recv-Q                Send-Q                               Local Address:Port                               Peer Address:Port
LISTEN               0                     128                                        0.0.0.0:80                                      0.0.0.0:*
LISTEN               0                     128                                        0.0.0.0:22                                      0.0.0.0:*
LISTEN               0                     5                                        127.0.0.1:631                                     0.0.0.0:*
LISTEN               0                     128                                           [::]:80                                         [::]:*
LISTEN               0                     128                                           [::]:22                                         [::]:*
LISTEN               0                     5                                            [::1]:631                                        [::]:*


 京公网安备 11010802041100号