热门标签 | HotTags
当前位置:  开发笔记 > 编程语言 > 正文

Android自定义StepView实现个人信息验证进度条

1,项目中要用到个人信息验证的在网上找了一下,好像有封装好了的StepView,首先感谢一下作者,这是作者的地址࿰

1,项目中要用到个人信息验证的在网上找了一下,好像有封装好了的StepView,首先感谢一下作者,这是作者的地址,效果图如下:

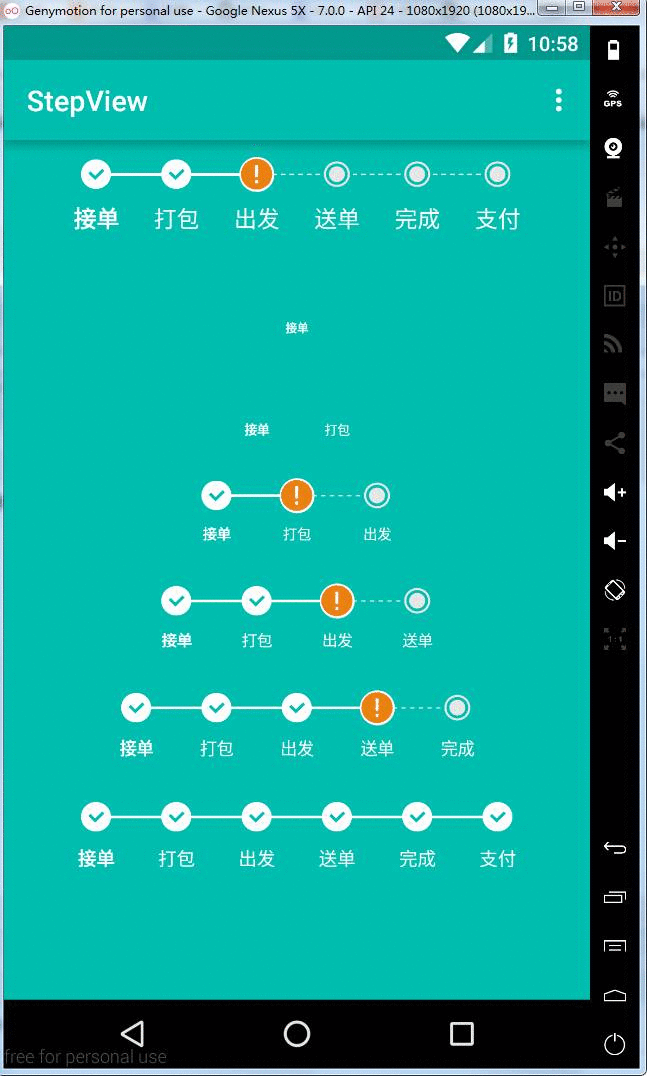
2,正准备撸起袖子就是一顿复制粘贴的时候,发现效果图成这个样子了(其实这里我们可以改变作者提供的方法改变文字的大小来解决这个问题,但是ui就是这个大的文字设计,我们猿拉不下脸来要别人改东西,所以就自己改了)

  西坝,这要是给项目经理看到了那中午加鸡腿这件事又泡汤了啊,so,让我们自己先看看作者源码,再自己重新搞一个呗

  • 准备阶段

  既然是自定义view,让我们先来热身一下,结合我们想要实现的,我们先来画一个空心矩形,线,虚线
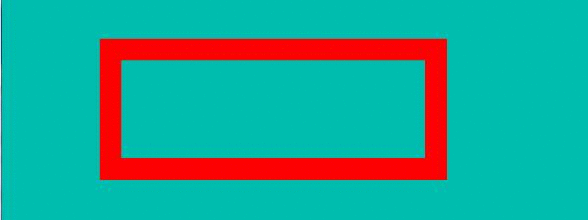
  首先我们来画一个矩形

//绘制矩形Paint paint = new Paint();//设置实心paint.setStyle(Paint.Style.STROKE);//设置消除锯齿paint.setAntiAlias(true);//设置画笔颜色paint.setColor(Color.RED);//设置paint的外边框宽度paint.setStrokeWidth(40);//绘制矩形canvas.drawRect(200, 200, 800, 420, paint);

  效果图如下:


  绘制虚线

Paint paint = new Paint();paint.setAntiAlias(true);paint.setColor(Color.RED);paint.setStyle(Paint.Style.STROKE);paint.setStrokeWidth(2);/**** 构造函数为DashPathEffect(float[] intervals, float offset),其中intervals为虚线的ON和OFF数组,该数组的length必须大于等于2,phase为绘制时的偏移量。本代码中先绘制8长度的实现,再绘制8长度的虚线,再绘制8长度的实现,再绘制8长度的虚线*/DashPathEffect mEffect = new DashPathEffect(new float[]{8, 8, 8, 8,}, 1);Path path = new Path();//移动画笔到坐标200,600 这个点path.moveTo(200, 600);//绘制直线path.lineTo(800, 600);paint.setPathEffect(mEffect);canvas.drawPath(path, paint);

  这里要注意下DashPathEffect,具体的作用就是帮助绘制虚线,绘制效果图如下:


  ok,简单的绘制图形说完了就来说说开始我们控件的绘制吧,先说一下我们的思路,我们打算把我们的控件的绘制分成两步,第一步:绘制上面的图形并记录位置,第二步:在对应每一步的图形下绘制对应的步骤名称,那我们先来将我们的图形的绘制。

  • 绘制图形

  先来看看我们要实现的效果图,如下图所示:

  分析难点,首先我们主要的问题是,怎么样将里面的图形控件放置在整个大的view的最正中间,这关系着我们在OnDraw()方法中绘制具体的view的起点坐标和重点坐标的计算,最主要的是找到第一个控件距离最左端的距离,那么下面我们在具体情况下来分析吧,假设到最左端的距离是mLeftPadding

  ①假设只存在一个“接单”这一个步骤,那么我们圆形控件最右端的,如图下红线标识的地方

  那么我们的是这样计算的

mLeftPadding= (getWidth() - 1*(mCircleRadius*2))/2;

  ②假设存在个“接单”和“打包”这两个步骤,那么我们圆形控件最右端的该怎么计算呢

  其实也很简单,只需要将中间的两个圆的直径减去,再减去虚线距离再除以而就搞定了(这里假设两个圆的半径都相同,每天线的长度也相同),所以公式变成了下面这种

mLeftPadding= (getWidth() - 2*(mCircleRadius*2)-1*mLineLength)/2;

  ③假设存在个“接单”和“打包”和“发出”这三个步骤,那么我们圆形控件最右端的该怎么计算呢

  其实也很简单,只需要将中间的三个圆的直径减去,再减去两虚线距离再除以而就搞定了(这里假设两个圆的半径都相同,每天线的长度也相同),所以公式变成了下面这种

mLeftPadding= (getWidth() - 3*(mCircleRadius*2)-2*mLineLength)/2;

  ok,我们其实感觉是不是有点规律了,每一个都是减去n个小圆的直径再减去n-1个直线距离,所以我们可以这样写

mLeftPadding = (getWidth() - n * mCircleRadius * 2 - (n - 1) * mLinePadding) / 2;

  然后我们可以通过mLeftPadding这个参数,将所有的图表的X坐标计算出来了,我们这里用一个集合来记录所有绘制的X坐标(方便我们绘制线和图标),具体代码如下:

for(int i = 0; i

  第一步:到了这里我们基本上把难点都解决了,现在我们创建一个StepViewIndicator,继承View,首先重写三个构造函数,再在创建构造函数的同时初始化类似于画笔、数组之类的属性,关键代码如下:

//下面这是重写构造函数
public StepViewIndicator(Context context) {this(context, null);}public StepViewIndicator(Context context, &#64;Nullable AttributeSet attrs) {this(context, attrs, 0);}public StepViewIndicator(Context context, &#64;Nullable AttributeSet attrs, int defStyleAttr) {super(context, attrs, defStyleAttr);init();}//这里是初始化属性/*** 初始化常见属性*/private void init() {mStepBeanList &#61; new ArrayList<>();mPath &#61; new Path();mEffect &#61; new DashPathEffect(new float[]{8, 8, 8, 8}, 1);//设置已完成的初始化基本设置mComplectedXPosition &#61; new ArrayList();mComplectedPaint &#61; new Paint();mComplectedPaint.setAntiAlias(true);mComplectedPaint.setColor(mCompletedLineColor);mComplectedPaint.setStyle(Paint.Style.FILL);mComplectedPaint.setStrokeWidth(2);//设置未完成的初始化基本设置mUnComplectedPaint &#61; new Paint();mUnComplectedPaint.setAntiAlias(true);mUnComplectedPaint.setColor(mUnCompletedLineColor);mUnComplectedPaint.setStyle(Paint.Style.STROKE);mUnComplectedPaint.setStrokeWidth(2);mUnComplectedPaint.setPathEffect(mEffect);//圆的半径、线的长度、线的高度基本值设置mCompletedLineHeight &#61; 0.05f * defaultStepIndicatorNum;mCircleRadius &#61; 0.28f * defaultStepIndicatorNum;mLinePadding &#61; 1.5f * defaultStepIndicatorNum;//初始化三种状态下的图片mCompleteIcon &#61; ContextCompat.getDrawable(getContext(), R.drawable.complted);mAttentionIcon &#61; ContextCompat.getDrawable(getContext(), R.drawable.attention);mDefaultIcon &#61; ContextCompat.getDrawable(getContext(), R.drawable.default_icon);}

  再来看看我们这个view中要用到的所有属性&#xff0c;代码里面都注释好了所有属性的含义了&#xff0c;我就不再给大家一一解释了

//定义默认的高度private int defaultStepIndicatorNum &#61; (int) TypedValue.applyDimension(TypedValue.COMPLEX_UNIT_DIP, 40, getResources().getDisplayMetrics());//直线private Path mPath;//虚线绘制函数private DashPathEffect mEffect;//完成的下标集合private List mComplectedXPosition;//已完成的部分绘制对象private Paint mComplectedPaint;//定义默认完成线的颜色 ;private int mCompletedLineColor &#61; Color.WHITE;//已完成线的高度private float mCompletedLineHeight;//未完成的部分绘制对象private Paint mUnComplectedPaint;//定义默认未完成线的颜色 ;private int mUnCompletedLineColor &#61; Color.WHITE;//定义圆的半径private float mCircleRadius;//定义线的长度private float mLinePadding;//定义三种状态下的图片(已完成的图片&#xff0c;正在进行的图片&#xff0c;未完成的图片)Drawable mCompleteIcon;Drawable mAttentionIcon;Drawable mDefaultIcon;//动态计算view位置private float mCenterY;private float mLeftY;private float mRightY;//总共有多少步骤private int mStepNum &#61; 0;private List mStepBeanList;//正在进行的位置private int mComplectingPosition;//添加对view的监听private OnDrawIndicatorListener mOnDrawListener;

  第二步&#xff1a;重写OnMeasuer&#xff08;&#xff09;方法&#xff0c;这里只是丈量了一下控件的宽高

/*** 测量自身的高度** &#64;param widthMeasureSpec* &#64;param heightMeasureSpec*/&#64;Overrideprotected void onMeasure(int widthMeasureSpec, int heightMeasureSpec) {super.onMeasure(widthMeasureSpec, heightMeasureSpec);int width &#61; defaultStepIndicatorNum * 2;if (MeasureSpec.UNSPECIFIED !&#61; MeasureSpec.getMode(widthMeasureSpec)) {width &#61; MeasureSpec.getSize(widthMeasureSpec);}int height &#61; defaultStepIndicatorNum;if (MeasureSpec.UNSPECIFIED !&#61; MeasureSpec.getMode(heightMeasureSpec)) {height &#61; Math.min(height, MeasureSpec.getSize(heightMeasureSpec));}setMeasuredDimension(width, height);}

  这里要注意一下MeasureSpec的三种测量模式&#xff0c;具体解释如下&#xff08;这点自定义view经常用到&#xff0c;在这里还是给大家普及一下&#xff09;&#xff1a;

mode共有三种情况&#xff0c;取值分别为MeasureSpec.UNSPECIFIED, MeasureSpec.EXACTLY, MeasureSpec.AT_MOST。MeasureSpec.EXACTLY:精确尺寸&#xff0c;当我们将控件的layout_width或layout_height指定为具体数值时andorid:layout_width&#61;"50dip"&#xff0c;或者为FILL_PARENT是&#xff0c;都是控件大小已经确定的情况&#xff0c;都是精确尺寸。MeasureSpec.AT_MOST:最大尺寸&#xff0c;当控件的layout_width或layout_height指定为WRAP_CONTENT时&#xff0c;控件大小一般随着控件的子空间或内容进行变化&#xff0c;此时控件尺寸只要不超过父控件允许的最大尺寸即可。因此&#xff0c;此时的mode是AT_MOST&#xff0c;size给出了父控件允许的最大尺寸。MeasureSpec.UNSPECIFIED:未指定尺寸&#xff0c;这种情况不多&#xff0c;一般都是父控件是AdapterView&#xff0c;通过measure方法传入的模式,例如在ScrollView里面嵌套ListView&#xff0c;里面的listview的高度不确定&#xff0c;这时候要重写listview&#xff0c;将我们的布局撑到最大&#xff0c;代码如下&#xff1a;
protected void onMeasure(int widthMeasureSpec, int heightMeasureSpec) {int expandSpec &#61; MeasureSpec.makeMeasureSpec(1000>> 2,MeasureSpec.AT_MOST);super.onMeasure(widthMeasureSpec, expandSpec);}
1000的二进制&#xff1a;1111101000
右移2位后&#xff1a;11111010&#xff0c;十进制为&#xff1a;250
这样就指定了listview的高度为250px以内的最大允许值&#xff08;一般就是250&#xff09;。

  第三步&#xff1a;重写OnSizeChange&#xff08;&#xff09;方法

/*** View大小改变** &#64;param w* &#64;param h* &#64;param oldw* &#64;param oldh*/&#64;Overrideprotected void onSizeChanged(int w, int h, int oldw, int oldh) {super.onSizeChanged(w, h, oldw, oldh);//下面这三句代码只是为了绘制矩形的线mCenterY &#61; 0.5f * getHeight();//获取左上方Y的位置&#xff0c;获取该点的意义是为了方便画矩形左上的Y位置mLeftY &#61; mCenterY - (mCompletedLineHeight / 2);//获取右下方Y的位置&#xff0c;获取该点的意义是为了方便画矩形右下的Y位置mRightY &#61; mCenterY &#43; mCompletedLineHeight / 2;mComplectedXPosition.clear();//计算所有总空间离最左边的距离&#xff0c;并记录所有的圆心x轴的坐标for (int i &#61; 0; i

  在这里就使用到了我们上面的公式了&#xff0c;而且再记录我们的矩形线段的起始和结束的Y坐标&#xff0c;还有OnSizeChange&#xff08;&#xff09;这个方法是在View的大小发生改变的时候进行调用&#xff0c;在这里我们需要了解一下

  第四步&#xff1a;重写OnDraw&#xff08;&#xff09;方法

&#64;Overrideprotected void onDraw(Canvas canvas) {super.onDraw(canvas);if (mOnDrawListener !&#61; null) {mOnDrawListener.ondrawIndicator();}mUnComplectedPaint.setColor(mUnCompletedLineColor);mComplectedPaint.setColor(mCompletedLineColor);//首先绘制线for (int i &#61; 0; i

  这个方法使我们最核心的&#xff0c;但是我们上面已经把难点的地方都抽出来单个解决了&#xff0c;所以onDraw&#xff08;&#xff09;方法里面还是很好理解的&#xff0c;大体思路是根据我们onSizeChange&#xff08;&#xff09;方法中记录的坐标来绘制对应的view&#xff0c;先是绘制线&#xff0c;再是绘制Rect&#xff0c;这里要注意下面这段代码&#xff0c;在做的时候我们发现即使你的坐标是正确的两个步骤之前的连线也会向左偏移一些&#xff0c;所以这里我们试了一下 &#xff0c;向右偏移10px就差不多了&#xff0c;这个大家可以自己去试试

canvas.drawRect(preComplectedXPosition &#43; mCircleRadius - 10, mLeftY, afterComplectedXPosition - mCircleRadius &#43; 10, mRightY, mComplectedPaint);

  这就是这个类的核心了&#xff0c;接下来我们来使用两组测试数据来试试&#xff0c;添加以下代码和以下方法

在init&#xff08;&#xff09;方法中添加以下代码//添加测试数据List datas &#61; new ArrayList<>();datas.add(new StepBean("接单", StepBean.STEP_COMPLETED));datas.add(new StepBean("打包", StepBean.STEP_CURRENT));datas.add(new StepBean("出发", StepBean.STEP_UNDO));setStepNum(datas);//这是setStepNuw方法具体代码/*** 设置步骤的基本流程*/public void setStepNum(List stepsBeanList) {this.mStepBeanList &#61; stepsBeanList;mStepNum &#61; mStepBeanList.size();if (mStepBeanList !&#61; null && mStepBeanList.size() > 0) {for (int i &#61; 0; i

  StepBean.java&#xff08;用实体类将具体的每一步的信息给抽象化&#xff09;  

package com.qianmo.mystepview.bean;/*** Created by Administrator on 2017/3/16 0016.* E-Mail&#xff1a;543441727&#64;qq.com*/public class StepBean {public static final int STEP_UNDO &#61; -1;//未完成 undo steppublic static final int STEP_CURRENT &#61; 0;//正在进行 current steppublic static final int STEP_COMPLETED &#61; 1;//已完成 completed stepprivate String name;private int state;public String getName() {return name;}public void setName(String name) {this.name &#61; name;}public int getState() {return state;}public void setState(int state) {this.state &#61; state;}public StepBean() {}public StepBean(String name, int state) {this.name &#61; name;this.state &#61; state;}
}

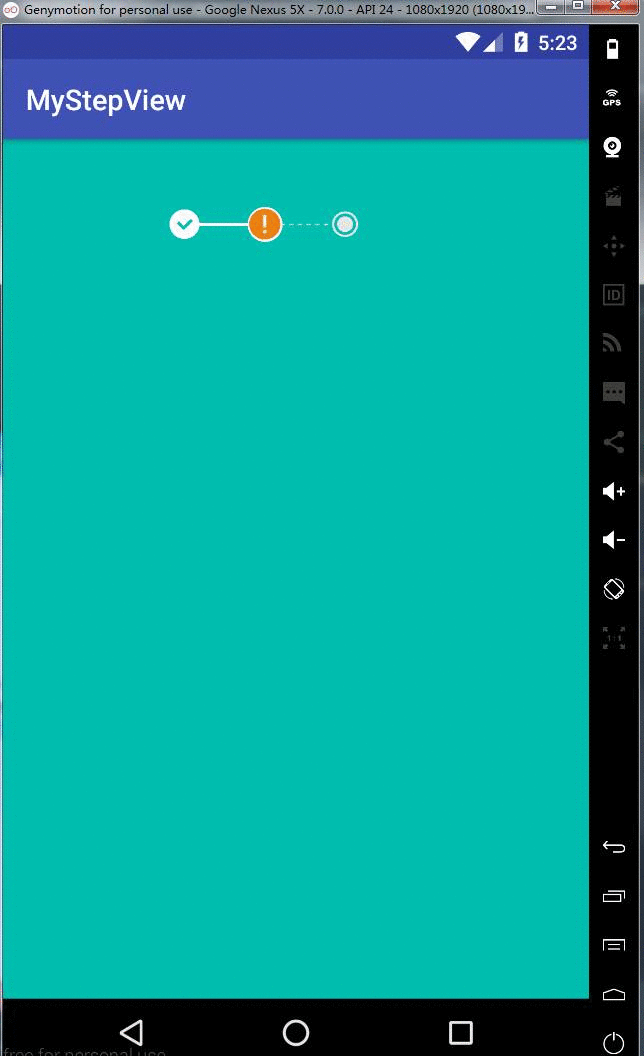
  看一下我们绘制的效果&#xff0c;这就把我们上面的图标给绘制完成了&#xff0c;我们的自定义view就基本上完成了一大半了&#xff01;

  再看一下我们StepViewIndicator类的所有代码

package com.qianmo.mystepview.view;import android.content.Context;
import android.graphics.Canvas;
import android.graphics.Color;
import android.graphics.DashPathEffect;
import android.graphics.Paint;
import android.graphics.Path;
import android.graphics.Rect;
import android.graphics.drawable.Drawable;
import android.support.annotation.Nullable;
import android.support.v4.content.ContextCompat;
import android.util.AttributeSet;
import android.util.Log;
import android.util.TypedValue;
import android.view.View;import com.qianmo.mystepview.R;
import com.qianmo.mystepview.bean.StepBean;import java.util.ArrayList;
import java.util.List;/*** Created by wangjitao on 2017/3/16 0016.* E-Mail&#xff1a;543441727&#64;qq.com* 横向指示器的创建*/public class StepViewIndicator extends View {//定义默认的高度private int defaultStepIndicatorNum &#61; (int) TypedValue.applyDimension(TypedValue.COMPLEX_UNIT_DIP, 40, getResources().getDisplayMetrics());//直线private Path mPath;//虚线绘制函数private DashPathEffect mEffect;//完成的下标集合private List mComplectedXPosition;//已完成的部分绘制对象private Paint mComplectedPaint;//定义默认完成线的颜色 ;private int mCompletedLineColor &#61; Color.WHITE;//已完成线的高度private float mCompletedLineHeight;//未完成的部分绘制对象private Paint mUnComplectedPaint;//定义默认未完成线的颜色 ;private int mUnCompletedLineColor &#61; Color.WHITE;//定义圆的半径private float mCircleRadius;//定义线的长度private float mLinePadding;//定义三种状态下的图片(已完成的图片&#xff0c;正在进行的图片&#xff0c;未完成的图片)Drawable mCompleteIcon;Drawable mAttentionIcon;Drawable mDefaultIcon;//动态计算view位置private float mCenterY;private float mLeftY;private float mRightY;//总共有多少步骤private int mStepNum &#61; 0;private List mStepBeanList;//正在进行的位置private int mComplectingPosition;//添加对view的监听private OnDrawIndicatorListener mOnDrawListener;private int screenWidth;//this screen widthpublic StepViewIndicator(Context context) {this(context, null);}public StepViewIndicator(Context context, &#64;Nullable AttributeSet attrs) {this(context, attrs, 0);}public StepViewIndicator(Context context, &#64;Nullable AttributeSet attrs, int defStyleAttr) {super(context, attrs, defStyleAttr);init();}/*** 初始化常见属性*/private void init() {mStepBeanList &#61; new ArrayList<>();mPath &#61; new Path();mEffect &#61; new DashPathEffect(new float[]{8, 8, 8, 8}, 1);//设置已完成的初始化基本设置mComplectedXPosition &#61; new ArrayList();mComplectedPaint &#61; new Paint();mComplectedPaint.setAntiAlias(true);mComplectedPaint.setColor(mCompletedLineColor);mComplectedPaint.setStyle(Paint.Style.FILL);mComplectedPaint.setStrokeWidth(2);//设置未完成的初始化基本设置mUnComplectedPaint &#61; new Paint();mUnComplectedPaint.setAntiAlias(true);mUnComplectedPaint.setColor(mUnCompletedLineColor);mUnComplectedPaint.setStyle(Paint.Style.STROKE);mUnComplectedPaint.setStrokeWidth(2);mUnComplectedPaint.setPathEffect(mEffect);//圆的半径、线的长度、线的高度基本值设置mCompletedLineHeight &#61; 0.05f * defaultStepIndicatorNum;mCircleRadius &#61; 0.28f * defaultStepIndicatorNum;mLinePadding &#61; 1.5f * defaultStepIndicatorNum;//初始化三种状态下的图片mCompleteIcon &#61; ContextCompat.getDrawable(getContext(), R.drawable.complted);mAttentionIcon &#61; ContextCompat.getDrawable(getContext(), R.drawable.attention);mDefaultIcon &#61; ContextCompat.getDrawable(getContext(), R.drawable.default_icon);//添加测试数据//List datas &#61; new ArrayList<>();//datas.add(new StepBean("接单", StepBean.STEP_COMPLETED));//datas.add(new StepBean("打包", StepBean.STEP_CURRENT));//datas.add(new StepBean("出发", StepBean.STEP_UNDO));//setStepNum(datas);}/*** 测量自身的高度** &#64;param widthMeasureSpec* &#64;param heightMeasureSpec*/&#64;Overrideprotected void onMeasure(int widthMeasureSpec, int heightMeasureSpec) {super.onMeasure(widthMeasureSpec, heightMeasureSpec);int width &#61; defaultStepIndicatorNum * 2;if (MeasureSpec.UNSPECIFIED !&#61; MeasureSpec.getMode(widthMeasureSpec)) {width &#61; MeasureSpec.getSize(widthMeasureSpec);}int height &#61; defaultStepIndicatorNum;if (MeasureSpec.UNSPECIFIED !&#61; MeasureSpec.getMode(heightMeasureSpec)) {height &#61; Math.min(height, MeasureSpec.getSize(heightMeasureSpec));}setMeasuredDimension(width, height);}/*** View大小改变** &#64;param w* &#64;param h* &#64;param oldw* &#64;param oldh*/&#64;Overrideprotected void onSizeChanged(int w, int h, int oldw, int oldh) {super.onSizeChanged(w, h, oldw, oldh);//下面这三句代码只是为了绘制矩形的线mCenterY &#61; 0.5f * getHeight();//获取左上方Y的位置&#xff0c;获取该点的意义是为了方便画矩形左上的Y位置mLeftY &#61; mCenterY - (mCompletedLineHeight / 2);//获取右下方Y的位置&#xff0c;获取该点的意义是为了方便画矩形右下的Y位置mRightY &#61; mCenterY &#43; mCompletedLineHeight / 2;mComplectedXPosition.clear();//计算所有总空间离最左边的距离&#xff0c;并记录所有的圆心x轴的坐标for (int i &#61; 0; i // if (mOnDrawListener !&#61; null) {
// mOnDrawListener.ondrawIndicator();
// Log.i("wangjitao", "onSizeChanged");
// }}/*** 绘制view** &#64;param canvas*/&#64;Overrideprotected void onDraw(Canvas canvas) {super.onDraw(canvas);if (mOnDrawListener !&#61; null) {mOnDrawListener.ondrawIndicator();Log.i("wangjitao", "onDraw");}mUnComplectedPaint.setColor(mUnCompletedLineColor);mComplectedPaint.setColor(mCompletedLineColor);//首先绘制线for (int i &#61; 0; i stepsBeanList) {this.mStepBeanList &#61; stepsBeanList;mStepNum &#61; mStepBeanList.size();if (mStepBeanList !&#61; null && mStepBeanList.size() > 0) {for (int i &#61; 0; i getComplectedXPosition() {return mComplectedXPosition;}/*** 设置正在进行position** &#64;param complectingPosition*/public void setComplectingPosition(int complectingPosition) {this.mComplectingPosition &#61; complectingPosition;invalidate();}/*** 设置正在进行position*/public int getComplectingPosition() {return this.mComplectingPosition;}/*** 设置流程步数** &#64;param stepNum 流程步数*/public void setStepNum(int stepNum) {this.mStepNum &#61; stepNum;invalidate();}/*** 设置未完成线的颜色** &#64;param unCompletedLineColor*/public void setUnCompletedLineColor(int unCompletedLineColor) {this.mUnCompletedLineColor &#61; unCompletedLineColor;}/*** 设置已完成线的颜色** &#64;param completedLineColor*/public void setCompletedLineColor(int completedLineColor) {this.mCompletedLineColor &#61; completedLineColor;}/*** 设置默认图片** &#64;param defaultIcon*/public void setDefaultIcon(Drawable defaultIcon) {this.mDefaultIcon &#61; defaultIcon;}/*** 设置已完成图片** &#64;param completeIcon*/public void setCompleteIcon(Drawable completeIcon) {this.mCompleteIcon &#61; completeIcon;}/*** 设置正在进行中的图片** &#64;param attentionIcon*/public void setAttentionIcon(Drawable attentionIcon) {this.mAttentionIcon &#61; attentionIcon;}
}

  • 创建StepView类&#xff0c;继承自LinearLayout&#xff0c;用于将我们上面的创建的StepViewIndicator和包含所有文字的LinearLayout合并在一起&#xff0c;其布局文件如下


  具体的代码如下

package com.qianmo.mystepview.view;import android.content.Context;
import android.graphics.Typeface;
import android.graphics.drawable.Drawable;
import android.support.v4.content.ContextCompat;
import android.util.AttributeSet;
import android.util.TypedValue;
import android.view.LayoutInflater;
import android.view.View;
import android.view.ViewGroup;
import android.widget.LinearLayout;
import android.widget.RelativeLayout;
import android.widget.TextView;import com.qianmo.mystepview.R;
import com.qianmo.mystepview.bean.StepBean;import java.util.List;/*** 日期&#xff1a;16/6/22 15:47*

* 描述&#xff1a;StepView*/
public class StepView extends LinearLayout implements StepViewIndicator.OnDrawIndicatorListener
{private RelativeLayout mTextContainer;private StepViewIndicator mStepsViewIndicator;private List mStepBeanList;private int mComplectingPosition;private int mUnComplectedTextColor &#61; ContextCompat.getColor(getContext(), R.color.uncompleted_text_color);//定义默认未完成文字的颜色;private int mComplectedTextColor &#61; ContextCompat.getColor(getContext(), android.R.color.white);//定义默认完成文字的颜色;private int mTextSize &#61; 14;//default textSizeprivate TextView mTextView;public StepView(Context context){this(context, null);}public StepView(Context context, AttributeSet attrs){this(context, attrs, 0);}public StepView(Context context, AttributeSet attrs, int defStyleAttr){super(context, attrs, defStyleAttr);init();}private void init(){View rootView &#61; LayoutInflater.from(getContext()).inflate(R.layout.widget_horizontal_stepsview, this);mStepsViewIndicator &#61; (StepViewIndicator) rootView.findViewById(R.id.steps_indicator);mStepsViewIndicator.setOnDrawListener(this);mTextContainer &#61; (RelativeLayout) rootView.findViewById(R.id.rl_text_container);}/*** 设置显示的文字** &#64;param stepsBeanList* &#64;return*/public StepView setStepViewTexts(List stepsBeanList){mStepBeanList &#61; stepsBeanList;mStepsViewIndicator.setStepNum(mStepBeanList);return this;}/*** 设置未完成文字的颜色** &#64;param unComplectedTextColor* &#64;return*/public StepView setStepViewUnComplectedTextColor(int unComplectedTextColor){mUnComplectedTextColor &#61; unComplectedTextColor;return this;}/*** 设置完成文字的颜色** &#64;param complectedTextColor* &#64;return*/public StepView setStepViewComplectedTextColor(int complectedTextColor){this.mComplectedTextColor &#61; complectedTextColor;return this;}/*** 设置StepsViewIndicator未完成线的颜色** &#64;param unCompletedLineColor* &#64;return*/public StepView setStepsViewIndicatorUnCompletedLineColor(int unCompletedLineColor){mStepsViewIndicator.setUnCompletedLineColor(unCompletedLineColor);return this;}/*** 设置StepsViewIndicator完成线的颜色** &#64;param completedLineColor* &#64;return*/public StepView setStepsViewIndicatorCompletedLineColor(int completedLineColor){mStepsViewIndicator.setCompletedLineColor(completedLineColor);return this;}/*** 设置StepsViewIndicator默认图片** &#64;param defaultIcon*/public StepView setStepsViewIndicatorDefaultIcon(Drawable defaultIcon){mStepsViewIndicator.setDefaultIcon(defaultIcon);return this;}/*** 设置StepsViewIndicator已完成图片** &#64;param completeIcon*/public StepView setStepsViewIndicatorCompleteIcon(Drawable completeIcon){mStepsViewIndicator.setCompleteIcon(completeIcon);return this;}/*** 设置StepsViewIndicator正在进行中的图片** &#64;param attentionIcon*/public StepView setStepsViewIndicatorAttentionIcon(Drawable attentionIcon){mStepsViewIndicator.setAttentionIcon(attentionIcon);return this;}/*** set textSize** &#64;param textSize* &#64;return*/public StepView setTextSize(int textSize){if(textSize > 0){mTextSize &#61; textSize;}return this;}&#64;Overridepublic void ondrawIndicator(){if(mTextContainer !&#61; null){mTextContainer.removeAllViews();List complectedXPosition &#61; mStepsViewIndicator.getComplectedXPosition();if(mStepBeanList !&#61; null && complectedXPosition !&#61; null && complectedXPosition.size() > 0){for(int i &#61; 0; i

  但是我们关注ondrawIndicator&#xff08;&#xff09;这个方法中的逻辑&#xff0c;主要是通过OnDrawIndicatorListener这个类的回调来绘制对应的文字描述&#xff0c;再看看在Activity中只的使用

StepView setpview &#61; (StepView) findViewById(R.id.step_view0);List stepsBeanList &#61; new ArrayList<>();StepBean stepBean0 &#61; new StepBean("手机绑定",1);StepBean stepBean1 &#61; new StepBean("提交信息",1);StepBean stepBean2 &#61; new StepBean("充值",0);StepBean stepBean3 &#61; new StepBean("用车",-1);stepsBeanList.add(stepBean0);stepsBeanList.add(stepBean1);stepsBeanList.add(stepBean2);stepsBeanList.add(stepBean3);setpview.setStepViewTexts(stepsBeanList).setTextSize(16);//set textSize

  很简单有没有&#xff0c;看着一次我们自己写的效果有没有之前作者那种文字重叠的问题 如下图&#xff1a;

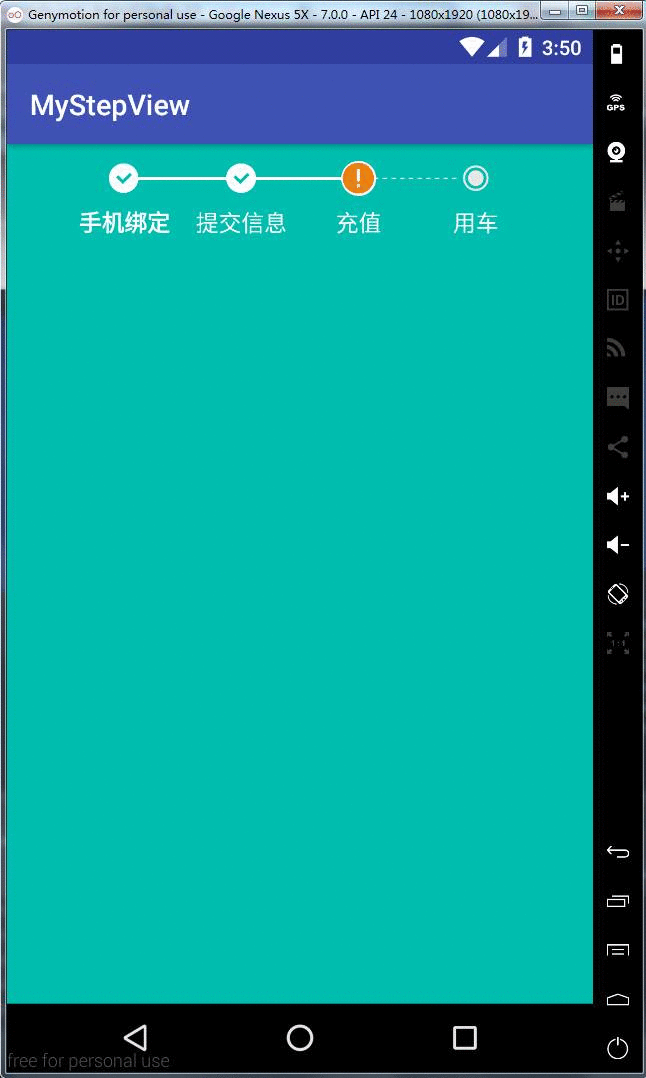
  很明显&#xff0c;没有&#xff0c;因为我在StepViewIndicator类中将的mLinePadding属性的值修改大了

  修改之后

mLinePadding &#61; 1.5f * defaultStepIndicatorNum;

  修改之钱

mLinePadding &#61; 0.85f * defaultStepIndicatorNum;

  这里其实可以提供一个set方法来设置动态的设置一下实线和虚线的距离的&#xff0c;好了&#xff0c;这样我们就是实现了我们的需求了&#xff0c;再次感谢StepView的作者&#xff0c;如果有需要源码的同学&#xff0c;可以去下一下&#xff0c;Github下载地址&#xff0c;See You Next Time &#xff01;&#xff01;&#xff01;


推荐阅读
  • 涉及的知识点-ViewGroup的测量与布局-View的测量与布局-滑动冲突的处理-VelocityTracker滑动速率跟踪-Scroller实现弹性滑动-屏幕宽高的获取等实现步 ... [详细]
  • 本文详细介绍了Android中的坐标系以及与View相关的方法。首先介绍了Android坐标系和视图坐标系的概念,并通过图示进行了解释。接着提到了View的大小可以超过手机屏幕,并且只有在手机屏幕内才能看到。最后,作者表示将在后续文章中继续探讨与View相关的内容。 ... [详细]
  • 带添加按钮的GridView,item的删除事件
    先上图片效果;gridView无数据时显示添加按钮,有数据时,第一格显示添加按钮,后面显示数据:布局文件:addr_manage.xml<?xmlve ... [详细]
  • 本文介绍了Swing组件的用法,重点讲解了图标接口的定义和创建方法。图标接口用来将图标与各种组件相关联,可以是简单的绘画或使用磁盘上的GIF格式图像。文章详细介绍了图标接口的属性和绘制方法,并给出了一个菱形图标的实现示例。该示例可以配置图标的尺寸、颜色和填充状态。 ... [详细]
  • 今天就跟大家聊聊有关怎么在Android应用中实现一个换肤功能,可能很多人都不太了解,为了让大家更加了解,小编给大家总结了以下内容,希望大家根 ... [详细]
  • SmartRefreshLayout自定义头部刷新和底部加载
    1.添加依赖implementation‘com.scwang.smartrefresh:SmartRefreshLayout:1.0.3’implementation‘com.s ... [详细]
  • 在Android开发中,使用Picasso库可以实现对网络图片的等比例缩放。本文介绍了使用Picasso库进行图片缩放的方法,并提供了具体的代码实现。通过获取图片的宽高,计算目标宽度和高度,并创建新图实现等比例缩放。 ... [详细]
  • android listview OnItemClickListener失效原因
    最近在做listview时发现OnItemClickListener失效的问题,经过查找发现是因为button的原因。不仅listitem中存在button会影响OnItemClickListener事件的失效,还会导致单击后listview每个item的背景改变,使得item中的所有有关焦点的事件都失效。本文给出了一个范例来说明这种情况,并提供了解决方法。 ... [详细]
  • Java容器中的compareto方法排序原理解析
    本文从源码解析Java容器中的compareto方法的排序原理,讲解了在使用数组存储数据时的限制以及存储效率的问题。同时提到了Redis的五大数据结构和list、set等知识点,回忆了作者大学时代的Java学习经历。文章以作者做的思维导图作为目录,展示了整个讲解过程。 ... [详细]
  • 本文讨论了一个关于cuowu类的问题,作者在使用cuowu类时遇到了错误提示和使用AdjustmentListener的问题。文章提供了16个解决方案,并给出了两个可能导致错误的原因。 ... [详细]
  • 自动轮播,反转播放的ViewPagerAdapter的使用方法和效果展示
    本文介绍了如何使用自动轮播、反转播放的ViewPagerAdapter,并展示了其效果。该ViewPagerAdapter支持无限循环、触摸暂停、切换缩放等功能。同时提供了使用GIF.gif的示例和github地址。通过LoopFragmentPagerAdapter类的getActualCount、getActualItem和getActualPagerTitle方法可以实现自定义的循环效果和标题展示。 ... [详细]
  • JDK源码学习之HashTable(附带面试题)的学习笔记
    本文介绍了JDK源码学习之HashTable(附带面试题)的学习笔记,包括HashTable的定义、数据类型、与HashMap的关系和区别。文章提供了干货,并附带了其他相关主题的学习笔记。 ... [详细]
  • 欢乐的票圈重构之旅——RecyclerView的头尾布局增加
    项目重构的Git地址:https:github.comrazerdpFriendCircletreemain-dev项目同步更新的文集:http:www.jianshu.comno ... [详细]
  • android 触屏处理流程,android触摸事件处理流程 ? FOOKWOOD「建议收藏」
    android触屏处理流程,android触摸事件处理流程?FOOKWOOD「建议收藏」最近在工作中,经常需要处理触摸事件,但是有时候会出现一些奇怪的bug,比如有时候会检测不到A ... [详细]
  • python3 logging
    python3logginghttps:docs.python.org3.5librarylogging.html,先3.5是因为我当前的python版本是3.5之所 ... [详细]
author-avatar
陈陈
这个家伙很懒,什么也没留下!
PHP1.CN | 中国最专业的PHP中文社区 | DevBox开发工具箱 | json解析格式化 |PHP资讯 | PHP教程 | 数据库技术 | 服务器技术 | 前端开发技术 | PHP框架 | 开发工具 | 在线工具
Copyright © 1998 - 2020 PHP1.CN. All Rights Reserved | 京公网安备 11010802041100号 | 京ICP备19059560号-4 | PHP1.CN 第一PHP社区 版权所有