前言
Spring Security是一个能够为基于Spring的企业应用系统提供声明式的安全访问控制解决方案的安全框架。它提供了一组可以在Spring应用上下文中配置的Bean,充分利用了Spring IoC,DI(控制反转Inversion of Control ,DI:Dependency Injection 依赖注入)和AOP(面向切面编程)功能,为应用系统提供声明式的安全访问控制功能,减少了为企业系统安全控制编写大量重复代码的工作。
本文主要给大家介绍了关于Spring Boot整合Spring Security实现登入登出的相关内容,下面话不多说了,来一起看看详细的介绍吧
技术栈 : SpringBoot + SpringSecurity + jpa + freemark ,完整项目地址 : https://github.com/EalenXie/spring-security-login (本地下载)
方法如下:
1 . 新建一个spring-security-login的maven项目 ,pom.xml添加基本依赖 :
4.0.0com.wuxicloudspring-security-login1.0 org.springframework.bootspring-boot-starter-parent1.5.6.RELEASE EalenXieSpringBoot整合SpringSecurity实现简单登入登出 org.springframework.bootspring-boot-starter org.springframework.bootspring-boot-starter-web org.springframework.bootspring-boot-starter-data-jpa org.springframework.bootspring-boot-starter-test org.springframework.bootspring-boot-starter-security org.springframework.bootspring-boot-starter-freemarker org.springframework.bootspring-boot-starter-aop com.alibabadruid1.0.24 com.alibabafastjson1.2.31 mysqlmysql-connector-javaruntime
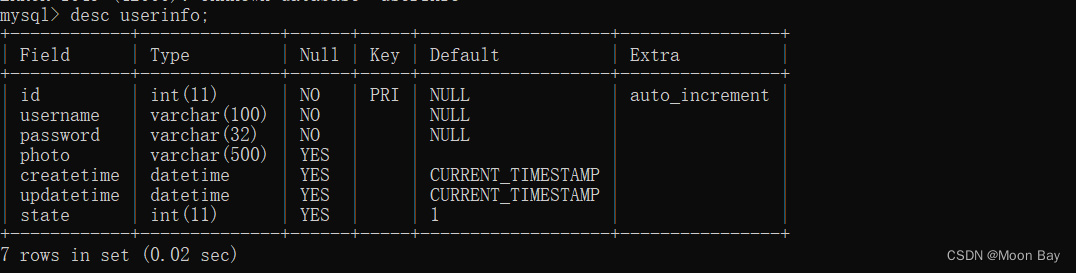
2 . 准备你的数据库,设计表结构,要用户使用登入登出,新建用户表。
DROP TABLE IF EXISTS `user`; CREATE TABLE `user` ( `id` int(11) NOT NULL AUTO_INCREMENT, `user_uuid` varchar(70) CHARACTER SET utf8 COLLATE utf8_general_ci DEFAULT NULL, `username` varchar(255) CHARACTER SET utf8 COLLATE utf8_general_ci DEFAULT NULL, `password` varchar(255) CHARACTER SET utf8 COLLATE utf8_general_ci DEFAULT NULL, `email` varchar(255) CHARACTER SET utf8 COLLATE utf8_general_ci DEFAULT NULL, `telephone` varchar(255) CHARACTER SET utf8 COLLATE utf8_general_ci DEFAULT NULL, `role` int(10) DEFAULT NULL, `image` varchar(255) CHARACTER SET utf8 COLLATE utf8_general_ci DEFAULT NULL, `last_ip` varchar(255) CHARACTER SET utf8 COLLATE utf8_general_ci DEFAULT NULL, `last_time` varchar(255) CHARACTER SET utf8 COLLATE utf8_general_ci DEFAULT NULL, PRIMARY KEY (`id`) USING BTREE ) ENGINE = InnoDB AUTO_INCREMENT = 2 CHARACTER SET = utf8 COLLATE = utf8_general_ci ROW_FORMAT = Compact; SET FOREIGN_KEY_CHECKS = 1;
3 . 用户对象User.java :
import javax.persistence.*; /** * Created by EalenXie on 2018/7/5 15:17 */ @Entity @Table(name = "USER") public class User { @Id @GeneratedValue(strategy = GenerationType.AUTO) private Integer id; private String user_uuid; //用户UUID private String username; //用户名 private String password; //用户密码 private String email; //用户邮箱 private String telephone; //电话号码 private String role; //用户角色 private String image; //用户头像 private String last_ip; //上次登录IP private String last_time; //上次登录时间 public Integer getId() { return id; } public String getRole() { return role; } public void setRole(String role) { this.role = role; } public String getImage() { return image; } public void setImage(String image) { this.image = image; } public void setId(Integer id) { this.id = id; } public String getUsername() { return username; } public void setUsername(String username) { this.username = username; } public String getEmail() { return email; } public void setEmail(String email) { this.email = email; } public String getTelephone() { return telephone; } public void setTelephone(String telephone) { this.telephOne= telephone; } public String getPassword() { return password; } public void setPassword(String password) { this.password = password; } public String getUser_uuid() { return user_uuid; } public void setUser_uuid(String user_uuid) { this.user_uuid = user_uuid; } public String getLast_ip() { return last_ip; } public void setLast_ip(String last_ip) { this.last_ip = last_ip; } public String getLast_time() { return last_time; } public void setLast_time(String last_time) { this.last_time = last_time; } @Override public String toString() { return "User{" + "id=" + id + ", user_uuid='" + user_uuid + '\'' + ", username='" + username + '\'' + ", password='" + password + '\'' + ", email='" + email + '\'' + ", telephOne='" + telephone + '\'' + ", role='" + role + '\'' + ", image='" + image + '\'' + ", last_ip='" + last_ip + '\'' + ", last_time='" + last_time + '\'' + '}'; } }
4 . application.yml配置一些基本属性
spring: resources: static-locations: classpath:/ freemarker: template-loader-path: classpath:/templates/ suffix: .html content-type: text/html charset: UTF-8 datasource: url: jdbc:mysql://localhost:3306/yourdatabase username: yourname password: yourpass driver-class-name: com.mysql.jdbc.Driver type: com.alibaba.druid.pool.DruidDataSource server: port: 8083 error: whitelabel: enabled: true
5 . 考虑我们应用的效率 , 可以配置数据源和线程池 :
package com.wuxicloud.config; import com.alibaba.druid.pool.DruidDataSource; import com.alibaba.druid.pool.DruidDataSourceFactory; import com.alibaba.druid.support.http.StatViewServlet; import com.alibaba.druid.support.http.WebStatFilter; import org.springframework.beans.factory.annotation.Autowired; import org.springframework.boot.context.properties.ConfigurationProperties; import org.springframework.boot.web.servlet.FilterRegistrationBean; import org.springframework.boot.web.servlet.ServletRegistrationBean; import org.springframework.context.annotation.Bean; import org.springframework.context.annotation.Configuration; import org.springframework.core.env.*; import javax.sql.DataSource; import java.util.HashMap; import java.util.Map; import java.util.Properties; @Configuration public class DruidConfig { private static final String DB_PREFIX = "spring.datasource."; @Autowired private Environment environment; @Bean @ConfigurationProperties(prefix = DB_PREFIX) public DataSource druidDataSource() { Properties dbProperties = new Properties(); Map map = new HashMap(); for (PropertySource propertySource : ((AbstractEnvironment) environment).getPropertySources()) { getPropertiesFromSource(propertySource, map); } dbProperties.putAll(map); DruidDataSource dds; try { dds = (DruidDataSource) DruidDataSourceFactory.createDataSource(dbProperties); dds.init(); } catch (Exception e) { throw new RuntimeException("load datasource error, dbProperties is :" + dbProperties, e); } return dds; } private void getPropertiesFromSource(PropertySource propertySource, Map map) { if (propertySource instanceof MapPropertySource) { for (String key : ((MapPropertySource) propertySource).getPropertyNames()) { if (key.startsWith(DB_PREFIX)) map.put(key.replaceFirst(DB_PREFIX, ""), propertySource.getProperty(key)); else if (key.startsWith(DB_PREFIX)) map.put(key.replaceFirst(DB_PREFIX, ""), propertySource.getProperty(key)); } } if (propertySource instanceof CompositePropertySource) { for (Prop[email protected]#码网ertySource s : ((CompositePropertySource) propertySource).getPropertySources()) { getPropertiesFromSource(s, map); } } } @Bean public ServletRegistrationBean druidServlet() { return new ServletRegistrationBean(new StatViewServlet(), "/druid/*"); } @Bean public FilterRegistrationBean filterRegistrationBean() { FilterRegistrationBean filterRegistratiOnBean= new FilterRegistrationBean(); filterRegistrationBean.setFilter(new WebStatFilter()); filterRegistrationBean.addUrlPatterns("/*"); filterRegistrationBean.addInitParameter("exclusions", "*.js,*.gif,*.jpg-600,*.png-600,*.css,*.ico,/druid/*"); return filterRegistrationBean; } }
配置线程池 :
package com.wuxicloud.config; import org.springframework.context.annotation.Bean; import org.springframework.context.annotation.Configuration; import org.springframework.scheduling.annotation.EnableAsync; import org.springframework.scheduling.concurrent.ThreadPoolTaskExecutor; import java.util.concurrent.Executor; import java.util.concurrent.ThreadPoolExecutor; @Configuration @EnableAsync public class ThreadPoolConfig { @Bean public Executor getExecutor() { ThreadPoolTaskExecutor executor = new ThreadPoolTaskExecutor(); executor.setCorePoolSize(5);//线程池维护线程的最少数量 executor.setMaxPoolSize(30);//线程池维护线程的最大数量 executor.setQueueCapacity(8); //缓存队列 executor.setRejectedExecutionHandler(new ThreadPoolExecutor.CallerRunsPolicy()); //对拒绝task的处理策略 executor.setKeepAliveSeconds(60);//允许的空闲时间 executor.initialize(); return executor; } }
6.用户需要根据用户名进行登录,访问数据库 :
import com.wuxicloud.model.User; import org.springframework.data.jpa.repository.JpaRepository; /** * Created by EalenXie on 2018/7/11 14:23 */ public interface UserRepository extends JpaRepository { User findByUsername(String username); }
7.构建真正用于SpringSecurity登录的安全用户(UserDetails),我这里使用新建了一个POJO来实现 :
package com.wuxicloud.security; import com.wuxicloud.model.User; import org.springframework.security.core.GrantedAuthority; import org.springframework.security.core.authority.SimpleGrantedAuthority; import org.springframework.security.core.userdetails.UserDetails; import java.util.ArrayList; import java.util.Collection; public class SecurityUser extends User implements UserDetails { private static final long serialVersiOnUID= 1L; public SecurityUser(User user) { if (user != null) { this.setUser_uuid(user.getUser_uuid()); this.setUsername(user.getUsername()); this.setPassword(user.getPassword()); this.setEmail(user.getEmail()); this.setTelephone(user.getTelephone()); this.setRole(user.getRole()); this.setImage(user.getImage()); this.setLast_ip(user.getLast_ip()); this.setLast_time(user.getLast_time()); } } @Override public Collection getAuthorities() { Collection authorities = new ArrayList(); String username = this.getUsername(); if (username != null) { SimpleGrantedAuthority authority = new SimpleGrantedAuthority(username); authorities.add(authority); } return authorities; } @Override public boolean isAccountNonExpired() { return true; } @Override public boolean isAccountNonLocked() { return true; } @Override public boolean isCredentialsNonExpired() { return true; } @Override public boolean isEnabled() { return true; } }
8 . 核心配置,配置SpringSecurity访问策略,包括登录处理,登出处理,资源访问,密码基本加密。
package com.wuxicloud.config; import com.wuxicloud.dao.UserRepository; import com.wuxicloud.model.User; import com.wuxicloud.security.SecurityUser; import org.slf4j.Logger; import org.slf4j.LoggerFactory; import org.springframework.beans.factory.annotation.Autowired; import org.springframework.context.annotation.Bean; import org.springframework.context.annotation.Configuration; import org.springframework.security.config.annotation.authentication.builders.AuthenticationManagerBuilder; import org.springframework.security.config.annotation.web.builders.HttpSecurity; import org.springframework.security.config.annotation.web.configuration.EnableWebSecurity; import org.springframework.security.config.annotation.web.configuration.WebSecurityConfigurerAdapter; import org.springframework.security.core.Authentication; import org.springframework.security.core.userdetails.UserDetails; import org.springframework.security.core.userdetails.UserDetailsService; import org.springframework.security.core.userdetails.UsernameNotFoundException; import org.springframework.security.crypto.bcrypt.BCryptPasswordEncoder; import org.springframework.security.web.authentication.SavedRequestAwareAuthenticationSuccessHandler; import org.springframework.security.web.authentication.logout.LogoutSuccessHandler; import javax.servlet.ServletException; import javax.servlet.http.HttpServletRequest; import javax.servlet.http.HttpServletResponse; import java.io.IOException; /** * Created by EalenXie on 2018/1/11. */ @Configuration @EnableWebSecurity public class WebSecurityConfig extends WebSecurityConfigurerAdapter { private static final Logger logger = LoggerFactory.getLogger(WebSecurityConfig.class); @Override protected void configure(HttpSecurity http) throws Exception { //配置策略 http.csrf().disable(); http.authorizeRequests(). antMatchers("/static/**").permitAll().anyRequest().authenticated(). and().formLogin().loginPage("/login").permitAll().successHandler(loginSuccessHandler()). and().logout().permitAll().invalidateHttpSession(true). deleteCOOKIEs("JSESSIONID").logoutSuccessHandler(logoutSuccessHandler()). and().sessionManagement().maximumSessions(10).expiredUrl("/login"); } @Autowired public void configureGlobal(AuthenticationManagerBuilder auth) throws Exception { auth.userDetailsService(userDetailsService()).passwordEncoder(passwordEncoder()); auth.eraseCredentials(false); } @Bean public BCryptPasswordEncoder passwordEncoder() { //密码加密 return new BCryptPasswordEncoder(4); } @Bean public LogoutSuccessHandler logoutSuccessHandler() { //登出处理 return new LogoutSuccessHandler() { @Override public void onLogoutSuccess(HttpServletRequest httpServletRequest, HttpServletResponse httpServletResponse, Authentication authentication) throws IOException, ServletException { try { SecurityUser user = (SecurityUser) authentication.getPrincipal(); logger.info("USER : " + user.getUsername() + " LOGOUT SUCCESS ! "); } catch (Exception e) { logger.info("LOGOUT EXCEPTION , e : " + e.getMessage()); } httpServletResponse.sendRedirect("/login"); } }; } @Bean public SavedRequestAwareAuthenticationSuccessHandler loginSuccessHandler() { //登入处理 return new SavedRequestAwareAuthenticationSuccessHandler() { @Override public void onAuthenticationSuccess(HttpServletRequest request, HttpServletResponse response, Authentication authentication) throws IOException, ServletException { User userDetails = (User) authentication.getPrincipal(); logger.info("USER : " + userDetails.getUsername() + " LOGIN SUCCESS ! "); super.onAuthenticationSuccess(request, response, authentication); } }; } @Bean public UserDetailsService userDetailsService() { //用户登录实现 return new UserDetailsService() { @Autowired private UserRepository userRepository; @Override public UserDetails loadUserByUsername(String s) throws UsernameNotFoundException { User user = userRepository.findByUsername(s); if (user == null) throw new UsernameNotFoundException("Username " + s + " not found"); return new SecurityUser(user); } }; } }
9.至此,已经基本将配置搭建好了,从上面核心可以看出,配置的登录页的url 为/login,可以创建基本的Controller来验证登录了。
package com.wuxicloud.web; import com.wuxicloud.model.User; import org.springframework.security.core.Authentication; import org.springframework.security.core.context.SecurityContext; import org.springframework.security.core.context.SecurityContextHolder; import org.springframework.security.core.userdetails.UserDetails; import org.springframework.stereotype.Controller; import org.springframework.web.bind.annotation.RequestMapping; import org.springframework.web.bind.annotation.RequestMethod; import org.springframework.web.context.request.RequestContextHolder; import org.springframework.web.context.request.ServletRequestAttributes; import javax.servlet.http.HttpServletRequest; /** * Created by EalenXie on 2018/1/11. */ @Controller public class LoginController { @RequestMapping(value = "/login", method = RequestMethod.GET) public String login() { return "login"; } @RequestMapping("/") public String root() { return "index"; } public User getUser() { //为了session从获取用户信息,可以配置如下 User user = new User(); SecurityContext ctx = SecurityContextHolder.getContext(); Authentication auth = ctx.getAuthentication(); if (auth.getPrincipal() instanceof UserDetails) user = (User) auth.getPrincipal(); return user; } public HttpServletRequest getRequest() { return ((ServletRequestAttributes) RequestContextHolder.getRequestAttributes()).getRequest(); } }
11 . SpringBoot基本的启动类 Application.class
package com.wuxicloud; import org.springframework.boot.SpringApplication; import org.springframework.boot.autoconfigure.SpringBootApplication; /** * Created by EalenXie on 2018/7/11 15:01 */ @SpringBootApplication public class Application { public static void main(String[] args) { SpringApplication.run(Application.class, args); } }
11.根据Freemark和Controller里面可看出配置的视图为 /templates/index.html和/templates/index.login。所以创建基本的登录页面和登录成功页面。
login.html
用户名 : 密码 :
注意 : 这里方法必须是POST,因为GET在controller被重写了,用户名的name属性必须是username,密码的name属性必须是password
index.html
    欢迎你,${user.username}
注销
注意 : 为了从session中获取到登录的用户信息,根据配置SpringSecurity的用户信息会放在Session.SPRING_SECURITY_CONTEXT.authentication.principal里面,根据FreeMarker模板引擎的特点,可以通过这种方式进行获取 :
12 . 为了方便测试,我们在数据库中插入一条记录,注意,从WebSecurity.java配置可以知道密码会被加密,所以我们插入的用户密码应该是被加密的。
这里假如我们使用的密码为admin,则加密过后的字符串是 $2a$04$1OiUa3yEchBXQBJI8JaMyuKZNlwzWvfeQjKAHnwAEQwnacjt6ukqu
测试类如下 :
package com.wuxicloud.security; import org.junit.Test; import org.springframework.security.crypto.bcrypt.BCryptPasswordEncoder; /** * Created by EalenXie on 2018/7/11 15:13 */ public class TestEncoder { @Test public void encoder() { String password = "admin"; BCryptPasswordEncoder encoder = new BCryptPasswordEncoder(4); String enPassword = encoder.encode(password); System.out.println(enPassword); } }
测试登录,从上面的加密的密码我们插入一条数据到数据库中。
INSERT INTO `USER` VALUES (1, 'd242ae49-4734-411e-8c8d-d2b09e87c3c8', 'EalenXie', '$2a$04$petEXpgcLKfdLN4TYFxK0u8ryAzmZDHLASWLX/XXm8hgQar1C892W', 'SSSSS', 'ssssssssss', 1, 'g', '0:0:0:0:0:0:0:1', '2018-07-11 11:26:27');
13 . 启动项目进行测试 ,访问 localhost:8083
点击登录,登录失败会留在当前页面重新登录,成功则进入index.html
登录如果成功,可以看到后台打印登录成功的日志 :
页面进入index.html :
点击注销 ,则回重新跳转到login.html,后台也会打印登出成功的日志 :
总结
以上就是这篇文章的全部内容了,希望本文的内容对大家的学习或者工作具有一定的参考学习价值,如果有疑问大家可以留言交流,谢谢大家对gaodaima编程笔记的支持。


 京公网安备 11010802041100号