在电脑中下载 linux.x64_11gR2_database_1of2.zip 和 linux.x64_11gR2_database_2of2.zip
http://download.oracle.com/otn/linux/oracle11g/R2/linux.x64_11gR2_database_1of2.zip
http://download.oracle.com/otn/linux/oracle11g/R2/linux.x64_11gR2_database_2of2.zip
复制链接直接用迅雷下载
root用户登录Linux
创建/data/oracle/oraclesetup/目录
[root@lynn-02 ~]# mkdir -p /data/oracle/oraclesetup/进入/data/oracle/oraclesetup/目录
[root@lynn-02 ~]# cd /data/oracle/oraclesetup/Ctrl加Alt加F 打开xftp 将下载好的linux.x64_11gR2_database_1of2.zip 和 linux.x64_11gR2_database_2of2.zip上传到Linux下/data/oracle/oraclesetup/目录中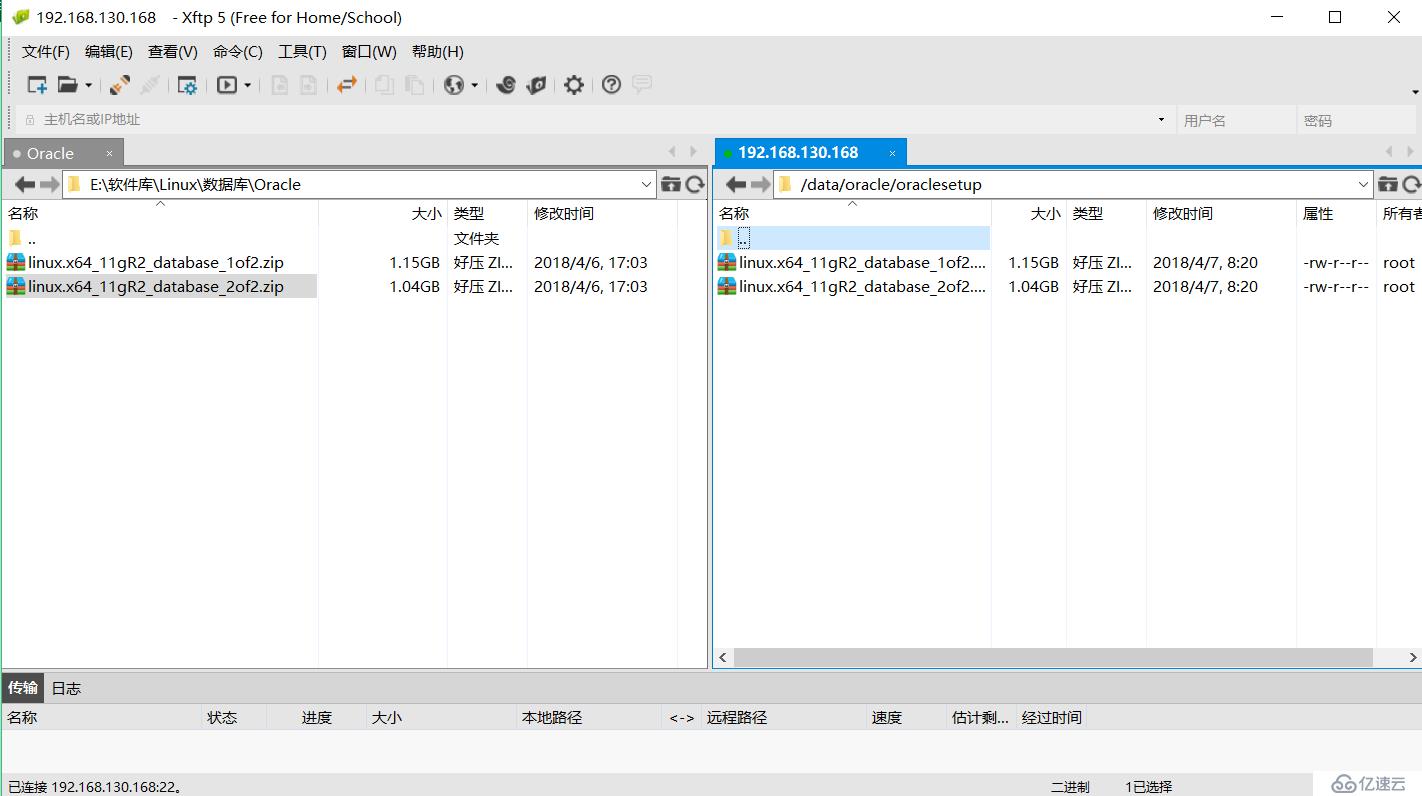
查看/data/oracle/oraclesetup/目录下的linux.x64_11gR2_database_1of2.zip 和 linux.x64_11gR2_database_2of2.zip
[root@lynn-02 oraclesetup]# ls
linux.x64_11gR2_database_1of2.zip  linux.x64_11gR2_database_2of2.zip
解压Oracle压缩包
[root@lynn-02 oraclesetup]# unzip linux.x64_11gR2_database_1of2.zip && unzip linux.x64_11gR2_database_2of2.zip解压Oracle压缩包后会在当前目录下产生一个database目录里面有Oracle安装程序
[root@lynn-02 oraclesetup]# ls
database  linux.x64_11gR2_database_1of2.zip  linux.x64_11gR2_database_2of2.zip
[root@lynn-02 oraclesetup]# cd database
[root@lynn-02 database]# ls
doc  install  response  rpm  runInstaller  sshsetup  stage  welcome.html
在/etc/hosts中添加主机名
[root@lynn-02 database]# vim /etc/hosts
127.0.0.1   localhost localhost.localdomain localhost4 localhost4.localdomain4
::1         localhost localhost.localdomain localhost6 localhost6.localdomain6
192.168.130.168 CentOS
关闭SELinux
[root@lynn-02 database]# vim /etc/selinux/config
# This file controls the state of SELinux on the system.
# SELINUX= can take one of these three values:
#     enforcing - SELinux security policy is enforced.
#     permissive - SELinux prints warnings instead of enforcing.
#     disabled - No SELinux policy is loaded.
SELINUX=disabled
# SELINUXTYPE= can take one of three two values:
#     targeted - Targeted processes are protected,
#     minimum - Modification of targeted policy. Only selected processes are protected.
#     mls - Multi Level Security protection.
SELINUXTYPE=targeted
[root@lynn-02 database]# setenforce 0
关闭防火墙
[root@lynn-02 database]# service iptables stop
Redirecting to /bin/systemctl stop iptables.service
[root@lynn-02 database]# systemctl stop firewalld
[root@lynn-02 database]# systemctl disable firewalld
安装Oracle 11g依赖包
[root@lynn-02 database]# yum install -y gcc make binutils gcc-c++ compat-libstdc++-33elfutils-libelf-devel elfutils-libelf-devel-static ksh libaio libaio-develnumactl-devel sysstat unixODBC unixODBC-devel pcre-devel添加安装用户和用户组
[root@lynn-02 database]# groupadd oinstall
[root@lynn-02 database]# groupadd dba
[root@lynn-02 database]# useradd -g oinstall -G dba oracle
[root@lynn-02 database]# passwd oracle
更改用户 oracle 的密码 。
新的 密码:
无效的密码: 密码少于 8 个字符
重新输入新的 密码:
passwd:所有的身份验证令牌已经成功更新。
[root@lynn-02 database]# id oracle
uid=1000(oracle) gid=1000(oinstall) 组=1000(oinstall),1001(dba)
修改内核参数配置文件/etc/sysctl.conf
添加如下内容
fs.aio-max-nr = 1048576
fs.file-max = 6815744
kernel.shmall = 2097152
kernel.shmmax = 1073741824
kernel.shmmni = 4096
kernel.sem = 250 32000 100 128
net.ipv4.ip_local_port_range = 9000 65500
net.core.rmem_default = 262144
net.core.rmem_max = 4194304
net.core.wmem_default = 262144
net.core.wmem_max = 1048576
其中kernel.shmmax = 1073741824为本机物理内存(2G)的一半,单位为byte。
[root@lynn-02 database]# vim /etc/sysctl.conf

# sysctl settings are defined through files in
# /usr/lib/sysctl.d/, /run/sysctl.d/, and /etc/sysctl.d/.
#
# Vendors settings live in /usr/lib/sysctl.d/.
# To override a whole file, create a new file with the same in
# /etc/sysctl.d/ and put new settings there. To override
# only specific settings, add a file with a lexically later
# name in /etc/sysctl.d/ and put new settings there.
#
# For more information, see sysctl.conf(5) and sysctl.d(5).
fs.aio-max-nr = 1048576

fs.file-max = 6815744

kernel.shmall = 2097152

kernel.shmmax = 1073741824

kernel.shmmni = 4096

kernel.sem = 250 32000 100 128

net.ipv4.ip_local_port_range = 9000 65500

net.core.rmem_default = 262144

net.core.rmem_max = 4194304

net.core.wmem_default = 262144

net.core.wmem_max = 1048576
修改用户的限制文件/etc/security/limits.conf
添加以下内容
oracle soft nproc 2047
oracle hard nproc 16384
oracle soft nofile 1024
oracle hard nofile 65536
oracle soft stack 10240
[root@lynn-02 database]# vim /etc/security/limits.conf
# /etc/security/limits.conf
#
#This file sets the resource limits for the users logged in via PAM.
#It does not affect resource limits of the system services.
#
#Also note that configuration files in /etc/security/limits.d directory,
#which are read in alphabetical order, override the settings in this
#file in case the domain is the same or more specific.
#That means for example that setting a limit for wildcard domain here
#can be overriden with a wildcard setting in a config file in the
#subdirectory, but a user specific setting here can be overriden only
#with a user specific setting in the subdirectory.
#
#Each line describes a limit for a user in the form:
#
# -
#
#Where:
# can be:
# - a user name
# - a group name, with @group syntax
# - the wildcard *, for default entry
# - the wildcard %, can be also used with %group syntax,
# for maxlogin limit
# - fsize - maximum filesize (KB)
# - memlock - max locked-in-memory address space (KB)
# - nofile - max number of open file descriptors
# - rss - max resident set size (KB)
# - stack - max stack size (KB)
# - cpu - max CPU time (MIN)
# - nproc - max number of processes
# - as - address space limit (KB)
# - maxlogins - max number of logins for this user
# - maxsyslogins - max number of logins on the system
# - priority - the priority to run user process with
# - locks - max number of file locks the user can hold
# - sigpending - max number of pending signals
# - msgqueue - max memory used by POSIX message queues (bytes)
# - nice - max nice priority allowed to raise to values: [-20, 19]
# - rtprio - max realtime priority
#
# -
#
#* soft core 0
#* hard rss 10000
#@student hard nproc 20
#@faculty soft nproc 20
#@faculty hard nproc 50
#ftp hard nproc 0
#@student - maxlogins 4
# End of file
oracle soft nproc 2047
oracle hard nproc 16384
oracle soft nofile 1024
oracle hard nofile 65536
oracle soft stack 10240
修改/etc/pam.d/login文件:
添加以下内容:
session required /lib64/security/pam_limits.so
session required pam_limits.so
[root@lynn-02 database]# vim /etc/pam.d/login

#%PAM-1.0
auth [user_unknown=ignore success=ok ignore=ignore default=bad] pam_securetty.so
auth       substack     system-auth
auth       include      postlogin
account    required     pam_nologin.so
account    include      system-auth
password   include      system-auth
# pam_selinux.so close should be the first session rule
session    required     pam_selinux.so close
session    required     pam_loginuid.so
session    optional     pam_console.so
session required  /lib64/security/pam_limits.so
session required   pam_limits.so
# pam_selinux.so open should only be followed by sessions to be executed in the user context
session    required     pam_selinux.so open
session    required     pam_namespace.so
session    optional     pam_keyinit.so force revoke
session    include      system-auth
session    include      postlogin
-session   optional     pam_ck_connector.so
修改/etc/profile文件:
添加以下内容:
if [ $USER = "oracle" ]; then
if[ $SHELL = "/bin/ksh" ]; then
ulimit -p 16384
ulimit -n 65536
else
ulimit -u 16384 -n 65536
fi
fi
[root@lynn-02 database]# vim /etc/profile

# /etc/profile

# System wide environment and startup programs, for login setup
# Functions and aliases go in /etc/bashrc

# It's NOT a good idea to change this file unless you know what you
# are doing. It's much better to create a custom.sh shell script in
# /etc/profile.d/ to make custom changes to your environment, as this
# will prevent the need for merging in future updates.

pathmunge () {
    case ":${PATH}:" in
        *:"$1":*)
            ;;
        *)
            if [ "$2" = "after" ] ; then
                PATH=$PATH:$1
            else
                PATH=$1:$PATH
            fi
    esac
}

if [ -x /usr/bin/id ]; then
    if [ -z "$EUID" ]; then
        # ksh workaround
        EUID=`/usr/bin/id -u`
        UID=`/usr/bin/id -ru`
    fi
    USER="`/usr/bin/id -un`"
    LOGNAME=$USER
    MAIL="/var/spool/mail/$USER"
fi

# Path manipulation
if [ "$EUID" = "0" ]; then
    pathmunge /usr/sbin
    pathmunge /usr/local/sbin

# By default, we want umask to get set. This sets it for login shell
# Current threshold for system reserved uid/gids is 200
# You could check uidgid reservation validity in
# /usr/share/doc/setup-*/uidgid file
if [ $UID -gt 199 ] && [ "`/usr/bin/id -gn`" = "`/usr/bin/id -un`" ]; then
    umask 002
else
    umask 022
fi

for i in /etc/profile.d/*.sh ; do
    if [ -r "$i" ]; then
        if [ "${-#*i}" != "$-" ]; then
            . "$i"
        else
            . "$i" >/dev/null
        fi
    fi
done

unset i
unset -f pathmunge
if [ $USER = "oracle" ]; then

  if [ $SHELL = "/bin/ksh" ]; then

  ulimit -p 16384

  ulimit -n 65536

 else

  ulimit -u 16384 -n 65536

  fi

fi
创建安装目录和设置文件权限
[root@lynn-02 database]# vim /etc/security/limits.conf
[root@lynn-02 database]# vim /etc/pam.d/login
[root@lynn-02 database]# vim /etc/profile
[root@lynn-02 database]# mkdir -p /data/oracle/product/11.2.0
[root@lynn-02 database]# mkdir /data/oracle/oradata
[root@lynn-02 database]# mkdir /data/oracle/inventory
[root@lynn-02 database]# mkdir /data/oracle/fast_recovery_area
[root@lynn-02 database]# chown -R oracle:oinstall /data/oracle
[root@lynn-02 database]# chmod -R 775 /data/oracle
设置oracle用户环境变量
登陆到oracle用户
[root@lynn-02 ~]# su - oracle
上一次登录:六 4月  7 09:27:52 CST 2018pts/0 上
编辑.bash_profile添加如下内容:
ORACLE_BASE=/data/oracle
ORACLE_HOME=$ORACLE_BASE/product/11.2.0
ORACLE_SID=ora11
PATH=$PATH:$ORACLE_HOME/bin
export ORACLE_BASE ORACLE_HOME ORACLE_SID PATH
注意,粗体处必须与创建的数据库实例名称一致,否则数据库启动后无法访问。
[oracle@lynn-02 ~]$ vim .bash_profile

# .bash_profile

# Get the aliases and functions
if [ -f ~/.bashrc ]; then
        . ~/.bashrc
fi

# User specific environment and startup programs

PATH=$PATH:$HOME/.local/bin:$HOME/bin

export PATH
ORACLE_BASE=/data/oracle

ORACLE_HOME=$ORACLE_BASE/product/11.2.0

ORACLE_SID=ora11

PATH=$PATH:$ORACLE_HOME/bin

export ORACLE_BASE ORACLE_HOME ORACLE_SIDPATH
编辑/data/oracle/oraclesetup/database/response/db_install.rsp静默安装响应文件
[oracle@lynn-02 ~]$ vim /data/oracle/oraclesetup/database/response/db_install.rsp需要设置的选项如下:
oracle.install.option=INSTALL_DB_SWONLY
ORACLE_HOSTNAME=CentOS
UNIX_GROUP_NAME=oinstall
INVENTORY_LOCATION=/data/oracle/inventory
SELECTED_LANGUAGES=en,zh_CN
ORACLE_HOME=/data/oracle/product/11.2.0
ORACLE_BASE=/data/oracle
oracle.install.db.InstallEdition=EE
oracle.install.db.DBA_GROUP=dba
oracle.install.db.OPER_GROUP=dba
DECLINE_SECURITY_UPDATES=true
[oracle@lynn-02 response]$ cd /data/oracle/oraclesetup/database/
[oracle@lynn-02 database]$ ./runInstaller -silent -responseFile /data/oracle/oraclesetup/database/response/db_install.rsp -ignorePrereq
Starting Oracle Universal Installer...

Checking Temp space: must be greater than 120 MB.   Actual 9490 MB    Passed
Checking swap space: must be greater than 150 MB.   Actual 4095 MB    Passed
Preparing to launch Oracle Universal Installer from /tmp/OraInstall2018-04-07_11-12-32AM. Please wait ...[oracle@lynn-02 database]$ [WARNING] [INS-32055] The Central Inventory is located in the Oracle base.
   CAUSE: The Central Inventory is located in the Oracle base.
   ACTION: Oracle recommends placing this Central Inventory in a location outside the Oracle base directory.
[WARNING] [INS-32055] The Central Inventory is located in the Oracle base.
   CAUSE: The Central Inventory is located in the Oracle base.
   ACTION: Oracle recommends placing this Central Inventory in a location outside the Oracle base directory.
You can find the log of this install session at:
 /data/oracle/inventory/logs/installActions2018-04-07_11-12-32AM.log
The following configuration scripts need to be executed as the "root" user.
 #!/bin/sh
 #Root scripts to run

/data/oracle/inventory/orainstRoot.sh
/data/oracle/product/11.2.0/root.sh
To execute the configuration scripts:
     1. Open a terminal window
     2. Log in as "root"
     3. Run the scripts
     4. Return to this window and hit "Enter" key to continue

Successfully Setup Software.
开始Oracle在后台静默安装。安装过程中,如果提示[WARNING]不必理会,此时安装程序仍在后台进行,如果出现[FATAL],则安装程序已经停止了。
安装到出现Successfully Setup Software 则安装成功
打开终端,以root身份登录,执行脚本:
[root@lynn-02 ~]# sh /data/oracle/inventory/orainstRoot.sh
Changing permissions of /data/oracle/inventory.
Adding read,write permissions for group.
Removing read,write,execute permissions for world.

Changing groupname of /data/oracle/inventory to oinstall.
The execution of the script is complete.
[root@lynn-02 ~]# sh /data/oracle/product/11.2.0/root.sh
Check /data/oracle/product/11.2.0/install/root_lynn-02_2018-04-07_11-26-59.log for the output of root script
以静默方式配置监听:
重新使用oracle用户登录 执行netca /silent /responseFile /data/oracle/oraclesetup/database/response/netca.rsp
[root@lynn-02 ~]# su - oracle
上一次登录:六 4月  7 10:16:21 CST 2018pts/1 上
[oracle@lynn-02 ~]$ netca /silent /responseFile /data/oracle/oraclesetup/database/response/netca.rsp

正在对命令行参数进行语法分析:
参数"silent" = true
参数"responsefile" = /data/oracle/oraclesetup/database/response/netca.rsp
完成对命令行参数进行语法分析。
Oracle Net Services 配置:
完成概要文件配置。
Oracle Net 监听程序启动:
    正在运行监听程序控制:
      /data/oracle/product/11.2.0/bin/lsnrctl start LISTENER
    监听程序控制完成。
    监听程序已成功启动。
监听程序配置完成。
成功完成 Oracle Net Services 配置。退出代码是0
成功运行后,在/data/oracle/product/11.2.0/network/admin/中生成listener.ora和sqlnet.ora
[oracle@lynn-02 ~]$ ls /data/oracle/product/11.2.0/network/admin/
listener.ora  samples  shrept.lst  sqlnet.ora
通过netstat命令可以查看1521端口正在监听。
[root@lynn-02 ~]# netstat -tnulp |grep 1521
tcp6       0      0 :::1521                 :::*                    LISTEN      13419/tnslsnr
以静默方式建立新库,同时也建立一个对应的实例。
编辑/data/oracle/oraclesetup/database/response/dbca.rsp
设置以下参数:
GDBNAME= "ora11"
SID =" ora11"
SYSPASSWORD= " 20180606"
SYSTEMPASSWORD= "20180606"
SYSMANPASSWORD= " 20180606"
DBSNMPPASSWORD= " 20180606"
DATAFILEDESTINATION=/data/oracle/oradata
RECOVERYAREADESTINATION=/data/oracle/fast_recovery_area
CHARACTERSET= "ZHS16GBK"
TOTALMEMORY= "1638"
其中TOTALMEMORY ="1638" 为1638MB,物理内存2G*80%。
[oracle@lynn-02 ~]$ vim /data/oracle/oraclesetup/database/response/dbca.rsp进行静默配置
[oracle@lynn-02 ~]$ dbca -silent -responseFile /data/oracle/oraclesetup/database/response/dbca.rsp
复制数据库文件
1% 已完成
3% 已完成
11% 已完成
18% 已完成
26% 已完成
37% 已完成
正在创建并启动 Oracle 实例
40% 已完成
45% 已完成
50% 已完成
55% 已完成
56% 已完成
60% 已完成
62% 已完成
正在进行数据库创建
66% 已完成
70% 已完成
73% 已完成
85% 已完成
96% 已完成
100% 已完成
有关详细信息, 请参阅日志文件 "/data/oracle/cfgtoollogs/dbca/ora11/ora11.log"。
建库后进行实例进程检查:
[oracle@lynn-02 ~]$ ps -ef | grep ora_ | grep -v grep
oracle    13850      1  0 14:32 ?        00:00:00 ora_pmon_ora11
oracle    13852      1  0 14:32 ?        00:00:00 ora_vktm_ora11
oracle    13856      1  0 14:32 ?        00:00:00 ora_gen0_ora11
oracle    13858      1  0 14:32 ?        00:00:00 ora_diag_ora11
oracle    13860      1  0 14:32 ?        00:00:00 ora_dbrm_ora11
oracle    13862      1  0 14:32 ?        00:00:00 ora_psp0_ora11
oracle    13864      1  0 14:32 ?        00:00:00 ora_dia0_ora11
oracle    13866      1  0 14:32 ?        00:00:00 ora_mman_ora11
oracle    13868      1  0 14:32 ?        00:00:00 ora_dbw0_ora11
oracle    13870      1  0 14:32 ?        00:00:00 ora_lgwr_ora11
oracle    13872      1  0 14:32 ?        00:00:00 ora_ckpt_ora11
oracle    13874      1  0 14:32 ?        00:00:00 ora_smon_ora11
oracle    13876      1  0 14:32 ?        00:00:00 ora_reco_ora11
oracle    13878      1  0 14:32 ?        00:00:00 ora_mmon_ora11
oracle    13880      1  0 14:32 ?        00:00:00 ora_mmnl_ora11
oracle    13882      1  0 14:32 ?        00:00:00 ora_d000_ora11
oracle    13884      1  0 14:32 ?        00:00:00 ora_s000_ora11
oracle    13898      1  0 14:32 ?        00:00:00 ora_qmnc_ora11
oracle    13913      1  0 14:32 ?        00:00:00 ora_cjq0_ora11
oracle    13915      1  0 14:32 ?        00:00:00 ora_q000_ora11
oracle    13917      1  0 14:32 ?        00:00:00 ora_q001_ora11
查看监听状态:
[oracle@lynn-02 ~]$  lsnrctl status

LSNRCTL for Linux: Version 11.2.0.1.0 - Production on 07-APR-2018 14:34:17

Copyright (c) 1991, 2009, Oracle.  All rights reserved.

Connecting to (DESCRIPTION=(ADDRESS=(PROTOCOL=IPC)(KEY=EXTPROC1521)))
STATUS of the LISTENER
------------------------
Alias                     LISTENER
Version                   TNSLSNR for Linux: Version 11.2.0.1.0 - Production
Start Date                07-APR-2018 14:11:08
Uptime                    0 days 0 hr. 23 min. 13 sec
Trace Level               off
Security                  ON: Local OS Authentication
SNMP                      OFF
Listener Parameter File   /data/oracle/product/11.2.0/network/admin/listener.ora
Listener Log File         /data/oracle/diag/tnslsnr/lynn-02/listener/alert/log.xml
Listening Endpoints Summary...
  (DESCRIPTION=(ADDRESS=(PROTOCOL=ipc)(KEY=EXTPROC1521)))
  (DESCRIPTION=(ADDRESS=(PROTOCOL=tcp)(HOST=lynn-02)(PORT=1521)))
Services Summary...
Service "ora11" has 1 instance(s).
  Instance "ora11", status READY, has 1 handler(s) for this service...
Service "ora11XDB" has 1 instance(s).
  Instance "ora11", status READY, has 1 handler(s) for this service...
The command completed successfully
登录查看实例状态:
[oracle@lynn-02 ~]$ sqlplus / as sysdba

SQL*Plus: Release 11.2.0.1.0 Production on Sat Apr 7 17:28:34 2018

Copyright (c) 1982, 2009, Oracle.  All rights reserved.

Connected to:
Oracle Database 11g Enterprise Edition Release 11.2.0.1.0 - 64bit Production
With the Partitioning, OLAP, Data Mining and Real Application Testing options

SQL> select status from v$instance;

STATUS
------------
OPEN

SQL>
修改/data/oracle/product/11.2.0/bin/dbstart
[oracle@lynn-02 ~]$ vim /data/oracle/product/11.2.0/bin/dbstart将ORACLE_HOME_LISTNER=$1修改为ORACLE_HOME_LISTNER=$ORACLE_HOME
修改/data/oracle/product/11.2.0/bin/dbshut
[oracle@lynn-02 ~]$ vim /data/oracle/product/11.2.0/bin/dbshut将ORACLE_HOME_LISTNER=$1修改为ORACLE_HOME_LISTNER=$ORACLE_HOME
修改/etc/oratab文件
将orcl:/data/oracle/product/11.2.0:N中最后的N改为Y,成为orcl:/data/oracle/product/11.2.0:Y
[oracle@lynn-02 ~]$ vim /etc/oratab

#

# This file is used by ORACLE utilities.  It is created by root.sh
# and updated by the Database Configuration Assistant when creating
# a database.

# A colon, ':', is used as the field terminator.  A new line terminates
# the entry.  Lines beginning with a pound sign, '#', are comments.
#
# Entries are of the form:
#   $ORACLE_SID:$ORACLE_HOME::
#
# The first and second fields are the system identifier and home
# directory of the database respectively.  The third filed indicates
# to the dbstart utility that the database should , "Y", or should not,
# "N", be brought up at system boot time.
#
# Multiple entries with the same $ORACLE_SID are not allowed.
#
#
ora11:/data/oracle/product/11.2.0:Y
输入命令dbshut和dbstart测试
[oracle@lynn-02 ~]$ dbshut
Processing Database instance "ora11": log file /data/oracle/product/11.2.0/shutdown.log
[oracle@lynn-02 ~]$ lsnrctl status

LSNRCTL for Linux: Version 11.2.0.1.0 - Production on 07-APR-2018 14:52:41

Copyright (c) 1991, 2009, Oracle.  All rights reserved.

Connecting to (DESCRIPTION=(ADDRESS=(PROTOCOL=IPC)(KEY=EXTPROC1521)))
TNS-12541: TNS:no listener
 TNS-12560: TNS:protocol adapter error
  TNS-00511: No listener
   Linux Error: 2: No such file or directory
Connecting to (DESCRIPTION=(ADDRESS=(PROTOCOL=TCP)(HOST=CentOS)(PORT=1521)))
TNS-12541: TNS:no listener
 TNS-12560: TNS:protocol adapter error
  TNS-00511: No listener
   Linux Error: 111: Connection refused
[oracle@lynn-02 ~]$ ps -ef |grep ora_ |grep -v grep
[oracle@lynn-02 ~]$
Oracle监听停止,进程消失。
[oracle@lynn-02 ~]$ dbstart
Processing Database instance "ora11": log file /data/oracle/product/11.2.0/startup.log
[oracle@lynn-02 ~]$ lsnrctl status

LSNRCTL for Linux: Version 11.2.0.1.0 - Production on 07-APR-2018 14:54:27

Copyright (c) 1991, 2009, Oracle.  All rights reserved.

Connecting to (DESCRIPTION=(ADDRESS=(PROTOCOL=IPC)(KEY=EXTPROC1521)))
STATUS of the LISTENER
------------------------
Alias                     LISTENER
Version                   TNSLSNR for Linux: Version 11.2.0.1.0 - Production
Start Date                07-APR-2018 14:54:13
Uptime                    0 days 0 hr. 0 min. 19 sec
Trace Level               off
Security                  ON: Local OS Authentication
SNMP                      OFF
Listener Parameter File   /data/oracle/product/11.2.0/network/admin/listener.ora
Listener Log File         /data/oracle/diag/tnslsnr/lynn-02/listener/alert/log.xml
Listening Endpoints Summary...
  (DESCRIPTION=(ADDRESS=(PROTOCOL=ipc)(KEY=EXTPROC1521)))
  (DESCRIPTION=(ADDRESS=(PROTOCOL=tcp)(HOST=lynn-02)(PORT=1521)))
Services Summary...
Service "ora11" has 1 instance(s).
  Instance "ora11", status READY, has 1 handler(s) for this service...
Service "ora11XDB" has 1 instance(s).
  Instance "ora11", status READY, has 1 handler(s) for this service...
The command completed successfully
[oracle@lynn-02 ~]$ ps -ef |grep ora_ |grep -v grep
oracle    14236      1  0 14:54 ?        00:00:00 ora_pmon_ora11
oracle    14238      1  0 14:54 ?        00:00:00 ora_vktm_ora11
oracle    14242      1  0 14:54 ?        00:00:00 ora_gen0_ora11
oracle    14245      1  0 14:54 ?        00:00:00 ora_diag_ora11
oracle    14247      1  0 14:54 ?        00:00:00 ora_dbrm_ora11
oracle    14249      1  0 14:54 ?        00:00:00 ora_psp0_ora11
oracle    14251      1  0 14:54 ?        00:00:00 ora_dia0_ora11
oracle    14253      1  0 14:54 ?        00:00:00 ora_mman_ora11
oracle    14255      1  0 14:54 ?        00:00:00 ora_dbw0_ora11
oracle    14257      1  0 14:54 ?        00:00:00 ora_lgwr_ora11
oracle    14259      1  0 14:54 ?        00:00:00 ora_ckpt_ora11
oracle    14261      1  0 14:54 ?        00:00:00 ora_smon_ora11
oracle    14264      1  0 14:54 ?        00:00:00 ora_reco_ora11
oracle    14266      1  1 14:54 ?        00:00:00 ora_mmon_ora11
oracle    14268      1  0 14:54 ?        00:00:00 ora_mmnl_ora11
oracle    14270      1  0 14:54 ?        00:00:00 ora_d000_ora11
oracle    14272      1  0 14:54 ?        00:00:00 ora_s000_ora11
oracle    14280      1  0 14:54 ?        00:00:00 ora_qmnc_ora11
oracle    14358      1  0 14:54 ?        00:00:00 ora_cjq0_ora11
oracle    14360      1  0 14:54 ?        00:00:00 ora_j000_ora11
oracle    14362      1  0 14:54 ?        00:00:00 ora_j001_ora11
oracle    14371      1  0 14:54 ?        00:00:00 ora_q000_ora11
oracle    14373      1  0 14:54 ?        00:00:00 ora_q001_ora11
Oracle监听启动,进程启动。
切换到root账户建立自启动脚本
[oracle@lynn-02 ~]$ su -
密码:
上一次登录:六 4月  7 11:21:33 CST 2018pts/0 上
[root@lynn-02 ~]# vim /etc/rc.d/init.d/oracle
添加以下内容(有些值如ORACLE_HOME和ORACLE_USER等根据实际情况可以修改):
#!/bin/bash

#oracle: Start/Stop Oracle Database 11g R2

#chkconfig: 345 90 10

#description: The Oracle Database is an Object-Relational Database ManagementSystem.

#

. /etc/rc.d/init.d/functions

LOCKFILE=/var/lock/subsys/oracle

ORACLE_HOME=/data/oracle/product/11.2.0

ORACLE_USER=oracle

case "$1" in

'start')

         if [ -f $LOCKFILE ]; then

                   echo $0 already running.

         else

                   echo -n $"StartingOracle Database:"

                   su - $ORACLE_USER -c"$ORACLE_HOME/bin/lsnrctl start"

                   su - $ORACLE_USER -c"$ORACLE_HOME/bin/dbstart $ORACLE_HOME"

                   su - $ORACLE_USER -c"$ORACLE_HOME/bin/emctl start dbconsole"

                   touch $LOCKFILE

         fi

   ;;

'stop')

         if [ ! -f $LOCKFILE ]; then

                   echo $0 already stopping.

         else

                   echo -n $"StoppingOracle Database:"

                   su - $ORACLE_USER -c"$ORACLE_HOME/bin/lsnrctl stop"

                   su - $ORACLE_USER -c"$ORACLE_HOME/bin/dbshut"

                   su - $ORACLE_USER -c"$ORACLE_HOME/bin/emctl stop dbconsole"

                   rm -f $LOCKFILE

         fi

   ;;

'restart')

         $0 stop

         sleep 5

         $0 start

   ;;

'status')

         if [ -f $LOCKFILE ]; then

                   echo $0 started.

         else

                   echo $0 stopped.

         fi

   ;;

*)

         echo "Usage: $0[start|stop|status]"

         exit 1

esac

exit 0
修改/etc/init.d/oracle服务文件权限
[root@lynn-02 ~]# chmod 755 /etc/init.d/oracle设置为开机启动
[root@lynn-02 ~]# chkconfig oracle on
[root@lynn-02 ~]# chkconfig --list oracle

注:该输出结果只显示 SysV 服务,并不包含
原生 systemd 服务。SysV 配置数据
可能被原生 systemd 配置覆盖。

      要列出 systemd 服务,请执行 'systemctl list-unit-files'。
      查看在具体 target 启用的服务请执行
      'systemctl list-dependencies [target]'。

oracle          0:关 1:关 2:开 3:开 4:开 5:开 6:关
进行service oracle start/stop/restart测试
[root@lynn-02 ~]# service oracle status
/etc/init.d/oracle stopped.
[root@lynn-02 ~]# service oracle start
Starting oracle (via systemctl):                           [  确定  ]
[root@lynn-02 ~]# service oracle stop
Stopping oracle (via systemctl):                           [  确定  ]
[root@lynn-02 ~]# service oracle restart
Restarting oracle (via systemctl):                         [  确定  ]
Reboot重启查看Oracle监听和实例进程均能自动启动。


 京公网安备 11010802041100号 | 京ICP备19059560号-4 | PHP1.CN 第一PHP社区 版权所有