作者:Gome--李想 | 来源:互联网 | 2022-02-28 11:20
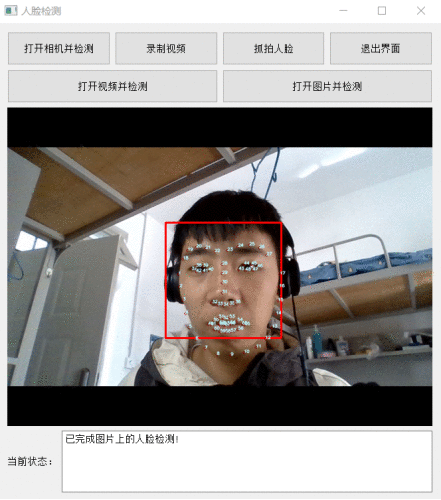
Python调用OpenCV实现人脸识别,供大家参考,具体内容如下
硬件环境:
Win10 64位
软件环境:
Python版本:2.7.3
IDE:JetBrains PyCharm 2016.3.2
Python库:
1.1) opencv-python(3.2.0.6)
搭建过程:
OpenCV Python库:
1. PyCharm的插件源中选择opencv-python(3.2.0.6)库安装
题外话:Python入门Tips
PS1:如何安装whl文件
1.先安装PIP
2.CMD命令进入D:\Python27\Scripts里面后再执行PIP命令安装pip install wheel
如果提示'pip'不是内部或外部命令,也不是可运行的程序或批处理文件:
①将python安装目录下的scripts目录(例如D:\Python27\Scripts)添加到系统环境变量path里,注意前加分号。再执行该命令
pip install wheel
②在cmd下进入到D:\Python27\Scripts目录下执行该命令
pip install wheel
3.把文件最好放在\Script文件夹里面再pip install xxxx.whl
4.注意whl文件名不能改 必须一模一样和原名
PS2:到哪找.whl文件?
相关代码:
import cv2
import numpy as np

cv2.namedWindow("test") # Create a window
cap = cv2.VideoCapture(0) #Open camera one
success, frame = cap.read() #Read one frame

print("Camera open operation is: ", success);
color = (255,0,0) #Config the color
classfier = cv2.CascadeClassifier("Resources\haarcascade_frontalface_alt.xml")

#Make sure this xml file is in the same directory with py file
#Otherwise change it to absolute directory. This xml file can be found in D:\My

Documents\Downloads\opencv\sources\data\haarcascades

while success:
  success, frame = cap.read()
  size = frame.shape[:2] #
  image = np.zeros(size, dtype = np.float16) #
  image = cv2.cvtColor(frame, cv2.COLOR_BGR2GRAY) #
  cv2.equalizeHist(image, image) #
  #Below three lines config the minimal image size
  divisor = 8
  h, w = size
  minSize = ((int)(w/divisor), (int)(h/divisor))
  faceRects = classfier.detectMultiScale(image, 1.2, 2, cv2.CASCADE_SCALE_IMAGE, minSize) #Face detect
  if len(faceRects) > 0:#If face array length > 0
    for faceRect in faceRects: #Draw a rectangle for every face
        xf, yf, wf, hf = faceRect
        x = int((float)(xf))
        y = int((float)(yf))
        w = int((float)(wf))
        h = int((float)(hf))
        cv2.rectangle(frame, (x, y), (x + w, y + h), color)
        cv2.circle(frame, ((int)(x + 1.2 * w / 4), (int)(y + h / 3)), min((int)(w / 8), (int)(h / 8)), (255, 0, 0))
        cv2.circle(frame, ((int)(x + 2.8 * w / 4), (int)(y + h / 3)), min((int)(w / 8), (int)(h / 8)), (255, 0, 0))
        #cv2.rectangle(frame, ((int)(x + 3 * w / 8, (int)(y + 3 * h / 4))), ((int)(x + 5 * w / 8), (int)(y + 7 * h / 8)), (255, 0, 0))
  cv2.imshow("test", frame) #Display image

  key = cv2.waitKey(10)
  c = chr(key & 255)
  if c in ['q', 'Q', chr(27)]:
    break

cv2.destroyWindow("test")
以上就是本文的全部内容,希望对大家的学习有所帮助,也希望大家多多支持。


 京公网安备 11010802041100号