作者:iflbicfb_6114756 | 来源:互联网 | 2018-04-18 20:03
NodeJS
byShahid Shaikh· June 29, 2014

I have already explained about Express.js tutorial and creating simple app with it. As promised in that post i thought to come up with another Express.js tutorial with MySQL. But again, explaining just the concept about library is not enough and this is not even whycodeforgeekexits. So i thought to come up with example and demo of real time frequent use thing which i can wrap around my tutorial and here it is – Facebook Status box using Node.js and MySQL.
Want to know about Express.js ?Read here.
If you want to view the demonstration of this app, you may see it in video down below. Since i do not have enough money to host Node.js demo online, i found YouTube best alternative to do that and of course you can download the source code for free from Github .
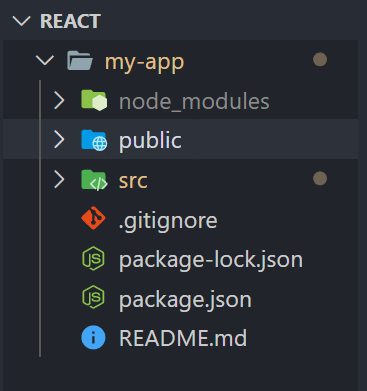
Directory Structure of Status Box:

Directory structure of Status box app.
In main folder there are 3 directories named as “ js “, “ node_modules “, “ views “. Server logic is placed in main folder as Server.js and of course package.json.
node_modules is automatically created by NPM after installing it.
JS -> handleDB.js : This file contains code to perform MySql operations and we are importing it in Server.js.
views->index.html : Normal HTML file with some DOM elements.
Define package.json:
Package.json is a file which contains every information about your app like Name, version, author and above all dependencies which your app to run. Package.json file made deployment of Node.js app very quick and easy.
File: package.json
| 1 2 3 4 5 6 7 8 9 10 | { "name": "fbstatus-app", "version": "1.0.0", "dependencies": { "express": "~4.0.0", "mysql":"*", "ejs": "~1.0.0" } } |
Installing dependencies of Facebook status box app:
I hope you have created any folder and placed package.json. Switch to that folder using command prompt using CD command and type:
npm install
That’s it. Wait for some time and let NPM install everything for you.
Server.js implementation:
Time to do some real stuff. Create file and name it as Server.js and put below code in it.
| 1 2 3 4 5 6 7 | var express = require ( 'express' ) ; var url = require ( 'url' ) ; var db = require ( './js/handleDB' ) ; var app = express ( ) ; app. set ( 'views' , __dirname + '/views' ) ; app. set ( 'view engine' , 'ejs' ) ; app.engine('html', require('ejs') .renderFile); |
From line 1 to line 3 we are simply importing libraries which we have installed in node_modules. in line 4 we are creating our express app. from line 4 to line 7 we are telling node to set “View” path (concept of MVC pattern) to folder named as “views”. Since we want to send HTML file in response to HTTP request we are going to need EJS to render HTML file and that’s what we did in line 6,7.
Implementing Router to handle HTTP Request:
To handle request such as “user want to see home page” or “user want to add status” we need router (which router request to particular function written to fulfill that request). So here is simple express.js router in Server.js file.
app.all(“*”,function(req,res){
//Code to handle router
});
You can use app.get or app.post for this as well but since i need to access different router and want to wrap it in single switch case i am using app.all(). Inside this function you can use URL variable and determine whether user request “homepage” from browser or user hit the DOM elements, all up to you. To handle Facebook status app router i am using following code.
| 1 2 3 4 5 6 7 8 9 10 11 12 13 14 15 | app. all ( '*' , function ( req , res ) { var path = url. parse ( req. url ) . pathname ; if ( path == "/" ) { //it means app is loaded with no additional URL parameter. //e.g: http://localhost:3000 and on it we will return HTML page. res. render ( "index.html" ) ; } else if ( path == "/add" ) { var status = url. parse ( req. url , true ) . query ; //This line will get the textarea value written in HTML page (that value is status update) db. add_status ( status , res ) ; //here we have called function to add status into DB. } }); |
Now to start our app and listen to request add these line in Server.js file and save it.
app.listen(3000);
Create View ( Just HTML page ):
Okay so let’s create front-end of our app. Oh yes we need one box on which user will type status and hit on “Add Status” button. We have to deal with click event in order to capture and send request to our Server.js to perform other functions. And when it’s about to handle events, jquery is always a Savior.
File : index.html ( Stored in Views folder )
| 1 2 3 4 5 6 7 8 9 10 11 12 13 14 15 16 | Facebook Status Update using Node.JS and MySQL |
HTML part is very easy and i don’t find any reason to explain it though. Javascript part is however different story. In click function we are hitting the URL with POST function and that URL is gonna be capture by Server and calls DB function.
Hey What about Database 
Okay time to create back-end. No big deal i hope you have Phpmyadmin installed in your system. Just go there and create any database and inside create one table with three rows. I have given name to database as “fbstatus” and table as “ status “. inside “status” table i have created three rows ( status_id , s_text , t_status ) where ID is auto generated and text_t is of TEXT data type, t_status is time-stamp field.
Handle Database functions:
In Server.js file i have import handleDB which is stored in JS folder. Here is a code of handleDB.js. file name: HandleDB.js (stored in JS folder)
| 1 2 3 4 5 6 7 8 9 10 11 12 13 14 15 16 17 18 19 20 21 | var db = require ( 'mysql' ) ; var cOnnection= db. createConnection ( { host : "localhost" , user : "root" , password : "" , database : "fbstatus" } ) ; module. exports = { add_status : function ( s , res ) { var query = "insert into status(s_text,t_status) values ('" + s. status + "',CURRENT_TIMESTAMP)" ; connection. query ( query , function ( err , rows ) { if ( err ) { console. log ( "Connot execute" ) ; } else { console. log ( "Status " + s. status + " is been added to Database" ) ; res. end ( "Yes" ) ; } } ) ; } }; |
If you have different mysql credentials than mine then just update it in code.
All done ! Let’s run.
Okay time to run the code. No big deal just switch to that folder which you have created (mine is “fb status update”) and type “node Server.js”. You may access your app at http://localhost:3000 via any web browser.


 京公网安备 11010802041100号