1. 概念
比较并交换(compare and swap,CAS),是原⼦操作的⼀种,可⽤于在多线程编程中实现不被打断的数据交换操作,从而避免多线程同时改写某⼀数据时由于执行顺序不确定性以及中断的不可预知性产⽣的数据不一致问题。
有了CAS,我们就可以用它来实现各种无锁(lock free)的数据结构。
2. 实现原理
该操作通过将内存中的值与指定数据进行比较,当数值⼀样时将内存中的数据替换为新的值。
实现方式1:
//输入reg的地址,判断reg的值与oldval是否相等
//如果相等,那么就将newval赋值给reg;否则reg保持不变
//最终将reg原先的值返回回去int compare_and_swap(int *reg, int oldval, int newval)
{int old_ref_val = *reg;if(old_reg_val == oldval)*reg = newval;return old_reg_val;
}
实现方式2:
//输入一个pAddr的地址,在函数内部判断其的值是否与期望值nExpected相等
//如果相等那么就将pAddr的值改为nNew并同时返回true;否则就返回false,什么都不做bool compare_and_swap(int *pAddr, int nExpected, int nNew)
{if(*pAddr == nExpected){*pAddr = nNew;return true;}elsereturn false;
}
在上面的两种实现中第二种形式更好,因为它返回bool值让调用者知道是否更新成功。
3. 应用层实现
因为CAS是原子操作,所以在各种库的原子库中都有对应的CAS实现方式。
3.1 gcc/g++中的CAS
对于gcc、g++编译器来讲,其原子操作中包含下面两个函数,是专门用来做CAS的:
bool __sync_bool_compare_and_swap (type *ptr, type oldval type newval, ...);
type __sync_val_compare_and_swap (type *ptr, type oldval type newval, ...);
3.2 windows下的CAS
在Windows下,你可以使用下面的Windows API来完成CAS:
InterlockedCompareExchange ( __inout LONG volatile *Target,__in LONG Exchange,__in LONG Comperand);
3.3 c++中的CAS
C++11标准库引入了原子操作,包含在头文件中,下面是专门用于CAS操作的接口:
template
bool atomic_compare_exchange_weak( std::atomic* obj,T* expected, T desired );
template
bool atomic_compare_exchange_weak( volatile std::atomic* obj,T* expected, T desired );
4. 无锁队列的实现
此处我们只考虑队列出队列和进队列的并发问题:
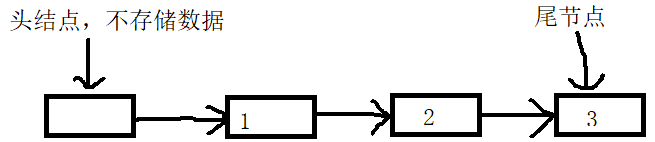
- 出队列:出队列时,要保证只有一个线程在对头结点进行出队列的操作,否则就会发生错乱
- 入队列:入队列时,也一样,保证只有一个线程在对尾节点进行入队列的操作,否则就会发生错乱
4.1 代码实现
queue_cas.h
//queue_cas.h
#include template
class Queue
{
public:Queue();                  //构造函数~Queue();                 //析构函数
public:void push(ElemType elem); //入队列bool pop();               //出队列void show();              //打印队列的内容
private:struct _qNode             //队列节点{_qNode(): _next(nullptr) { } _qNode(ElemType elem): _elem(elem), _next(nullptr) { } ElemType       _elem;struct _qNode *_next;};
private:struct _qNode *_head;    //头结点struct _qNode *_tail;    //尾节点
};template
Queue::Queue()
{_head = _tail =new _qNode();
}template
Queue::~Queue()
{while(_head != nullptr){struct _qNode *tempNode = _head;_head = _head->_next;delete tempNode;}
}template
void Queue::push(ElemType elem)
{//创建一个新的节点struct _qNode *newNode = new struct _qNode(elem);struct _qNode *p = _tail;struct _qNode *oldp = _tail;do{while(p->_next != nullptr)p = p->_next;} while(__sync_bool_compare_and_swap(&_tail->_next, nullptr, newNode) != true);__sync_bool_compare_and_swap(&_tail, oldp, newNode);
}template
bool Queue::pop()
{struct _qNode *p;do {p = _head;if(p->_next == nullptr)return false;} while(__sync_bool_compare_and_swap(&_head, p , p->_next) != true);delete p;return true;
}template
void Queue::show()
{struct _qNode* tempNode &#61; _head->_next;if(tempNode &#61;&#61; nullptr){std::cout <<"Empty" <_elem <<" ";tempNode &#61; tempNode->_next;}std::cout <}
上面为无锁队列的实现代码&#xff0c;我们假定此队列中头结点不存储数据(当做哨兵)&#xff0c;尾节点存储数据
其使用到CAS的核心函数就是push()和pop()函数&#xff0c;在下面我们将_sync_bool_compare_and_swap()函数调用称之为CAS操作。
push()如下&#xff1a;
- 假设线程T1和T2都执行push()函数&#xff0c;当线程T1先执行do-while中的CAS操作然后发现其尾节点后为空&#xff0c;于是就执行do-while中的CAS操作将尾节点_tail的_next指针赋值为newNode&#xff0c;然后退出do-while循环&#xff0c;调用第二个CAS操作将尾节点指针向后移动一位
- 由于CAS是一个原子操作&#xff0c;所以即使同时T2线程了也调用了do-while中的CAS操作&#xff0c;但是其判断p->_next不为空&#xff0c;因为T1线程已经将尾节点向后移动了&#xff0c;所以其只能继续执行do&#xff0c;将p向后移动&#xff0c;重新移动到尾节点继续重新判断&#xff0c;直到成功为止....
- 为什么push()函数的最后一个CAS操作不需要判断是否执行成功&#xff0c;因为&#xff1a;
如果有一个线程T1&#xff0c;它的while中的CAS如果成功的话&#xff0c;那么其它所有的随后线程的CAS都会失败&#xff0c;然后就会再循环
此时&#xff0c;如果T1线程还没有更新tail指针&#xff0c;其它的线程继续失败&#xff0c;因为tail->next不是NULL了
直到T1线程更新完tail指针&#xff0c;于是其它的线程中的某个线程就可以得到新的tail指针&#xff0c;继续往下走了
- do作用域中为什么要使用while将p指针向后移动&#xff1a;
假设T1线程在调用第二个CAS操作更新_tail指针之前&#xff0c;T1线程停掉或者挂掉了&#xff0c;那么其它线程就会进入死循环
template
void Queue::push(ElemType elem)
{//创建一个新的节点struct _qNode *newNode &#61; new struct _qNode(elem);struct _qNode *p &#61; _tail;struct _qNode *oldp &#61; _tail;do{//不断的向后指&#xff0c;直到直到尾节点为止while(p->_next !&#61; nullptr)p &#61; p->_next;} while(__sync_bool_compare_and_swap(&p->_next, nullptr, newNode) !&#61; true); //如果p没有移动到真正的尾节点上&#xff0c;那么继续执行do//当CAS函数执行成功之后&#xff0c;那么执行这个CAS函数&#xff0c;将尾节点指针向后移动1位__sync_bool_compare_and_swap(&_tail, oldp, newNode);
}
pop()如下&#xff1a;
- 原理与push()同理&#xff0c;假设线程T1和线程T2都执行pop()操作&#xff0c;假设T1先执行CAS操作将_head向后移动了一位&#xff0c;并且删除了原先的头指针
- 那么当T2再执行时发现T1更新过后的_head指针(移动了)与一开始获取的头指针p不相等了&#xff0c;那么就继续执行do作用域重新获取头指针&#xff0c;然后重新进行CAS操作
template
bool Queue::pop()
{struct _qNode *p;do {//获取_head指针p &#61; _head;if(p->_next &#61;&#61; nullptr)return false;} while(__sync_bool_compare_and_swap(&_head, p , p->_next) !&#61; true); //判断头结点是否被移动过&#xff0c;如果移动过那么就执行do内部重新获取_head指针//删除头指针delete p;return true;
}
4.2 测试代码
//queue_cas_test.cpp
#include "queue_cas.h"int main()
{Queue queue;queue.push(1);queue.push(2);queue.push(3);queue.show();queue.pop();queue.show();queue.pop();queue.show();queue.pop();queue.show();queue.push(1);queue.show();queue.push(2);queue.show();
}
编译运行&#xff1a;
[root&#64;192 CAS]# g&#43;&#43; queue_cas.cpp -o queue_cas
[root&#64;192 CAS]# ls
queue_cas queue_cas.cpp queue_cas.h
[root&#64;192 CAS]# ./queue_cas
1 2 3
2 3
3
Empty
1
1 2
[root&#64;192 CAS]#
5. 无锁队列性能测试
5.1 stl库中的queue
#include
#include
#include
#include
#include using namespace std;#define FOR_LOOP_NUM 10000000 //队列push和pop操作函数中for循环的次数static std::queue _queue; //队列
static std::mutex _mutex; //队列操作要用到的互斥锁static int push_count; //队列总共push的次数
static int pop_count; //队列总共pop的次数typedef void *(*thread_func_t)(void *arg);void *queue_push(void *arg)
{for(int i &#61; 0; i }void *queue_pop(void *arg)
{while(true){_mutex.lock();if(_queue.size() > 0){_queue.pop();pop_count&#43;&#43;;}_mutex.unlock();if(pop_count >&#61; FOR_LOOP_NUM)break;}return NULL;
}void test_queue(thread_func_t push_func, thread_func_t pop_func, void *arg)
{clock_t start &#61; clock();pthread_t push_tid;if(pthread_create(&push_tid, NULL, push_func, arg) !&#61; 0){perror("pthread_create");}pthread_t pop_tid;if(pthread_create(&pop_tid, NULL, pop_func, arg) !&#61; 0){perror("pthread_create");}pthread_join(push_tid, NULL);pthread_join(pop_tid, NULL);clock_t end &#61; clock();printf("spend clock: %ld\n", (end - start) / CLOCKS_PER_SEC);
}int main()
{push_count &#61; 0;pop_count &#61; 0;test_queue(queue_push, queue_pop, NULL);printf("push_count:%d, pop_count:%d\n", push_count, pop_count);return 0;
}
编译运行&#xff1a;
[root&#64;192 queue_stl]# g&#43;&#43; -lpthread queue_stl.cpp -o queue_stl
[root&#64;192 queue_stl]# ls
queue_stl queue_stl.cpp
[root&#64;192 queue_stl]# ./queue_stl
spend clock: 15
push_count:10000000, pop_count:10000000
[root&#64;192 queue_stl]# ./queue_stl
spend clock: 16
push_count:10000000, pop_count:10000000
[root&#64;192 queue_stl]# ./queue_stl
spend clock: 15
push_count:10000000, pop_count:10000000
[root&#64;192 queue_stl]# ./queue_stl
spend clock: 14
push_count:10000000, pop_count:10000000
[root&#64;192 queue_stl]# ./queue_stl
spend clock: 17
push_count:10000000, pop_count:10000000
[root&#64;192 queue_stl]#
5.2 无锁队列
#include
#include
#include
#include "queue_cas.h"using namespace std;#define FOR_LOOP_NUM 10000000 //队列push和pop操作函数中for循环的次数static int push_count; //队列总共push的次数
static int pop_count; //队列总共pop的次数static Queue _queue;typedef void *(*thread_func_t)(void *arg);void *queue_push(void *arg)
{for(int i &#61; 0; i }void *queue_pop(void *arg)
{while(true){_queue.pop();pop_count&#43;&#43;;if(pop_count >&#61; FOR_LOOP_NUM)break;}return NULL;
}void test_queue(thread_func_t push_func, thread_func_t pop_func, void *arg)
{clock_t start &#61; clock();pthread_t push_tid;if(pthread_create(&push_tid, NULL, push_func, arg) !&#61; 0){perror("pthread_create");}pthread_t pop_tid;if(pthread_create(&pop_tid, NULL, pop_func, arg) !&#61; 0){perror("pthread_create");}pthread_join(push_tid, NULL);pthread_join(pop_tid, NULL);clock_t end &#61; clock();printf("spend clock: %ld\n", (end - start) / CLOCKS_PER_SEC);
}int main()
{push_count &#61; 0;pop_count &#61; 0;test_queue(queue_push, queue_pop, NULL);printf("push_count:%d, pop_count:%d\n", push_count, pop_count);return 0;
}
编译运行&#xff1a;
[root&#64;192 CAS]# g&#43;&#43; -lpthread queue_cas.cpp -o queue_cas
[root&#64;192 CAS]# ls
queue_cas queue_cas.cpp queue_cas.h queue_stl
[root&#64;192 CAS]# ./queue_cas
spend clock: 1
push_count:10000000, pop_count:10000000
[root&#64;192 CAS]# ./queue_cas
spend clock: 2
push_count:10000000, pop_count:10000000
[root&#64;192 CAS]# ./queue_cas
spend clock: 1
push_count:10000000, pop_count:10000000
[root&#64;192 CAS]# ./queue_cas
spend clock: 1
push_count:10000000, pop_count:10000000
[root&#64;192 CAS]# ./queue_cas
spend clock: 1
push_count:10000000, pop_count:10000000
[root&#64;192 CAS]# ./queue_cas
spend clock: 2
push_count:10000000, pop_count:10000000
[root&#64;192 CAS]#
对比发现&#xff0c;无锁队列的效率更高。


 京公网安备 11010802041100号