本文实例讲述了android动态布局之动态加入TextView和ListView的方法。分享给大家供大家参考。具体实现方法如下:
package org.guoshi;
import java.util.ArrayList;
import java.util.HashMap;
import java.util.List;
import java.util.Map;
import org.guoshi.adapter.ImageAndTextAdapter;
import android.app.Activity;
import android.graphics.Color;
import android.os.Bundle;
import android.util.Log;
import android.view.View;
import android.view.View.OnClickListener;
import android.view.ViewGroup.LayoutParams;
import android.widget.LinearLayout;
import android.widget.ListAdapter;
import android.widget.ListView;
import android.widget.RelativeLayout;
import android.widget.TextView;
public class Main extends Activity {
/** Called when the activity is first created. */
@Override
public void onCreate(Bundle savedInstanceState) {
super.onCreate(savedInstanceState);
setContentView(R.layout.friend_info_view);
final LinearLayout linearLayout = (LinearLayout) findViewById(R.id.groups);
final ListView lv = new ListView(this);
List> data = new ArrayList>();
Map map = new HashMap();
map.put("title", "jayqean");
map.put("imgsrc", R.drawable.icon);
data.add(map);
ListAdapter adapter = new ImageAndTextAdapter(Main.this, data, R.layout.chats_view_item, new String[] { "title", "imgsrc" }, new int[] {
R.id.chats_view_name,
R.id.chats_view_item_image });
lv.setAdapter(adapter);
final TextView tv1 = new TextView(this);
tv1.setText("常用联系人");
tv1.setId(1);
final RelativeLayout.LayoutParams lp1 = new RelativeLayout.LayoutParams(LayoutParams.FILL_PARENT, LayoutParams.WRAP_CONTENT);
lp1.addRule(RelativeLayout.BELOW, R.id.groups);
tv1.setLayoutParams(lp1);
tv1.setBackgroundColor(R.color.group_view_background);
tv1.setOnClickListener(new OnClickListener() {
boolean flag = false;
@Override
public void onClick(View v) {
// TODO Auto-generated method stub
Log.d("tag", tv1.getText().toString());
if(!flag){
linearLayout.addView(lv, linearLayout.indexOfChild(tv1) + 1);
// lp1.addRule(RelativeLayout.BELOW, 1);
// linearLayout.addView(lv, lp1);
flag = true;
} else{
linearLayout.removeView(lv);
flag = false;
}
}
});
linearLayout.addView(tv1, lp1);
// 线性布局 通过参数index控制加入的控件的位置
// ------------------------
// 加入分割线
final TextView line = new TextView(this);
line.setLayoutParams(new LayoutParams(LayoutParams.FILL_PARENT, 1));
line.setBackgroundColor(Color.WHITE);
linearLayout.addView(line, 1);
// ------------------------
final ListView lv2 = new ListView(this);
List> data2 = new ArrayList>();
Map map2 = new HashMap();
map2.put("title", "xiaobei");
map2.put("imgsrc", R.drawable.icon);
data2.add(map2);
ListAdapter adapter2 = new ImageAndTextAdapter(Main.this, data2, R.layout.chats_view_item, new String[] { "title", "imgsrc" }, new int[] {
R.id.chats_view_name,
R.id.chats_view_item_image });
lv2.setAdapter(adapter2);
final TextView tv2 = new TextView(this);
tv2.setText("离线好友");
tv2.setLayoutParams(new LayoutParams(LayoutParams.FILL_PARENT, LayoutParams.WRAP_CONTENT));
tv2.setBackgroundColor(R.color.group_view_background);
tv2.setOnClickListener(new OnClickListener() {
boolean flag = false;
@Override
public void onClick(View v) {
// TODO Auto-generated method stub
Log.d("tag", tv2.getText().toString());
if(!flag){
linearLayout.addView(lv2, linearLayout.indexOfChild(tv2) + 1);
flag = true;
} else{
linearLayout.removeView(lv2);
flag = false;
}
}
});
linearLayout.addView(tv2, 2);
}
}
控制布局,可以通过RelativeLayout.LayoutParams类
final LinearLayout linearLayout = (LinearLayout) findViewById(R.id.groups);
final TextView tv1 = new TextView(this);
tv1.setText("常用联系人");
RelativeLayout.LayoutParams lp1 = new RelativeLayout.LayoutParams(LayoutParams.FILL_PARENT, LayoutParams.WRAP_CONTENT);
lp1.addRule(RelativeLayout.BELOW, R.id.groups);
tv1.setLayoutParams(lp1);
linearLayout.addView(tv1, lp1);
也可采用linearLayout.addView(tv1, 0); // 线性布局 通过参数index控制加入的控件的位置
package org.guoshi.adapter;
import java.util.List;
import java.util.Map;
import android.content.Context;
import android.graphics.Bitmap;
import android.graphics.BitmapFactory;
import android.util.Log;
import android.view.LayoutInflater;
import android.view.View;
import android.view.View.OnClickListener;
import android.view.ViewGroup;
import android.widget.Checkable;
import android.widget.ImageView;
import android.widget.SimpleAdapter;
import android.widget.TextView;
public class ImageAndTextAdapter extends SimpleAdapter {
private Context mcontext;
private int[] mTo;
private String[] mFrom;
private ViewBinder mViewBinder;
private List extends Map> mData;
private int mResource;
private LayoutInflater mInflater;
public ImageAndTextAdapter(Context context,
List extends Map> data, int resource, String[] from,
int[] to) {
super(context, data, resource, from, to);
mcontext = context;
mData = data;
mResource = resource;
mFrom = from;
mTo = to;
mInflater = (LayoutInflater) context
.getSystemService(Context.LAYOUT_INFLATER_SERVICE);
// mInflater = LayoutInflater.from(mcontext);
}
/**
* @see android.widget.Adapter#getView(int, View, ViewGroup)
*/
public View getView(int position, View convertView, ViewGroup parent) {
return createViewFromResource(position, convertView, parent, mResource);
}
private View createViewFromResource(int position, View convertView,
ViewGroup parent, int resource) {
View v;
if (convertView == null) {
v = mInflater.inflate(resource, parent, false);
final int[] to = mTo;
final int count = to.length;
final View[] holder = new View[count];
for (int i = 0; i holder[i] = v.findViewById(to[i]); } v.setTag(holder); } else { v = convertView; } bindView(position, v); // final int index = position; // v.setOnClickListener(new OnClickListener() { // // public void onClick(View v) { // // TODO Auto-generated method stub // Log.d("item", index + ""); // } // }); return v; } private void bindView(int position, View view) { final Map dataSet = mData.get(position); if (dataSet == null) { return; } final ViewBinder binder = mViewBinder; final View[] holder = (View[]) view.getTag(); final String[] from = mFrom; final int[] to = mTo; final int count = to.length; for (int i = 0; i final View v = holder[i]; if (v != null) { final Object data = dataSet.get(from[i]); String text = data == null ? "" : data.toString(); if (text == null) { text = ""; } boolean bound = false; if (binder != null) { bound = binder.setViewValue(v, data, text); } if (!bound) { if (v instanceof Checkable) { if (data instanceof Boolean) { ((Checkable) v).setChecked((Boolean) data); } else { throw new IllegalStateException(v.getClass() .getName() + " should be bound to a Boolean, not a " + data.getClass()); } } else if (v instanceof TextView) { setViewText((TextView) v, text); } else if (v instanceof ImageView) { if (data instanceof Integer) { setViewImage((ImageView) v, (Integer) data); } else { setViewImage((ImageView) v, text); } } else { throw new IllegalStateException( v.getClass().getName() + " is not a " + " view that can be bounds by this SimpleAdapter"); } } } } } /** * Called by bindView() to set the image for an ImageView but only if there * is no existing ViewBinder or if the existing ViewBinder cannot handle * binding to an ImageView. * * This method is called instead of {@link #setViewImage(ImageView, String)} * if the supplied data is an int or Integer. * * @param v * ImageView to receive an image * @param value * the value retrieved from the data set * * @see #setViewImage(ImageView, String) */ public void setViewImage(ImageView v, int value) { v.setImageResource(value); } /** * Called by bindView() to set the image for an ImageView but only if there * is no existing ViewBinder or if the existing ViewBinder cannot handle * binding to an ImageView. * * By default, the value will be treated as an image resource. If the value * cannot be used as an image resource, the value is used as an image Uri. * * This method is called instead of {@link #setViewImage(ImageView, int)} if * the supplied data is not an int or Integer. * * @param v * ImageView to receive an image * @param value * the value retrieved from the data set * * @see #setViewImage(ImageView, int) */ public void setViewImage(ImageView v, String value) { Bitmap bitMap = BitmapFactory.decodeFile(value); v.setImageBitmap(bitMap); } } 下面是friend_info_view.xml android:orientation="vertical" android:layout_width="fill_parent" android:layout_height="fill_parent" android:background="#ffffff"> android:layout_height="wrap_content"> android:adjustViewBounds="true" android:layout_width="@dimen/self_image_width" android:layout_height="@dimen/self_image_height" android:layout_marginLeft="5.0dip" android:layout_marginBottom="10.0dip" android:layout_marginTop="3.0dip" android:src="@drawable/default_image" /> android:layout_width="wrap_content" android:layout_height="wrap_content" android:src="@drawable/status_available" android:layout_marginLeft="8.0dip" android:layout_marginTop="20.0dip" android:layout_toRightOf="@id/selfImage" /> android:layout_height="wrap_content" android:layout_marginTop="20.0dip" android:layout_marginLeft="8.0dip" android:text="Tap here to set your status" android:layout_toRightOf="@+id/currentStatus" /> android:adjustViewBounds="true" android:layout_height="50dip" android:layout_width="fill_parent" android:text="Search..." /> android:layout_height="wrap_content" android:orientation="vertical" > chats_view_item.xml android:orientation="vertical" android:layout_width="fill_parent" android:layout_height="fill_parent" android:background="@color/white"> android:layout_width="wrap_content" android:layout_height="wrap_content"> android:layout_width="@dimen/friend_image_width" android:layout_height="@dimen/friend_image_height" android:paddingLeft="5.0dip" android:paddingTop="2.0dip" android:src="@drawable/default_image" /> android:paddingLeft="10.0dip" android:textStyle="bold" android:ellipsize="marquee" android:layout_width="wrap_content" android:layout_height="wrap_content" android:text="username" android:singleLine="true" android:paddingTop="2.0dip" android:layout_toRightOf="@+id/chats_view_item_image" /> android:layout_width="wrap_content" android:layout_height="wrap_content" android:paddingLeft="10.0dip" android:paddingTop="1.0dip" android:layout_below="@+id/chats_view_name" android:layout_toRightOf="@+id/chats_view_item_image" android:src="@drawable/jabber_available" /> android:textColor="@android:color/secondary_text_light" android:ellipsize="marquee" android:layout_width="fill_parent" android:layout_height="wrap_content" android:text="available" android:singleLine="true" android:paddingLeft="2.0dip" android:layout_toRightOf="@+id/friend_status_icon" android:layout_below="@+id/chats_view_name" /> 效果图如下: 希望本文所述对大家的Android程序设计有所帮助。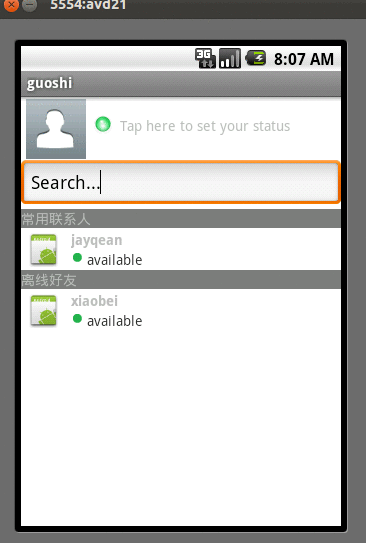

![[大整数乘法] java代码实现](https://img1.php1.cn/3cd4a/24c6f/9f3/0133bb25da242824.jpeg)


 京公网安备 11010802041100号 | 京ICP备19059560号-4 | PHP1.CN 第一PHP社区 版权所有