最近打算将现有项目的 Docker 部署到阿里云上面,但是之前是单机部署,现在阿里云上面有 3 台机器,所以想做一个 Docker 集群。之前考虑是用 Docker Swarm 来做这个事情的,不过后面看了一下现在 K8S 用的比较多,进而想在这三台机器上部署 K8S 集群。
下面附上 Kubernetes 介绍:
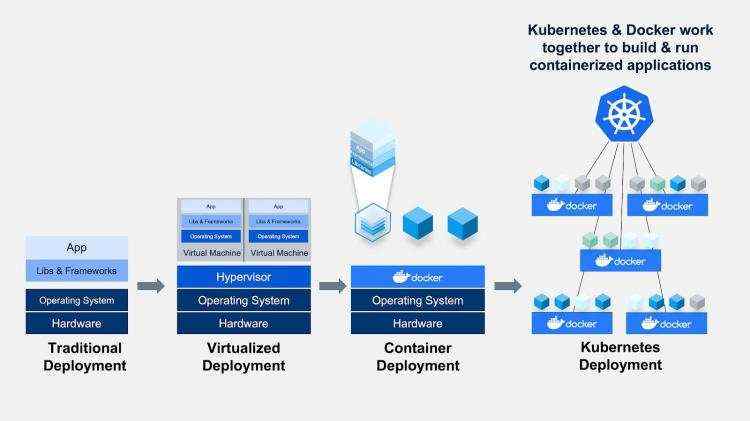
Kubernetes 是 Google 团队发起的开源项目,它的目标是管理跨多个主机的容器,提供基本的部署,维护以及运用伸缩,主要实现语言为 Go 语言。Kubernetes 是:
- 易学:轻量级,简单,容易理解
- 便携:支持公有云,私有云,混合云,以及多种云平台
- 可拓展:模块化,可插拔,支持钩子,可任意组合
- 自修复:自动重调度,自动重启,自动复制
看上去很牛掰的样子,下面我们就开始来部署吧。
万事开头难,本来如果没墙的话就没有这么多破事,首先我们要先配置好安装 Kubernetes 所需要的必备环境,这里我没有采用从零开始安装 Kubernetes 的方式,而是使用了 Kubeadm 来进行 K8S 集群的安装与配置。
关于如何在 CentOS 安装 Docker-CE 的文章大家可以看一下我 这篇文章 ,几分钟的事情就可以安装完毕。
安装 Kubeadm 首先我们要配置好阿里云的国内源,执行如下命令:
cat < /etc/yum.repos.d/kubernetes.repo
[kubernetes]
name=Kubernetes
baseurl=https://mirrors.aliyun.com/kubernetes/yum/repos/kubernetes-el7-x86_64
enabled=1
gpgcheck=0
EOF
之后呢,执行以下命令来重建 Yum 缓存:
yum -y install epel-release
yum clean all
yum makecache
下面就开始正式安装 Kubeadm 了:
yum -y install kubelet kubeadm kubectl kubernetes-cni不出意外的话,安装完成之后,我们执行以下命令来启用 Kubeadm 服务:
systemctl enable kubelet && systemctl start kubelet这里是重中之重,因为在国内的原因,无法访问到 Google 的镜像库,所以我们需要执行以下脚本来从 Docker Hub 仓库中获取相同的镜像,并且更改 TAG 让其变成与 Google 拉去镜像一致。
新建一个 Shell 脚本,填入以下代码之后保存。
#!/bin/bash
images=(kube-proxy-amd64:v1.11.0 kube-scheduler-amd64:v1.11.0 kube-controller-manager-amd64:v1.11.0 kube-apiserver-amd64:v1.11.0
etcd-amd64:3.2.18 coredns:1.1.3 pause-amd64:3.1 kubernetes-dashboard-amd64:v1.8.3 k8s-dns-sidecar-amd64:1.14.9 k8s-dns-kube-dns-amd64:1.14.9
k8s-dns-dnsmasq-nanny-amd64:1.14.9 )
for imageName in ${images[@]} ; do
docker pull keveon/$imageName
docker tag keveon/$imageName k8s.gcr.io/$imageName
docker rmi keveon/$imageName
done
# 个人新加的一句,V 1.11.0 必加
docker tag da86e6ba6ca1 k8s.gcr.io/pause:3.1
注:这里我就遇到过一个坑,原作者是根据 1.10 来的,然后在
kubeadm init执行的时候一直报错,说找不到镜像。之后镜像版本是下载对了,但还是在[init] this might take a minute or longer if the control plane images have to be pulled这一句卡住,在国外的 VPS 测试之后,发现多了一个 k8s.gcr.io/pause:3.1 镜像,他的 ID 其实与 pause-amd64:3.1 一样,然后加了一个新的 TAG 之后,正常部署。
保存之后记得用 chmod 命令赋予 Shell 脚本可执行权限:
chmod -R 777 ./xxx.shsudo swapoff -a
#要永久禁掉swap分区,打开如下文件注释掉swap那一行
# sudo vi /etc/fstab# 临时禁用selinux
# 永久关闭 修改/etc/sysconfig/selinux文件设置
sed -i 's/SELINUX=permissive/SELINUX=disabled/' /etc/sysconfig/selinux
# 这里按回车,下面是第二条命令
setenforce 0# 配置转发相关参数,否则可能会出错
cat < /etc/sysctl.d/k8s.conf
net.bridge.bridge-nf-call-ip6tables = 1
net.bridge.bridge-nf-call-iptables = 1
vm.swappiness=0
EOF
# 这里按回车,下面是第二条命令
sysctl --system 如果你做好了准备工作,后面的一切都是小菜一碟。
要初始化镜像,请运行以下命令:
kubeadm init --kubernetes-version=v1.11.0 --pod-network-cidr=10.244.0.0/16前面是版本号,后面是你 POD 网络的 IP 段。
执行之后,你大概会得到与我相近的输出:
I0712 10:46:30.938979   13461 feature_gate.go:230] feature gates: &{map[]}
[init] using Kubernetes version: v1.11.0
[preflight] running pre-flight checks
I0712 10:46:30.961005   13461 kernel_validator.go:81] Validating kernel version
I0712 10:46:30.961061   13461 kernel_validator.go:96] Validating kernel config
    [WARNING SystemVerification]: docker version is greater than the most recently validated version. Docker version: 18.03.1-ce. Max validated version: 17.03
    [WARNING Hostname]: hostname "g2-apigateway" could not be reached
    [WARNING Hostname]: hostname "g2-apigateway" lookup g2-apigateway on 100.100.2.138:53: no such host
[preflight/images] Pulling images required for setting up a Kubernetes cluster
[preflight/images] This might take a minute or two, depending on the speed of your internet connection
[preflight/images] You can also perform this action in beforehand using 'kubeadm config images pull'
[kubelet] Writing kubelet environment file with flags to file "/var/lib/kubelet/kubeadm-flags.env"
[kubelet] Writing kubelet configuration to file "/var/lib/kubelet/config.yaml"
[preflight] Activating the kubelet service
[certificates] Generated ca certificate and key.
[certificates] Generated apiserver certificate and key.
[certificates] apiserver serving cert is signed for DNS names [g2-apigateway kubernetes kubernetes.default kubernetes.default.svc kubernetes.default.svc.cluster.local] and IPs [10.96.0.1 172.16.8.62]
[certificates] Generated apiserver-kubelet-client certificate and key.
[certificates] Generated sa key and public key.
[certificates] Generated front-proxy-ca certificate and key.
[certificates] Generated front-proxy-client certificate and key.
[certificates] Generated etcd/ca certificate and key.
[certificates] Generated etcd/server certificate and key.
[certificates] etcd/server serving cert is signed for DNS names [g2-apigateway localhost] and IPs [127.0.0.1 ::1]
[certificates] Generated etcd/peer certificate and key.
[certificates] etcd/peer serving cert is signed for DNS names [g2-apigateway localhost] and IPs [172.16.8.62 127.0.0.1 ::1]
[certificates] Generated etcd/healthcheck-client certificate and key.
[certificates] Generated apiserver-etcd-client certificate and key.
[certificates] valid certificates and keys now exist in "/etc/kubernetes/pki"
[kubeconfig] Wrote KubeConfig file to disk: "/etc/kubernetes/admin.conf"
[kubeconfig] Wrote KubeConfig file to disk: "/etc/kubernetes/kubelet.conf"
[kubeconfig] Wrote KubeConfig file to disk: "/etc/kubernetes/controller-manager.conf"
[kubeconfig] Wrote KubeConfig file to disk: "/etc/kubernetes/scheduler.conf"
[controlplane] wrote Static Pod manifest for component kube-apiserver to "/etc/kubernetes/manifests/kube-apiserver.yaml"
[controlplane] wrote Static Pod manifest for component kube-controller-manager to "/etc/kubernetes/manifests/kube-controller-manager.yaml"
[controlplane] wrote Static Pod manifest for component kube-scheduler to "/etc/kubernetes/manifests/kube-scheduler.yaml"
[etcd] Wrote Static Pod manifest for a local etcd instance to "/etc/kubernetes/manifests/etcd.yaml"
[init] waiting for the kubelet to boot up the control plane as Static Pods from directory "/etc/kubernetes/manifests"
[init] this might take a minute or longer if the control plane images have to be pulled
[apiclient] All control plane components are healthy after 41.001672 seconds
[uploadconfig] storing the configuration used in ConfigMap "kubeadm-config" in the "kube-system" Namespace
[kubelet] Creating a ConfigMap "kubelet-config-1.11" in namespace kube-system with the configuration for the kubelets in the cluster
[markmaster] Marking the node g2-apigateway as master by adding the label "node-role.kubernetes.io/master=''"
[markmaster] Marking the node g2-apigateway as master by adding the taints [node-role.kubernetes.io/master:NoSchedule]
[patchnode] Uploading the CRI Socket information "/var/run/dockershim.sock" to the Node API object "g2-apigateway" as an annotation
[bootstraptoken] using token: o337m9.ceq32wg9g2gro7gx
[bootstraptoken] configured RBAC rules to allow Node Bootstrap tokens to post CSRs in order for nodes to get long term certificate credentials
[bootstraptoken] configured RBAC rules to allow the csrapprover controller automatically approve CSRs from a Node Bootstrap Token
[bootstraptoken] configured RBAC rules to allow certificate rotation for all node client certificates in the cluster
[bootstraptoken] creating the "cluster-info" ConfigMap in the "kube-public" namespace
[addons] Applied essential addon: CoreDNS
[addons] Applied essential addon: kube-proxy

Your Kubernetes master has initialized successfully!

To start using your cluster, you need to run the following as a regular user:

  mkdir -p $HOME/.kube
  sudo cp -i /etc/kubernetes/admin.conf $HOME/.kube/config
  sudo chown $(id -u):$(id -g) $HOME/.kube/config

You should now deploy a pod network to the cluster.
Run "kubectl apply -f [podnetwork].yaml" with one of the options listed at:
  https://kubernetes.io/docs/concepts/cluster-administration/addons/

You can now join any number of machines by running the following on each node
as root:

kubeadm join 172.16.8.62:6443 --token o337m9.ceq32wg9g2gro7gx --discovery-token-ca-cert-hash sha256:e8adc6dc2bbe6bd18569c73e4c0468b4652655e7c5c97209a9ec214beac55ea3export KUBECOnFIG=/etc/kubernetes/admin.conf
# 如果你想持久化的话,直接执行以下命令【推荐】
echo "export KUBECOnFIG=/etc/kubernetes/admin.conf" >> ~/.bash_profile请依次执行以下命令:
mkdir -p /etc/cni/net.d/cat < /etc/cni/net.d/10-flannel.conf
{
“name”: “cbr0”,
“type”: “flannel”,
“delegate”: {
“isDefaultGateway”: true
}
}
EOF mkdir /usr/share/oci-umount/oci-umount.d -pmkdir /run/flannel/cat < /run/flannel/subnet.env
FLANNEL_NETWORK=10.244.0.0/16
FLANNEL_SUBNET=10.244.1.0/24
FLANNEL_MTU=1450
FLANNEL_IPMASQ=true
EOF 最后,我们需要新建一个 flannel.yml 文件,内容如下:
---
kind: ClusterRole
apiVersion: rbac.authorization.k8s.io/v1beta1
metadata:
  name: flannel
rules:
  - apiGroups:
      - ""
    resources:
      - pods
    verbs:
      - get
  - apiGroups:
      - ""
    resources:
      - nodes
    verbs:
      - list
      - watch
  - apiGroups:
      - ""
    resources:
      - nodes/status
    verbs:
      - patch
---
kind: ClusterRoleBinding
apiVersion: rbac.authorization.k8s.io/v1beta1
metadata:
  name: flannel
roleRef:
  apiGroup: rbac.authorization.k8s.io
  kind: ClusterRole
  name: flannel
subjects:
- kind: ServiceAccount
  name: flannel
  namespace: kube-system
---
apiVersion: v1
kind: ServiceAccount
metadata:
  name: flannel
  namespace: kube-system
---
kind: ConfigMap
apiVersion: v1
metadata:
  name: kube-flannel-cfg
  namespace: kube-system
  labels:
    tier: node
    app: flannel
data:
  cni-conf.json: |
    {
      "name": "cbr0",
      "type": "flannel",
      "delegate": {
        "isDefaultGateway": true
      }
    }
  net-conf.json: |
    {
      "Network": "10.244.0.0/16",
      "Backend": {
        "Type": "vxlan"
      }
    }
---
apiVersion: extensions/v1beta1
kind: DaemonSet
metadata:
  name: kube-flannel-ds
  namespace: kube-system
  labels:
    tier: node
    app: flannel
spec:
  template:
    metadata:
      labels:
        tier: node
        app: flannel
    spec:
      hostNetwork: true
      nodeSelector:
        beta.kubernetes.io/arch: amd64
      tolerations:
      - key: node-role.kubernetes.io/master
        operator: Exists
        effect: NoSchedule
      serviceAccountName: flannel
      initContainers:
      - name: install-cni
        image: quay.io/coreos/flannel:v0.9.1-amd64
        command:
        - cp
        args:
        - -f
        - /etc/kube-flannel/cni-conf.json
        - /etc/cni/net.d/10-flannel.conf
        volumeMounts:
        - name: cni
          mountPath: /etc/cni/net.d
        - name: flannel-cfg
          mountPath: /etc/kube-flannel/
      containers:
      - name: kube-flannel
        image: quay.io/coreos/flannel:v0.9.1-amd64
        command: [ "/opt/bin/flanneld", "--ip-masq", "--kube-subnet-mgr" ]
        securityContext:
          privileged: true
        env:
        - name: POD_NAME
          valueFrom:
            fieldRef:
              fieldPath: metadata.name
        - name: POD_NAMESPACE
          valueFrom:
            fieldRef:
              fieldPath: metadata.namespace
        volumeMounts:
        - name: run
          mountPath: /run
        - name: flannel-cfg
          mountPath: /etc/kube-flannel/
      volumes:
        - name: run
          hostPath:
            path: /run
        - name: cni
          hostPath:
            path: /etc/cni/net.d
        - name: flannel-cfg
          configMap:
            name: kube-flannel-cfg
执行:
kubectl create -f ./flannel.yml执行完成之后,我们可以运行一下命令,查看现在的节点信息:
kubectl get nodes会得到类似于下面的输出:
NAME               STATUS    ROLES     AGE       VERSION
g2-master           Ready     master    46m       v1.11.0
好了,我们主机已经配置完成。
Node 节点所需要做的都在 准备工作 里面,做完之后直接执行刚刚主机输出的:
kubeadm join 172.16.8.62:6443 --token o337m9.ceq32wg9g2gro7gx --discovery-token-ca-cert-hash sha256:e8adc6dc2bbe6bd18569c73e4c0468b4652655e7c5c97209a9ec214beac55ea3执行完就 OK 了。
然后我们回到 62 主机服务器,我刚刚在两个从属的服务器执行了以上命令,然后运行:
kubectl get nodes得到输出:
NAME               STATUS    ROLES     AGE       VERSION
g2-master           Ready     master    46m       v1.11.0
g2-node1            Ready         41m       v1.11.0
g2-node2 Ready 41m v1.11.0 Kuberentes 配置 DashBoard 也不简单,当然你可以使用官方的 dashboard 的 yaml 文件进行部署,也可以使用 Mr.Devin 这位博主所提供的修改版,避免踩坑。
地址在:https://github.com/gh-Devin/kubernetes-dashboard,将这些 Yaml 文件下载下来,在其目录下(注意在 Yaml 文件所在目录),执行以下命令:
kubectl -n kube-system create -f .启动 Dashboard 所需要的所有容器。
访问你 MASTER 主机的 IP:30090,可以看到如下界面:
会发现报错。。。看不到容器,这个时候你需要新建一个 dashboard-admin.yaml 文件,然后填充如下内容:
apiVersion: rbac.authorization.k8s.io/v1beta1
kind: ClusterRoleBinding
metadata:
  name: kubernetes-dashboard
  labels:
    k8s-app: kubernetes-dashboard
roleRef:
  apiGroup: rbac.authorization.k8s.io
  kind: ClusterRole
  name: cluster-admin
subjects:
- kind: ServiceAccount
  name: kubernetes-dashboard
  namespace: kube-system
填好之后呢,执行如下命令启动容器:
kubectl -f ./dashboard-admin.yaml create再次访问,正常了。
参考资料:https://www.kubernetes.org.cn/3805.html
Dashboard Web-UI 配置 :https://www.kubernetes.org.cn/3834.html
Dashboard 问题解决:https://medium.com/@osamasaad_94885/i-got-it-to-work-finally-27514babede3


 京公网安备 11010802041100号 | 京ICP备19059560号-4 | PHP1.CN 第一PHP社区 版权所有