在4台服务器上的/etc/hosts上配置上相应的ip地址和主机名的映射
配置互信,保证tdsql4可以将安装包无密码推送到其它服务器上
[root@tdsql4 ~]# ssh-keygen -t rsa
[root@tdsql4 ~]# ssh-copy-id tdsql1
[root@tdsql4 ~]# ssh-copy-id tdsql2
[root@tdsql4 ~]# ssh-copy-id tdsql3
[root@tdsql4 ~]# ssh-copy-id tdsql4
在每个服务器上配置/data,/data1两个磁盘,每个磁盘至少100G
[root@tdsql4 ~]# df -h
Filesystem               Size  Used Avail Use% Mounted on
/dev/mapper/centos-root   20G  6.9G   14G  35% /
devtmpfs                 7.9G     0  7.9G   0% /dev
tmpfs                    7.9G     0  7.9G   0% /dev/shm
tmpfs                    7.9G  8.9M  7.9G   1% /run
tmpfs                    7.9G     0  7.9G   0% /sys/fs/cgroup
/dev/sr0                 4.3G  4.3G     0 100% /mnt/cdrom
/dev/sda1                5.0G  132M  4.9G   3% /boot
/dev/mapper/vg-data1     100G   33M  100G   1% /data1
/dev/mapper/vg-data      100G  586M  100G   1% /data
tmpfs                    1.6G     0  1.6G   0% /run/user/0
安装TDSQL数据库集群环境,主要用到以下3个安装包
[root@tdsql4 ~]# ls
ansible_install    tdsql_install  tdsql_packet
二、配置安装前的环境
[root@tdsql4 script]# ls -l ansible_install/script/
total 20
-rw-r--r--. 1 root root 2390 Jun 10  2020 init_os_for_apt_install.sh
-rw-r--r--. 1 root root 1513 Jun 10  2020 init_os_for_yum_install.sh
-rw-r--r--. 1 root root 1058 Jun 10  2020 install_ansible.sh
-rw-r--r--. 1 root root  266 Jun 10  2020 install_python3_for_arm.sh
-rw-r--r--. 1 root root  253 Jun 10  2020 install_python3_for_x86.sh
将系统盘挂载到挂载点后,配置好yum环境,执行以下脚本来安装TDSQL环境必要的系统包
[root@tdsql4 script]# sh init_os_for_yum_install.sh
[root@tdsql4 script]# sh install_python3_for_x86.sh
[root@tdsql4 script]# source /etc/profile
[root@tdsql4 script]# python3 --version
Python 3.8.2
[root@tdsql4 script]# sh install_ansible.sh
三、开始TDSQL的安装
[root@tdsql4 ~]# ls /root/tdsql_install
group_files  group_vars  playbooks  roles  tdsql_hosts  tdsql_update_hosts
TDSQL的主要配置文件只有2个,一个是tdsql_hosts,另一个是group_vars/all文件。
备注:此文件为安装TDSQL环境的主要文件之一
[root@tdsql4 tdsql_install]# cat /root/tdsql_install/tdsql_hosts
[tdsql_allmacforcheck]
tdsql_tdsql1 ansible_ssh_host=90.90.90.221
tdsql_tdsql2 ansible_ssh_host=90.90.90.222
tdsql_tdsql3 ansible_ssh_host=90.90.90.223
tdsql_tdsql4 ansible_ssh_host=90.90.90.224
[tdsql_zk]
tdsql_zk1 ansible_ssh_host=90.90.90.221
tdsql_zk2 ansible_ssh_host=90.90.90.222
tdsql_zk3 ansible_ssh_host=90.90.90.223
[tdsql_scheduler]
tdsql_scheduler1 ansible_ssh_host=90.90.90.222
tdsql_scheduler2 ansible_ssh_host=90.90.90.223
[tdsql_oss]
tdsql_oss1 ansible_ssh_host=90.90.90.222
tdsql_oss2 ansible_ssh_host=90.90.90.223
[tdsql_chitu]
tdsql_chitu1 ansible_ssh_host=90.90.90.222
tdsql_chitu2 ansible_ssh_host=90.90.90.223
[tdsql_monitor]
tdsql_monitor1 ansible_ssh_host=90.90.90.222
tdsql_monitor2 ansible_ssh_host=90.90.90.223
[tdsql_db]
tdsql_db1 ansible_ssh_host=90.90.90.221
tdsql_db2 ansible_ssh_host=90.90.90.222
tdsql_db3 ansible_ssh_host=90.90.90.223
[tdsql_proxy]
tdsql_proxy1 ansible_ssh_host=90.90.90.221
tdsql_proxy2 ansible_ssh_host=90.90.90.222
tdsql_proxy3 ansible_ssh_host=90.90.90.223
[tdsql_hdfs]
tdsql_hdfs1 ansible_ssh_host=90.90.90.224
[tdsql_lvs]
tdsql_lvs1 ansible_ssh_host=90.90.90.222
tdsql_lvs2 ansible_ssh_host=90.90.90.223
[tdsql_kafka]
tdsql_kafka1 ansible_ssh_host=90.90.90.221
tdsql_kafka2 ansible_ssh_host=90.90.90.222
tdsql_kafka3 ansible_ssh_host=90.90.90.223
[tdsql_consumer]
tdsql_consumer1 ansible_ssh_host=90.90.90.224
[tdsql_es]
tdsql_es1 ansible_ssh_host=90.90.90.224
[tdsql_intercity]
tdsql_intercity1 ansible_ssh_host=90.90.90.224
[tdsql_newdb]
tdsql_newdb1 ansible_ssh_host=1.1.1.1
tdsql_newdb2 ansible_ssh_host=2.2.2.2
tdsql_newdb3 ansible_ssh_host=3.3.3.3
[tdsql_ansible_test]
tdsql_ansible_test1 ansible_ssh_host=1.1.1.1
tdsql_ansible_test2 ansible_ssh_host=2.2.2.2
tdsql_ansible_test3 ansible_ssh_host=3.3.3.3
备注:此文件为安装TDSQL环境的主要文件之一
[root@tdsql4 ]# cat /root/tdsql_install/group_vars/all
---
tdsql_env_cpu: x86
tdsql_env_os: yum_install
tdsql_zk_num: 3
tdsql_sche_netif: eth0            //修改为当前IP地址所在的网卡名称
tdsql_os_pass: a+complex+password
tdsql_zk_rootdir: /tdsqlzk
tdsql_metadb_ip: 10.235.49.132
tdsql_metadb_port: 15001
tdsql_metadb_ip_bak: 10.240.179.3
tdsql_metadb_port_bak: 15001
tdsql_metadb_user: hanlon
tdsql_metadb_password: hanlon
tdsql_hdfs_num: 1             //hdfs节点,根据前期规划,配置个数为1
tdsql_hdfs_ssh: 22            //hdfs的ssh端口,设置为22
tdsql_hdfs_datadir: /data2/hdfs,/data3/hdfs,/data4/hdfs
tdsql_hdfsdatadir_count: 3
tdsql_kafka_logdir: /data2/kafka,/data3/kafka,/data4/kafka
tdsql_es_mem: 2             //es节点的内存大小,配置为2GB
tdsql_es_log_days: 7
tdsql_es_base_path: /data/application/es-install/es
tdsql_intercity_zkrootdir: /tdsqlcross
tdsql_intercity_netif: eth0
tdsql_zk_clientport: 2118
tdsql_zk_serverport1: 2338
tdsql_zk_serverport2: 2558
tdsql_oc_server_pass: K2JatUv5llBbMrske/k2YbqC
tdsql_oc_client_pass: LGhVs0v5nVxcOLQie/k9bb2I
tdsql_clouddba_metadb_pass: h5Wyg2Xy
tdsql_oss_metadb_pass: q9Cjn0Wl
此步骤必须执行,虽然上面的配置文件没有修改口令,但是在每次安装组件前建议执行下口令加密脚本
[root@tdsql4 tdsql_install]# sh playbooks/tdsql_encrypt.sh
[root@tdsql4 tdsql_install]# ansible-playbook  -i tdsql_hosts  playbooks/tdsql_part1_site.yml
PLAY [checkenv server] ***********************************************************************************************************
.......................................................
.......................................................
................................................
PLAY RECAP ***********************************************************************************************************************
tdsql_chitu1               : ok=28   changed=18   unreachable=0    failed=0    skipped=2    rescued=0    ignored=0
tdsql_chitu2               : ok=27   changed=17   unreachable=0    failed=0    skipped=2    rescued=0    ignored=0
tdsql_db1                  : ok=10   changed=10   unreachable=0    failed=0    skipped=0    rescued=0    ignored=0
tdsql_db2                  : ok=10   changed=10   unreachable=0    failed=0    skipped=0    rescued=0    ignored=0
tdsql_db3                  : ok=10   changed=10   unreachable=0    failed=0    skipped=0    rescued=0    ignored=0
tdsql_oss1                 : ok=12   changed=11   unreachable=0    failed=0    skipped=0    rescued=0    ignored=0
tdsql_oss2                 : ok=5    changed=4    unreachable=0    failed=1    skipped=0    rescued=0    ignored=0
tdsql_proxy1               : ok=10   changed=9    unreachable=0    failed=0    skipped=0    rescued=0    ignored=0
tdsql_proxy2               : ok=10   changed=9    unreachable=0    failed=0    skipped=0    rescued=0    ignored=0
tdsql_proxy3               : ok=10   changed=9    unreachable=0    failed=0    skipped=0    rescued=0    ignored=0
tdsql_scheduler1           : ok=18   changed=18   unreachable=0    failed=0    skipped=0    rescued=0    ignored=0
tdsql_scheduler2           : ok=14   changed=14   unreachable=0    failed=0    skipped=0    rescued=0    ignored=0
tdsql_tdsql1               : ok=41   changed=39   unreachable=0    failed=0    skipped=5    rescued=0    ignored=0
tdsql_tdsql2               : ok=37   changed=35   unreachable=0    failed=0    skipped=5    rescued=0    ignored=0
tdsql_tdsql3               : ok=37   changed=35   unreachable=0    failed=0    skipped=5    rescued=0    ignored=0
tdsql_tdsql4               : ok=37   changed=33   unreachable=0    failed=0    skipped=5    rescued=0    ignored=0
tdsql_zk1                  : ok=11   changed=11   unreachable=0    failed=0    skipped=0    rescued=0    ignored=0
tdsql_zk2                  : ok=10   changed=10   unreachable=0    failed=0    skipped=0    rescued=0    ignored=0
tdsql_zk3                  : ok=10   changed=10   unreachable=0    failed=0    skipped=0    rescued=0    ignored=0
备注:此安装过程持续的时间比较长,大概是10分钟左右,中途不需要人为干预,安装完成后,保证每一个组件的failed=0.
我在安装的过程中,出现了tdsql_oss组件failed=1的情况,这个的原因是由于我使用了vmware平台上的虚拟主机环境,环境存在一些差异,其它人使用腾讯的云主机CVM环境,均未出现过failed=1的情况。
解决办法:
{
当tdsql_oss组件的failed=1时,所以此组件安装失败了。登录到失败节点上,通用ps -ef | grep oss发现并未有oss的进程,此时需要手工修改oss的配置文件,然后手工启动OSS
此处存在failed=1的oss节点未tdsql_oss2,在前面的规划中此节点位于90.90.90.223服务器上
[tdsql@tdsql3 ]$ cat /data/application/oss/conf/scheduler.xml
[root@tdsql3 conf]# more scheduler.xml
然后手工修改为当前节点的IP地址,如下
[root@tdsql3 conf]# more scheduler.xml
然后手工启动OSS服务
[tdsql@tdsql3 ]$ /data/application/oss/bin/oss_server
}
登录http://90.90.90.222/tdsqlpcloud界面,进行初始化
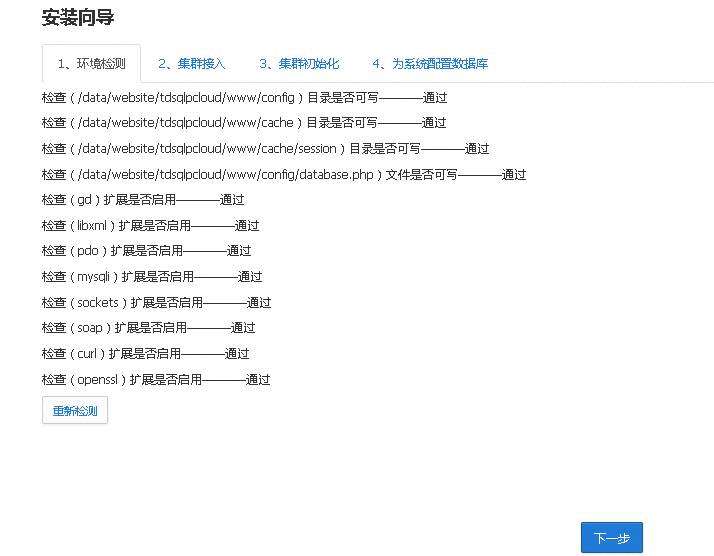
保证每个组件的检查结果为通过,然后点击下一步

在集群命名处填写自定义的集群名称
OSS服务列表处填写前期规划的OSS地址和端口
OSS服务的端口可以从OSS的配置文件中获取
[root@tdsql2 conf]# cat /data/application/oss/conf/scheduler.xml
然后点击测试服务连接,则会自动检测出Zookeeper列表信息和 Zookeeper节点信息。确认无误后点击下一步。


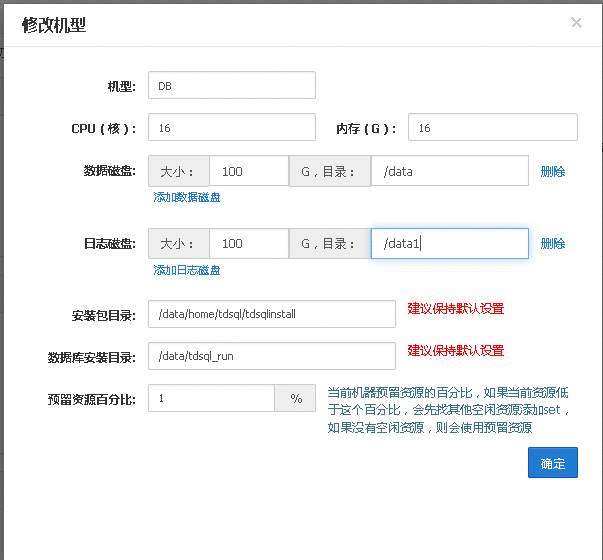

备注:机型的名字要全部大写,DB机型的资源配置尽量高一些,PROXY机型的资源可以小一些
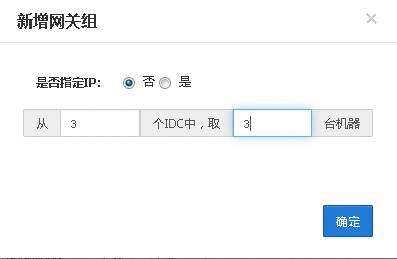
配置设备资源
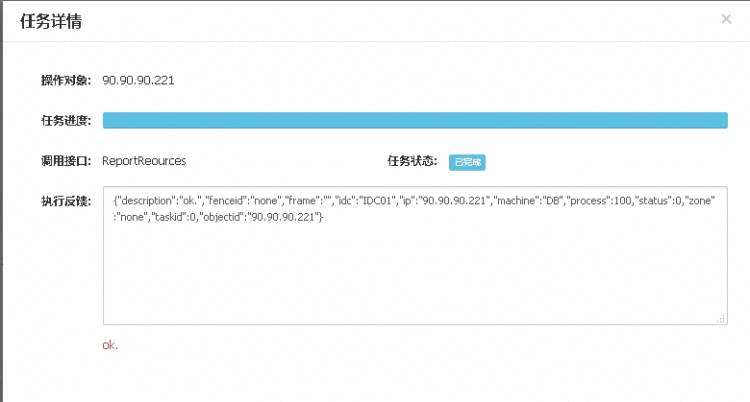
之后点击设备资源的"上报DB资源"依次添加3个DB资源
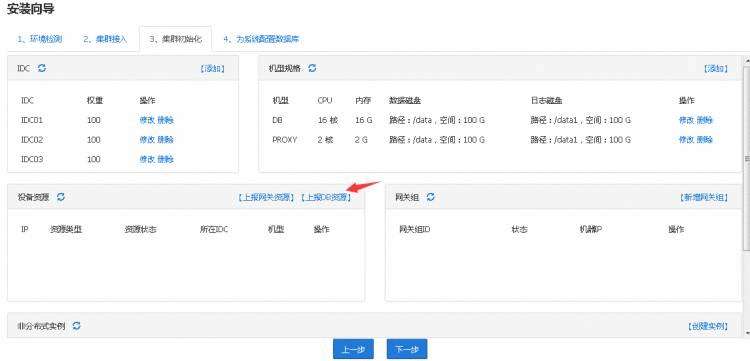

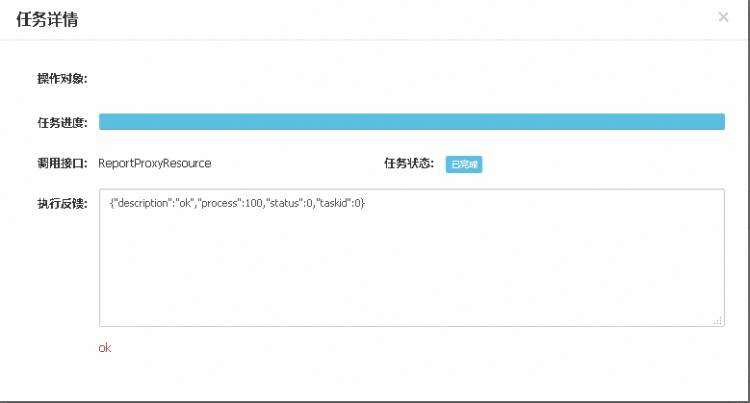
之后点击设备资源的"上报网关资源"依次添加3个网关资源

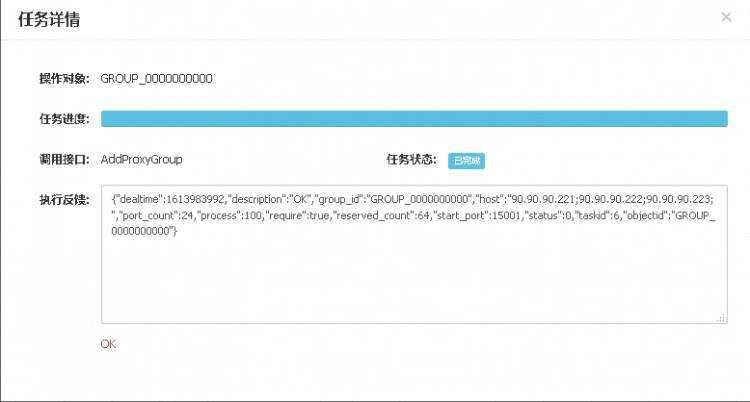
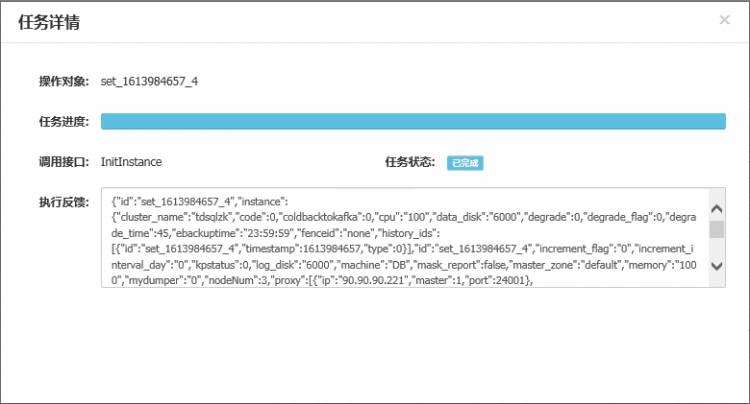
备注:此过程大概会持续4-5分钟的时间
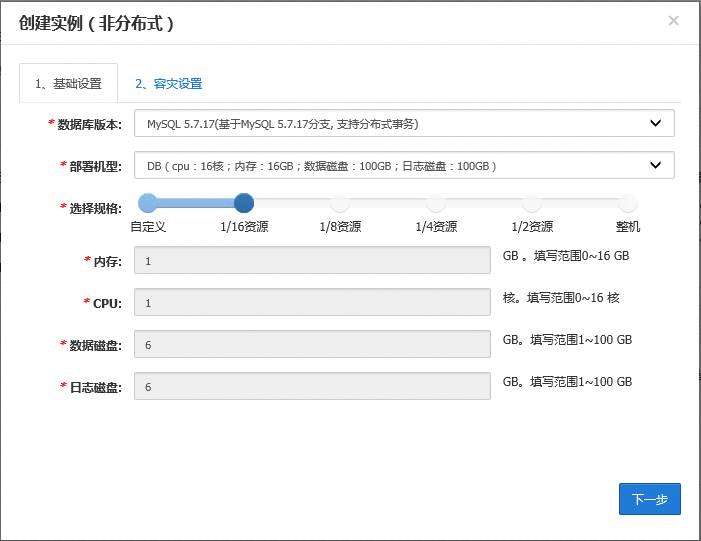
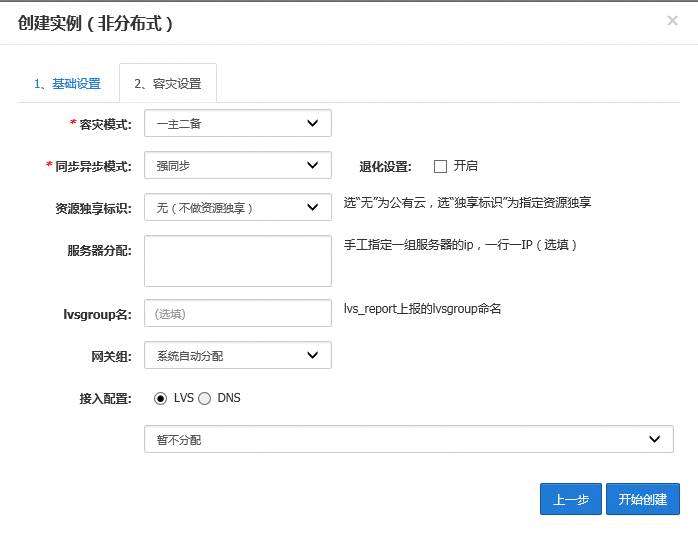
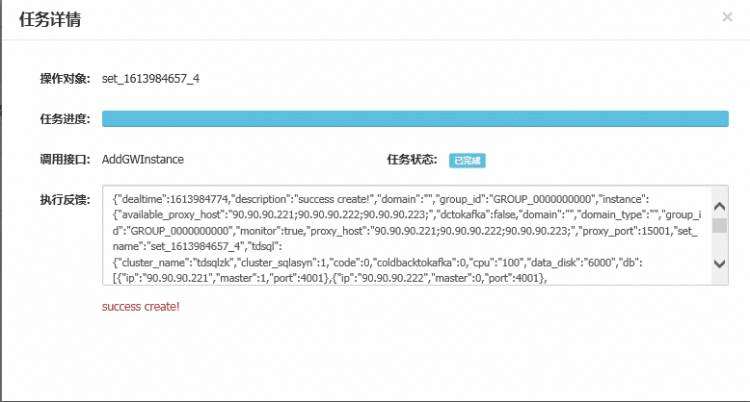
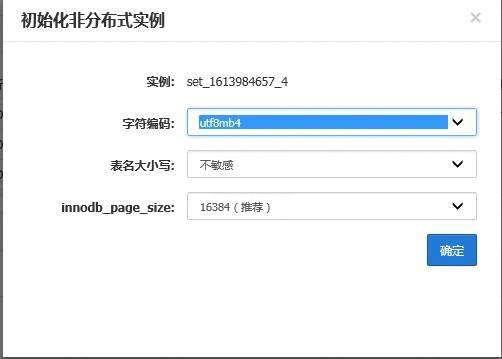
待数据库实例创建成功后,需要对实例进行初始化
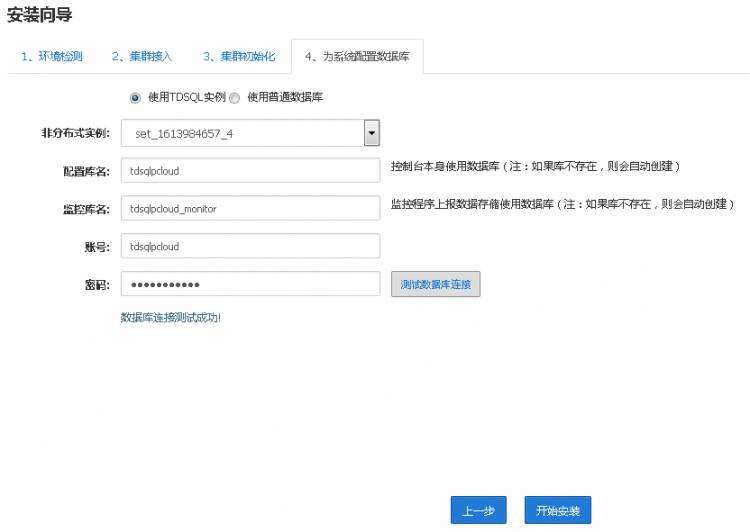
使用mysql客户端测试下是初始化的数据库实例是否正常,如果数据库正常的话,则就可以配置组件信息了。
连接的地址为proxy的地址,端口为proxy的端口15001,此端口可通过proxy的配置文件/data/tdsql_run/15001/gateway/conf/instance_15001.cnf获取
[root@tdsql2 conf]# more instance_15001.cnf
[root@tdsql4 playbooks]# mysql -h90.90.90.221 -P15001 -utdsqlpcloud -ptdsqlpcloud
Welcome to the MariaDB monitor.  Commands end with ; or \g.
Your MySQL connection id is 4393
Server version: 5.7.30-33-V2.0R630D001-v17-20200522-1443-log Source distribution
Copyright (c) 2000, 2018, Oracle, MariaDB Corporation Ab and others.
Type 'help;' or '\h' for help. Type '\c' to clear the current input statement.
MySQL [(none)]> select 1;
+---+
| 1 |
+---+
| 1 |
+---+
1 row in set (0.00 sec)
[root@tdsql4 playbooks]# mysql -h90.90.90.222 -P15001 -utdsqlpcloud -ptdsqlpcloud
Welcome to the MariaDB monitor.  Commands end with ; or \g.
Your MySQL connection id is 4441
Server version: 5.7.30-33-V2.0R630D001-v17-20200522-1443-log Source distribution
Copyright (c) 2000, 2018, Oracle, MariaDB Corporation Ab and others.
Type 'help;' or '\h' for help. Type '\c' to clear the current input statement.
MySQL [(none)]> select 1;
+---+
| 1 |
+---+
| 1 |
+---+
1 row in set (0.00 sec)
[root@tdsql4 playbooks]# mysql -h90.90.90.223 -P15001 -utdsqlpcloud -ptdsqlpcloud
Welcome to the MariaDB monitor.  Commands end with ; or \g.
Your MySQL connection id is 4455
Server version: 5.7.30-33-V2.0R630D001-v17-20200522-1443-log Source distribution
Copyright (c) 2000, 2018, Oracle, MariaDB Corporation Ab and others.
Type 'help;' or '\h' for help. Type '\c' to clear the current input statement.
MySQL [(none)]> select 1;
+---+
| 1 |
+---+
| 1 |
+---+
1 row in set (0.00 sec)
五、配置赤兔上的各个组件
修改group_vars/all配置文件,更新以下内容
tdsql_metadb_port: 15001                     #赤兔监控库的proxy 主port
tdsql_metadb_ip_bak: 90.90.90.222            #赤兔监控库的proxy  备IP
tdsql_metadb_port_bak: 15001                 #赤兔监控库的proxy  备port
tdsql_metadb_user: tdsqlpcloud              #赤兔监控库的用户名
tdsql_metadb_password: tdsqlpcloud          #赤兔监控库的密码
对配置文件中的口令进行加密
此步骤必须执行,对上面的配置文件中的口令进行加密
[root@tdsql4 tdsql_install]# sh playbooks/tdsql_encrypt.sh
[root@tdsql4 tdsql_install]# ansible-playbook -i tdsql_hosts playbooks/tdsql_part2_site.yml
PLAY [install allmac beginning] **************************************************************************************************
TASK [tdsql_beginning : create the directory] ************************************************************************************
[WARNING]: Consider using the file module with state=directory rather than running 'mkdir'.  If you need to use command because
file is insufficient you can add 'warn: false' to this command task or set 'command_warnings=False' in ansible.cfg to get rid of
this message.
changed: [tdsql_tdsql1]
changed: [tdsql_tdsql3]
changed: [tdsql_tdsql2]
changed: [tdsql_tdsql4]
PLAY RECAP ***********************************************************************************************************************
tdsql_chitu1               : ok=18   changed=16   unreachable=0    failed=0    skipped=0    rescued=0    ignored=0
tdsql_chitu2               : ok=5    changed=4    unreachable=0    failed=0    skipped=0    rescued=0    ignored=0
tdsql_monitor1             : ok=13   changed=13   unreachable=0    failed=0    skipped=0    rescued=0    ignored=0
tdsql_monitor2             : ok=12   changed=12   unreachable=0    failed=0    skipped=0    rescued=0    ignored=0
tdsql_oss1                 : ok=12   changed=9    unreachable=0    failed=0    skipped=0    rescued=0    ignored=0
tdsql_oss2                 : ok=5    changed=3    unreachable=0    failed=1    skipped=0    rescued=0    ignored=0
tdsql_scheduler1           : ok=30   changed=29   unreachable=0    failed=0    skipped=0    rescued=0    ignored=0
tdsql_scheduler2           : ok=15   changed=15   unreachable=0    failed=0    skipped=0    rescued=0    ignored=0
tdsql_tdsql1               : ok=31   changed=19   unreachable=0    failed=0    skipped=1    rescued=0    ignored=0
tdsql_tdsql2               : ok=28   changed=16   unreachable=0    failed=0    skipped=1    rescued=0    ignored=0
tdsql_tdsql3               : ok=28   changed=16   unreachable=0    failed=0    skipped=1    rescued=0    ignored=0
tdsql_tdsql4               : ok=28   changed=14   unreachable=0    failed=0    skipped=1    rescued=0    ignored=0
确保每个组件的配置信息failed=0,如上图出现的tdsql_oss2的failed=1,则处理方法详见上面的提示.
[root@tdsql4  ]#cat /root/tdsql_install/tdsql_hosts
....................
[tdsql_hdfs]
tdsql_hdfs1 ansible_ssh_host=90.90.90.224
...................
[root@tdsql4  ]#cat /root/tdsql_install/group_vars/all
......................
tdsql_hdfs_num: 1
tdsql_hdfs_ssh: 22
tdsql_hdfs_datadir: /data2/hdfs,/data3/hdfs,/data4/hdfs
tdsql_hdfsdatadir_count: 3
.....................
[root@tdsql4 ~]# mkdir -p /data2/hdfs  /data3/hdfs   /data4/hdfs
[root@tdsql4 ~]# chown tdsql:users  -R  /data2/hdfs  /data3/hdfs   /data4/hdfs
[root@tdsql4 tdsql_install]# ansible-playbook -i tdsql_hosts playbooks/tdsql_hdfs_single.yml
PLAY [install hdfs beginning] *****************************************************************************************************************************************
.......................................
PLAY RECAP ************************************************************************************************************************************************************
tdsql_db1                  : ok=42   changed=27   unreachable=0    failed=0    skipped=1    rescued=0    ignored=0
tdsql_db2                  : ok=39   changed=25   unreachable=0    failed=0    skipped=1    rescued=0    ignored=0
tdsql_db3                  : ok=39   changed=25   unreachable=0    failed=0    skipped=1    rescued=0    ignored=0
tdsql_hdfs1                : ok=49   changed=34   unreachable=0    failed=0    skipped=1    rescued=0    ignored=0
[root@tdsql4 ~]# su - tdsql
[tdsql@tdsql4 ~]$ hdfs namenode -format
WARNING: /data/hadoop/pids does not exist. Creating.
WARNING: /data/home/tdsql/hadoop/logs does not exist. Creating.
Formatting using clusterid: CID-9f486d22-bbac-46ff-9191-754ef7508e33
[tdsql@tdsql4 ~]$ hdfs --daemon start namenode
[tdsql@tdsql4 ~]$ hdfs --daemon start datanode
Found 1 items
drwxr-xr-x   - tdsql supergroup          0 2021-02-22 18:38 /tdsqlbackup
备注:lvs 机器建议单独部署,不建议和别人复用(最多只能和 zk 复用)
[root@tdsql4  ]#cat /root/tdsql_install/tdsql_hosts
.........................
[tdsql_lvs]
tdsql_lvs1 ansible_ssh_host=90.90.90.222
tdsql_lvs2 ansible_ssh_host=90.90.90.223
......................
[root@tdsql4 tdsql_install]# ansible-playbook -i tdsql_hosts playbooks/tdsql_lvs.yml
PLAY [install lvs beginning] *****************************************************************************************************
TASK [tdsql_beginning : create the directory] ************************************************************************************
[WARNING]: Consider using the file module with state=directory rather than running 'mkdir'.  If you need to use command because
file is insufficient you can add 'warn: false' to this command task or set 'command_warnings=False' in ansible.cfg to get rid of
this message.
changed: [tdsql_lvs1]
changed: [tdsql_lvs2]
..............................
..............................
..............................
PLAY RECAP ***********************************************************************************************************************
tdsql_lvs1                 : ok=41   changed=26   unreachable=0    failed=0    skipped=1    rescued=0    ignored=0
tdsql_lvs2                 : ok=34   changed=19   unreachable=0    failed=0    skipped=1    rescued=0    ignored=0
[root@tdsql4  ]#cat /root/tdsql_install/tdsql_hosts
.........................
[tdsql_kafka]
tdsql_kafka1 ansible_ssh_host=90.90.90.221
tdsql_kafka2 ansible_ssh_host=90.90.90.222
tdsql_kafka3 ansible_ssh_host=90.90.90.223
......................
[root@tdsql4  ]#cat /root/tdsql_install/group_vars/all
......................
tdsql_kafka_logdir: /data2/kafka,/data3/kafka,/data4/kafka
.....................
[root@tdsql4 ~]# mkdir -p /data2/kafka   /data3/kafka   /data4/kafka
[root@tdsql4 ~]# chown tdsql:users  -R  /data2/kafka   /data3/kafka   /data4/kafka
[root@tdsql4 tdsql_install]# ansible-playbook -i tdsql_hosts playbooks/tdsql_kafka.yml
PLAY [install kafka beginning] ****************************************************************************************************************************************
........................
.......................
......................
TASK [tdsql_kafka : start kafka service] ******************************************************************************************************************************
changed: [tdsql_kafka2]
PLAY RECAP ************************************************************************************************************************************************************
tdsql_kafka1               : ok=41   changed=26   unreachable=0    failed=1    skipped=1    rescued=0    ignored=0
tdsql_kafka2               : ok=40   changed=25   unreachable=0    failed=0    skipped=1    rescued=0    ignored=0
tdsql_kafka3               : ok=35   changed=20   unreachable=0    failed=1    skipped=1    rescued=0    ignored=0
备注:安装完成后,保证每一个组件的failed=0.
我在安装的过程中,出现了tdsql_kafka1和tdsql_kafka3组件failed=1的情况,这个的原因是由于我使用了vmware平台上的虚拟主机环境,环境存在一些差异,其它人使用腾讯的云主机CVM环境,均未出现过failed=1的情况。
解决办法:
{
此时需要手工修改kafka的配置文件,然后手工启动kafka
登录到failed=1的kafka节点上,修改配置文件/data/application/kafka/config/server.properties
kafka节点1:
[tdsql@tdsql1 ]$ cat /data/application/kafka/config/server.properties
.................................
# A comma seperated list of directories under which to store log files
#log.dirs=/tmp/kafka-logs
log.dirs=/data2/kafka,/data3/kafka,/data4/kafka
# The port the socket server listens on
#port=9092
# Hostname the broker will bind to. If not set, the server will bind to all interfaces
host.name=wait_for_change_hostname
# Hostname the broker will advertise to producers and consumers. If not set, it uses the
# value for "host.name" if configured.  Otherwise, it will use the value returned from
# java.net.InetAddress.getCanonicalHostName().
advertised.host.name=wait_for_change_hostname
..............................
更新为
# A comma seperated list of directories under which to store log files
#log.dirs=/tmp/kafka-logs
log.dirs=/data2/kafka,/data3/kafka,/data4/kafka
# The port the socket server listens on
#port=9092
# Hostname the broker will bind to. If not set, the server will bind to all interfaces
host.name=90.90.90.221
# Hostname the broker will advertise to producers and consumers. If not set, it uses the
# value for "host.name" if configured.  Otherwise, it will use the value returned from
# java.net.InetAddress.getCanonicalHostName().
advertised.host.name=90.90.90.221
然后对kafka目录设置属组,并启动kafka服务
[root@tdsql1 ~]# chown -R tdsql:users /data/application/kafka
[tdsql@tdsql1 bin]$ cd /data/application/kafka/bin
[tdsql@tdsql1 bin]$ ./kafka-server-start.sh   -daemon ../config/server.properties
kafka节点3:
[tdsql@tdsql3 ]$ cat /data/application/kafka/config/server.properties
.................................
# A comma seperated list of directories under which to store log files
#log.dirs=/tmp/kafka-logs
log.dirs=/data2/kafka,/data3/kafka,/data4/kafka
# The port the socket server listens on
#port=9092
# Hostname the broker will bind to. If not set, the server will bind to all interfaces
host.name=wait_for_change_hostname
# Hostname the broker will advertise to producers and consumers. If not set, it uses the
# value for "host.name" if configured.  Otherwise, it will use the value returned from
# java.net.InetAddress.getCanonicalHostName().
advertised.host.name=wait_for_change_hostname
..............................
更新为
# A comma seperated list of directories under which to store log files
#log.dirs=/tmp/kafka-logs
log.dirs=/data2/kafka,/data3/kafka,/data4/kafka
# The port the socket server listens on
#port=9092
# Hostname the broker will bind to. If not set, the server will bind to all interfaces
host.name=90.90.90.223
# Hostname the broker will advertise to producers and consumers. If not set, it uses the
# value for "host.name" if configured.  Otherwise, it will use the value returned from
# java.net.InetAddress.getCanonicalHostName().
advertised.host.name=90.90.90.223
然后对kafka目录设置属组,并启动kafka服务
[root@tdsql3 ~]# chown -R tdsql:users /data/application/kafka
[tdsql@tdsql3 bin]$ cd /data/application/kafka/bin
[tdsql@tdsql3 bin]$ ./kafka-server-start.sh   -daemon ../config/server.properties
}
[root@tdsql4 ~]#cat  /root/tdsql_install/tdsql_hosts
...................
[tdsql_consumer]
tdsql_consumer1 ansible_ssh_host=90.90.90.224
..................
[root@tdsql4 tdsql_install]# ansible-playbook -i tdsql_hosts playbooks/tdsql_consumer.yml
PLAY [install consumer beginning] *************************************************************************************************************************************
........................
........................
........................
TASK [tdsql_consumer : write /etc/crontab] ****************************************************************************************************************************
changed: [tdsql_consumer1]
PLAY RECAP ************************************************************************************************************************************************************
tdsql_consumer1            : ok=40   changed=27   unreachable=0    failed=0    skipped=1    rescued=0    ignored=0
[root@tdsql4  ]# su - tdsql
[tdsql@tdsql4 ]$cd /data/application/consumer/bin
[tdsql@tdsql4 bin]$ ./binlogconsumermgn --zklist 90.90.90.221:2118,90.90.90.222:2118,90.90.90.223:2118 --zkrootpath /tdsqlzk --kafkazklist 90.90.90.221:2118,90.90.90.222:2118,90.90.90.223:2118 --kafkazkrootpath /kafka --dev eth0
localip:90.90.90.224
[tdsql@tdsql4 bin]$
arglist:
[tdsql@tdsql4 bin]$ ps -ef | grep consum
tdsql    48445     1  0 19:36 ?        00:00:00 ./binlogconsumermgn --zklist 90.90.90.221:2118,90.90.90.222:2118,90.90.90.223:2118 --zkrootpath /tdsqlzk --kafkazklist 90.90.90.221:2118,90.90.90.222:2118,90.90.90.223:2118 --kafkazkrootpath /kafka --dev eth0
tdsql    48446 48445  0 19:36 ?        00:00:00 ./binlogconsumermgn --zklist 90.90.90.221:2118,90.90.90.222:2118,90.90.90.223:2118 --zkrootpath /tdsqlzk --kafkazklist 90.90.90.221:2118,90.90.90.222:2118,90.90.90.223:2118 --kafkazkrootpath /kafka --dev eth0
tdsql    48487 48396  0 19:36 pts/0    00:00:00 grep --color=auto consum
[root@tdsql4 ~]#cat  /root/tdsql_install/tdsql_hosts
.........................
[tdsql_es]
tdsql_es1 ansible_ssh_host=90.90.90.224
.......................
[root@tdsql4  ]#cat /root/tdsql_install/group_vars/all
.......................
tdsql_es_mem: 2
tdsql_es_log_days: 7
tdsql_es_base_path: /data/application/es-install/es
.......................
[root@tdsql4 tdsql_install]# ansible-playbook -i tdsql_hosts playbooks/tdsql_es_single.yml
PLAY [install es beginning] *******************************************************************************************************************************************
......................
......................
......................
PLAY [update conf on clouddba] ****************************************************************************************************************************************
TASK [tdsql_update_clouddba : replace diagnosis.conf esip] ************************************************************************************************************
changed: [tdsql_chitu1]
TASK [tdsql_update_clouddba : start clouddba service] *****************************************************************************************************************
changed: [tdsql_chitu1]
PLAY RECAP ************************************************************************************************************************************************************
tdsql_chitu1               : ok=2    changed=2    unreachable=0    failed=0    skipped=0    rescued=0    ignored=0
tdsql_es1                  : ok=39   changed=29   unreachable=0    failed=0    skipped=2    rescued=0    ignored=0
[tdsql@tdsql4 ]$ cd /data/application/es-install/es/master/tools/
[tdsql@tdsql4 ]$ nohup ./start-elasticsearch.sh  &
[tdsql@tdsql4 ]$ cd /data/application/es-install/es/data
[tdsql@tdsql4 ]$ nohup ./start-elasticsearch.sh   &
[tdsql@tdsql4 ]$ ps -ef |grep elasticsearch | grep -v 'grep' |wc -l
4
[tdsql@tdsql4 tools]$ cd /data/application/es-install/logstash/tools/
[tdsql@tdsql4 tools]$ nohup ./start-logstash.sh   &
[tdsql@tdsql4 es-cleaner]$ ps -ef |grep logstash | grep -v 'grep' |wc -l
2
[tdsql@tdsql4 tools]$ cd /data/application/es-install/es-cleaner/
nohup ./start-es-cleaner.sh &
1
[tdsql@tdsql4 es-cleaner]$ cd /data/application/es-install/kibana-5.6.4-linux-x86_64/
nohup ./kibana &
[tdsql@tdsql4 es-cleaner]$ ps -ef |grep 'node/bin/node' | grep -v 'grep' |wc -l
1
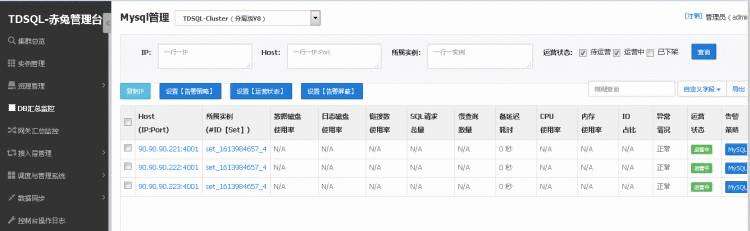
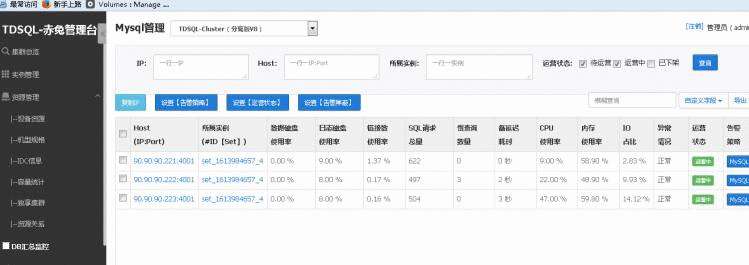
至此,TDSQL集群环境就安装成功了。
接下来就可以使用赤兔管理平台对TDSQL数据库集群环境进行管理和维护了。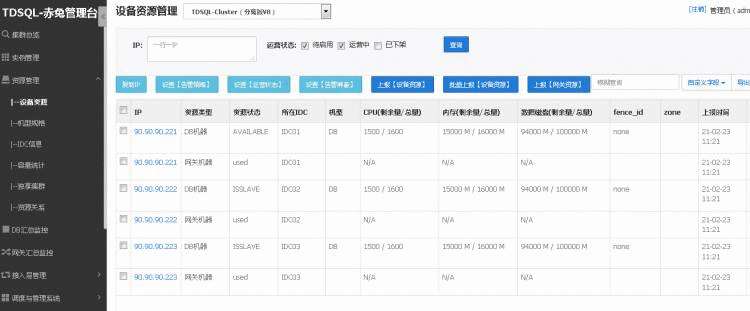


 京公网安备 11010802041100号 | 京ICP备19059560号-4 | PHP1.CN 第一PHP社区 版权所有