笔记来源:尚硅谷Spring框架视频教程(spring5源码级讲解)
目录
使用登录功能案例说明 AOP
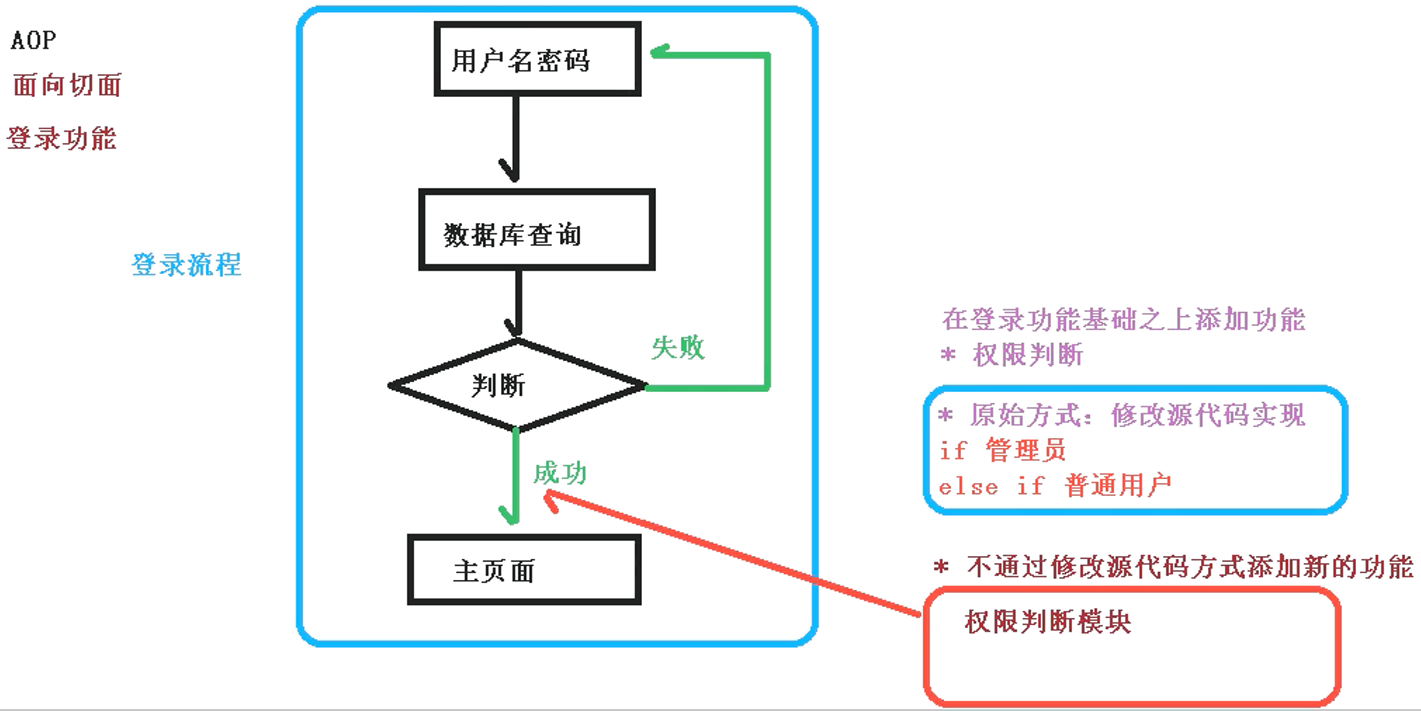
如果学习过设计模式,应该对上述两种代理方式非常了解了。没有学习过也没关系,我们接着往下看
public interface UserDao {
    void login();
}
public class UserDaoImpl implements UserDao {
    @Override
    public void login(){
        //登录实现过程
    }
}
有接口情况:创建 UserDao 接口实现类代理对象
public class User {
    public void add(){
        //...
    }
}
// 原始方法:通过子类继承,重写User类方法
public class Person extends User {
    @Override
    public void add(){
        super.add();
        //增强代码逻辑
    }
}
无接口情况:创建 User 类子类代理对象
由于 Spring5 中对上述代理已经做了很好的封装,我们只需要通过最简单的方式进行配置即可
但仍然需要我们对原理有一定的认识,只有做到“知其然,知其所以然”,才能真正“以不变应万变”
实现方式:使用Proxy中的方法创建代理对象

具体方法:newProxyInstance()
方法参数
ClassLoader loader:类加载器Class[] interfaces:增强方法所在类实现的接口数组InvocationHandler h:实现InvocationHandler接口,创建代理对象,编写增强方法
常言道:“Talking is cheap, show me the code"。话不多说,下面上代码~
public interface UserDao {
    int add(int a, int b);
    String update(String id);
}
public class UserDaoImpl implements UserDao {
    @Override
    public int add(int a, int b) {
        return a + b;
    }
    @Override
    public String update(String id) {
        return id;
    }
}
public class UserDaoProxy {
    private UserDao target;
    public UserDaoProxy(UserDao target) {
        this.target = target;
    }
    public UserDao newProxyInstance() {
        Class targetClass = target.getClass();
        ClassLoader classLoader = targetClass.getClassLoader();
        Class[] interfaces = targetClass.getInterfaces();
        return (UserDao) Proxy.newProxyInstance(classLoader, interfaces, new UserDaoInvocationHandler());
    }
    class UserDaoInvocationHandler implements InvocationHandler {
        @Override
        public Object invoke(Object proxy, Method method, Object[] args) throws Throwable {
            // 被代理对象方法前置逻辑
            System.out.print("method=" + method.getName() + ", args=" + Arrays.toString(args));
            // 被代理对象方法
            Object result = method.invoke(target, args);
            // 被代理对象方法后置逻辑
            System.out.println(", result=" + result);
            return result;
        }
    }
}
UserDao target = new UserDaoImpl();
UserDaoProxy userDaoProxy = new UserDaoProxy(target);
UserDao userDao = userDaoProxy.newProxyInstance();
userDao.add(1, 2);
userDao.update("UUID1");
// method=add, args=[1, 2], result=3
// method=update, args=[UUID1], result=UUID1
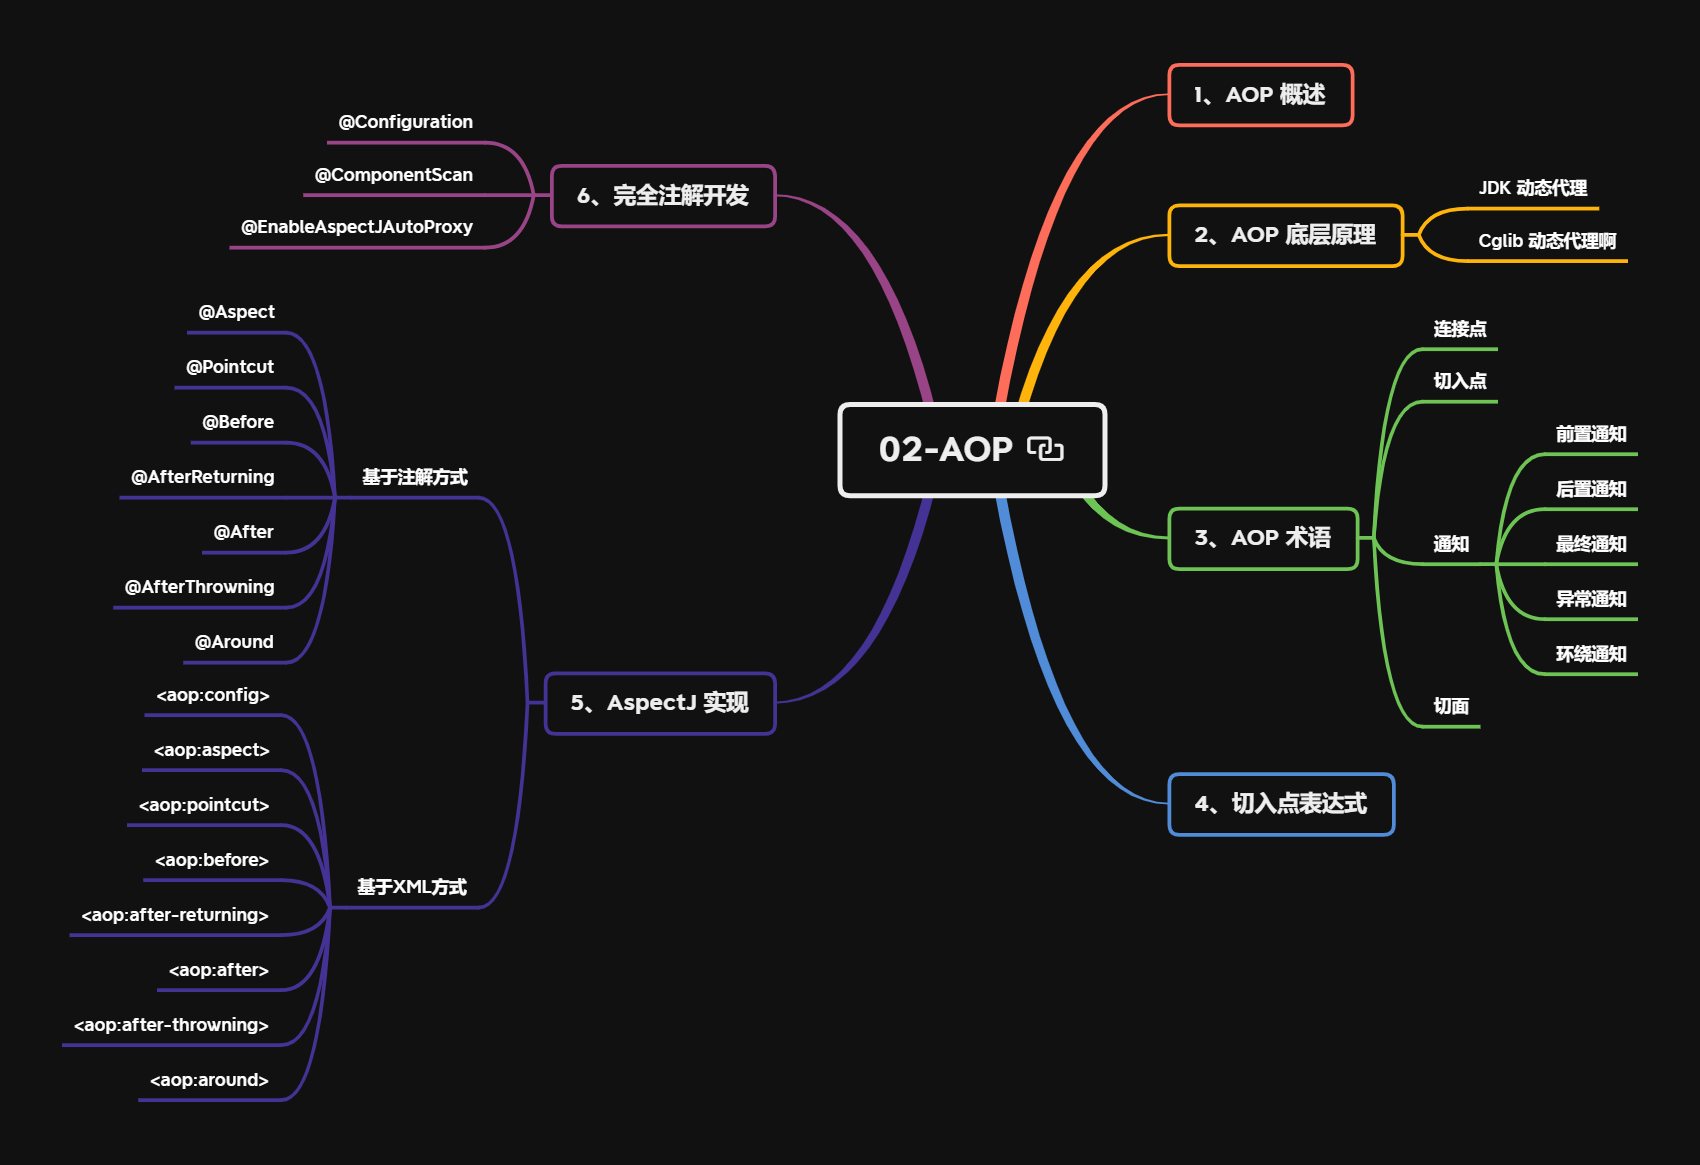
连接点:类中可以被增强的方法,称为连接点
切入点:类中实际被增强的方法,称为切入点
通知(增强):实际增强的逻辑部分,称为通知
通知分为五种类型:
try-catch-finally中的finally)切面:是一个动作,即把通知应用到切入点的过程
Spring 一般都是基于AspectJ实现 AOP 操作的
AspectJ不是 Spring 的一部分,而是一个独立的 AOP 框架AspectJ和 Spring 搭配使用,进行 AOP 操作,因为这样更加方便基于 AspectJ 进行 AOP 操作的两种方式:
切入点表达式的作用:知道对哪个类的哪个方法进行增强
语法结构:execution([权限修饰符][返回类型][类全路径][方法名]([参数列表]))
举例
⭐ 举例1:对com.vectorx.dao.BookDao中的add()方法进行增强
execution(* com.vectorx.dao.BookDao.add(..))
⭐ 举例2:对com.vectorx.dao.BookDao中的所有方法进行增强
execution(* com.vectorx.dao.BookDao.*(..))
⭐ 举例3:对com.vectorx.dao包中所有类的所有方法进行增强
execution(* com.vectorx.dao.*.*(..))
context和aop名称空间
xmlns:aop="http://www.springframework.org/schema/aop"
xmlns:xsi="http://www.w3.org/2001/XMLSchema-instance"
xsi:schemaLocation="http://www.springframework.org/schema/beans http://www.springframework.org/schema/beans/spring-beans.xsd
http://www.springframework.org/schema/context http://www.springframework.org/schema/context/spring-context.xsd
http://www.springframework.org/schema/aop http://www.springframework.org/schema/aop/spring-aop.xsd">
@Component注解@Component注解@Component
public class User {
public void add() {
System.out.println("add...");
}
}
@Component
public class UserProxy {
/**
* 前置通知
*/
public void before() {
System.out.println("before...");
}
/**
* 后置通知
*/
public void afterReturning() {
System.out.println("afterReturning...");
}
/**
* 最终通知
*/
public void after() {
System.out.println("after...");
}
/**
* 异常通知
*/
public void afterThrowing() {
System.out.println("afterThrowing...");
}
/**
* 环绕通知
*/
public void around() {
System.out.println("around...");
}
}
@Component
@Aspect
public class UserProxy {
    /**
     * 前置通知
     */
    @Before(value = "execution(* com.vectorx.spring5.s13_aspectj_annatation.User.add(..))")
    public void before() {
        System.out.println("before...");
    }
    /**
     * 后置通知
     */
    @AfterReturning(value = "execution(* com.vectorx.spring5.s13_aspectj_annatation.User.add(..))")
    public void afterReturning() {
        System.out.println("afterReturning...");
    }
    /**
     * 最终通知
     */
    @After(value = "execution(* com.vectorx.spring5.s13_aspectj_annatation.User.add(..))")
    public void after() {
        System.out.println("after...");
    }
    /**
     * 异常通知
     */
    @AfterThrowing(value = "execution(* com.vectorx.spring5.s13_aspectj_annatation.User.add(..))")
    public void afterThrowing() {
        System.out.println("afterThrowing...");
    }
    /**
     * 环绕通知
     */
    @Around(value = "execution(* com.vectorx.spring5.s13_aspectj_annatation.User.add(..))")
    public void around(ProceedingJoinPoint joinPoint) throws Throwable {
        System.out.println("around before...");
        // 执行被增强的方法
        joinPoint.proceed();
        System.out.println("around after...");
    }
}
ApplicationContext cOntext= new ClassPathXmlApplicationContext("bean11.xml");
User user = context.getBean("user", User.class);
user.add();
结果
around before...
before...
add...
afterReturning...
after...
around after...
为了演示异常通知,需要修改下被增强对象中的方法,模拟一个异常
@Component
public class User {
    public void add() {
        System.out.println("add...");
        // 模拟一个异常
        int i = 2 / 0;
    }
}
运行结果
around before...
before...
add...
afterThrowing...
after...
对比正常情况下,发现少了afterReturning即后置异常和around after即环绕增强的后置处理
通过上述的例子,应该对AspectJ注解实现有了一定的了解
同时我们发现切入点表达式都是完全一样的,可以对这些相同的切入点表达式进行抽取,以达到重用切入点表达式定义的目的
private final String execution = "execution(* com.vectorx.spring5.s13_aspectj_annatation.User.add(..))";
@Before(value = execution)
public void before() {
    System.out.println("before...");
}
AspectJ中提供了Pointcut注解(推荐)@Pointcut(value = "execution(* com.vectorx.spring5.s13_aspectj_annatation.User.add(..))")
private void pointcut(){}
@Before(value = "pointcut()")
public void before() {
System.out.println("before...");
}
如果有多个增强类对类中同一个方法进行增强,可以设置增强类的优先级,来决定哪个增强类先执行,哪个增强类后执行
使用@Order注解设置增强类的优先级,其中指定优先级数字,注解格式:@Order(数字类型值)
⭐最佳实践
@Component
@Aspect
@Order(1)
public class PersonProxy {
    //...
}
@Component
@Aspect
@Order(3)
public class UserProxy {
    //...
}
测试结果
person around before...
person before...
user around before...
user before...
add...
user afterReturning...
user after...
user around after...
person afterReturning...
person after...
person around after...
我们发现:
如果要用完全注解的方式进行开发,可以使用注解类代替 Spring 配置文件
@Configuration
@ComponentScan(value = "com.vectorx.spring5.s13_aspectj_annatation")
@EnableAspectJAutoProxy(proxyTargetClass = true)
public class AopConfig {
}
其中:
@ComponentScan(value = "com.vectorx.spring5.s13_aspectj_annatation")代替了@EnableAspectJAutoProxy(proxyTargetClass = true)代替了对应关系
| 注解方式 | 配置文件方式 |
|---|---|
@ComponentScan | |
@EnableAspectJAutoProxy | |
public class Book {
    public void buy() {
        System.out.println("buy...");
    }
}
public class BookProxy {
    public void before() {
        System.out.println("before...");
    }
    public void afterReturning() {
        System.out.println("afterReturning...");
    }
    public void after() {
        System.out.println("after...");
    }
    public void afterThrowing() {
        System.out.println("afterThrowing...");
    }
    public void around(ProceedingJoinPoint joinPoint) throws Throwable {
        System.out.println("around before...");
        joinPoint.proceed();
        System.out.println("around after...");
    }
}
aop名称空间aop增强
xsi:schemaLocation="http://www.springframework.org/schema/beans http://www.springframework.org/schema/beans/spring-beans.xsd http://www.springframework.org/schema/aop https://www.springframework.org/schema/aop/spring-aop.xsd">
其中,配置文件的标签与注解的对应关系如下表
| 配置文件方式 | 注解方式 |
|---|---|
| @Pointcut |
| @Aspect |
| @Before |
| @AfterReturning |
| @After |
| @AfterThrowing |
| @Around |
ApplicationContext cOntext= new ClassPathXmlApplicationContext("bean12.xml");
Book book = context.getBean("book", Book.class);
book.buy();
测试结果
before...
around before...
buy...
around after...
after...
afterReturning...
本节重点
以下总结仅供参考
原文链接:https://www.cnblogs.com/vectorx/p/15968216.html


 京公网安备 11010802041100号 | 京ICP备19059560号-4 | PHP1.CN 第一PHP社区 版权所有