热门标签 | HotTags
当前位置:  开发笔记 > 运维 > 正文

SpringBoot自定义starter的示例代码

这篇文章主要介绍了SpringBoot自定义starter的示例代码,小编觉得挺不错的,现在分享给大家,也给大家做个参考。一起跟随小编过来看看吧

SpringBoot 个人感觉特点:

1)众多库的集合(各种Starter),方便快速构建应用系统。

2)自动配置spring(通过AutoConfiguration机制),简化配置,也方便扩展新的Starter。

3)内嵌web容器,无需WAR部署。

创建一个用maven构建的springboot项目
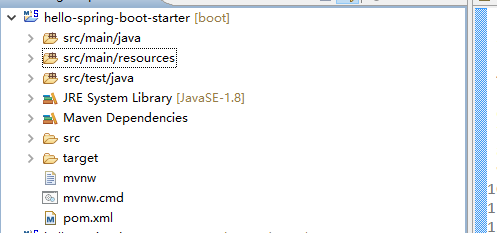
pom文件配置如下:

<&#63;xml version="1.0" encoding="UTF-8"&#63;>

  4.0.0

  com.xjw.springboot
  hellostarter
  0.0.1-SNAPSHOT
  jar

  hello-spring-boot-starter
  测试自定义starter

  
    org.springframework.boot
    spring-boot-starter-parent
    1.5.2.RELEASE


    UTF-8
    UTF-8
    1.8


      org.springframework.boot
      spring-boot-starter


      org.springframework.boot
      spring-boot-starter-test
      test
    
    
      org.springframework.boot
      spring-boot-configuration-processor
      true


        org.springframework.boot
        spring-boot-maven-plugin


定义一个pojo用来接收properties中配置的信息

package com.xjw;                                                     
                                                             
import org.springframework.boot.context.properties.ConfigurationProperties;                        
                                                             
@ConfigurationProperties(prefix = "hello")                                        
public class HelloServiceProperteis {                                           
                                                             
  private String msg;                                                  
                                                             
  public String getMsg() {                                               
    return msg;                                                    
  }                                                           
                                                             
  public void setMsg(String msg) {                                           
    this.msg = msg;                                                  
  }                                                           
                                                             
}

@ConfigurationProperties:用来标识这个pojo是一个用来接收指定前缀的资源配置值

prefix:表示在配置文件中配置项前缀[/code]

编写一个Service用来对外提供服务

package com.xjw;

public class HelloService {

  private String msg;

  public String sayHello() {
    return "Hello " + msg;
  }

  public String getMsg() {
    return msg;
  }

  public void setMsg(String msg) {
    this.msg = msg;
  }

}

配置一个pojo用来读取上面配置的HelloServiceProperteis

package com.xjw;                                                              
                                                                      
import org.springframework.beans.factory.annotation.Autowired;                                       
import org.springframework.boot.autoconfigure.condition.ConditionalOnClass;                                 
import org.springframework.boot.autoconfigure.condition.ConditionalOnMissingBean;                              
import org.springframework.boot.autoconfigure.condition.ConditionalOnProperty;                               
import org.springframework.boot.context.properties.EnableConfigurationProperties;                              
import org.springframework.context.annotation.Bean;                                             
import org.springframework.context.annotation.Configuration;                                        
                                                                      
@Configuration                                                               
@EnableConfigurationProperties(value = HelloServiceProperteis.class)                                    
@ConditionalOnClass(HelloService.class)                                                   
@ConditionalOnProperty(prefix = "hello", value = "enable", matchIfMissing = true)                              
public class HelloAutoConfiguration {                                                    
                                                                      
  @Autowired                                                               
  private HelloServiceProperteis helloServiceProperteis;                                         
                                                                      
  @Bean                                                                  
  @ConditionalOnMissingBean(HelloService.class)                                              
  public HelloService helloService() {                                                  
    HelloService helloService = new HelloService();                                           
    helloService.setMsg(helloServiceProperteis.getMsg());                                        
    return helloService;                                                        
  }                                                                    
}

@Configuration:标识此类为一个spring配置类

@EnableConfigurationProperties(value = HelloServiceProperteis.class):启动配置文件,value用来指定我们要启用的配置类,可以有多个,多个时我们可以这么写value={xxProperties1.class,xxProperteis2.class....}

@ConditionalOnClass(HelloService.class):表示当classPath下存在HelloService.class文件时改配置文件类才有效

@ConditionalOnProperty(prefix = "hello", value = "enable", matchIfMissing = true):表示只有我们的配置文件是否配置了以hello为前缀的资源项值,并且在该资源项值为enable,如果没有配置我们默认设置为enable[/code]

最后在src/main/resources 文件夹下新建文件夹 META-INF,在新建的META-INF文件夹下新建spring.factories
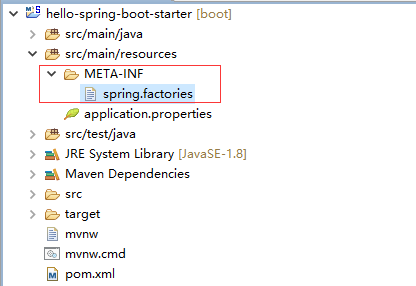
在新建的spring.factories文件中配置自动启动类为我们之前编写的HelloAutoConfiguration 类

org.springframework.boot.autoconfigure.EnableAutoCOnfiguration=com.xjw.HelloAutoConfiguration

然后就可以在其他的spring-boot项目中使用我们刚刚新建的starter了,我们来测试一下

在新建一个spring-boot项目,pom.xml配置如下:

<&#63;xml version="1.0" encoding="UTF-8"&#63;>

  4.0.0

  com.xjw.springboot
  hellostarter.test
  0.0.1-SNAPSHOT
  jar

  hello-spring-boot-starter-test
  测试自定义starter

  
    org.springframework.boot
    spring-boot-starter-parent
    1.5.2.RELEASE


    UTF-8
    UTF-8
    1.8


      org.springframework.boot
      spring-boot-starter-web


      org.springframework.boot
      spring-boot-starter-test
      test


      com.xjw.springboot
      hellostarter
      0.0.1-SNAPSHOT
    
    
      org.springframework.boot
      spring-boot-devtools


        org.springframework.boot
        spring-boot-maven-plugin


然后我们直接在咋们的启动类中中尝试使用以下我们上面定义的starter提供的HelloService:

package com.xjw;

import org.springframework.beans.factory.annotation.Autowired;
import org.springframework.boot.SpringApplication;
import org.springframework.boot.autoconfigure.SpringBootApplication;
import org.springframework.web.bind.annotation.RequestMapping;
import org.springframework.web.bind.annotation.RestController;

@RestController
@SpringBootApplication
public class HelloSpringBootStarterTestApplication {

  @Autowired
  private HelloService helloService;

  @RequestMapping("/")
  public String index() {
    return helloService.sayHello();
  }

  public static void main(String[] args) {
    SpringApplication.run(HelloSpringBootStarterTestApplication.class, args);
  }
}

接着我们修改测试项目中的application.properteis,加入如下配置:

debug=true
server.port=8888

#hello=enable
hello.msg=测试starter

最后启动项目,观察控制台输出的内容中依赖的starter,从Positive matches下我们可以看到有这么一句:

HelloAutoConfiguration matched:
- @ConditionalOnClass found required class 'com.xjw.HelloService'; @ConditionalOnMissingClass did not find unwanted class (OnClassCondition)
- @ConditionalOnProperty (hello.enable) matched (OnPropertyCondition)

或者我们打开项目依赖树也能找到我们的starter ,这说明spring已经自动的启动了我们的starter了,打开浏览器输入地址:http://localhost:8888/将会看到如下结果
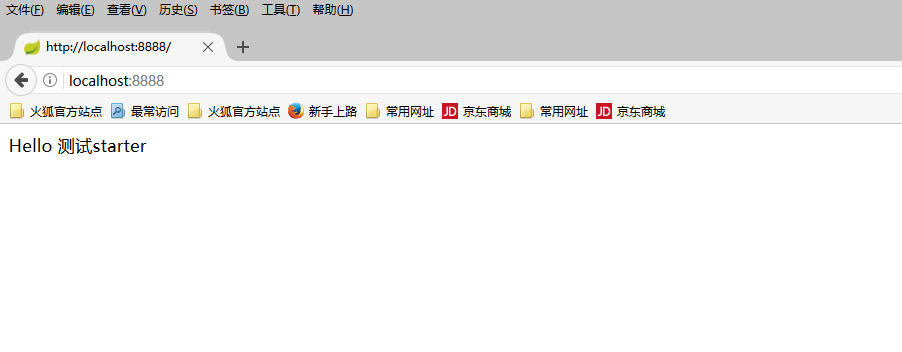
以上就是本文的全部内容,希望对大家的学习有所帮助,也希望大家多多支持。


推荐阅读
  • 本文讨论了Alink回归预测的不完善问题,指出目前主要针对Python做案例,对其他语言支持不足。同时介绍了pom.xml文件的基本结构和使用方法,以及Maven的相关知识。最后,对Alink回归预测的未来发展提出了期待。 ... [详细]
  • Android系统移植与调试之如何修改Android设备状态条上音量加减键在横竖屏切换的时候的显示于隐藏
    本文介绍了如何修改Android设备状态条上音量加减键在横竖屏切换时的显示与隐藏。通过修改系统文件system_bar.xml实现了该功能,并分享了解决思路和经验。 ... [详细]
  • 标题: ... [详细]
  • Spring常用注解(绝对经典),全靠这份Java知识点PDF大全
    本文介绍了Spring常用注解和注入bean的注解,包括@Bean、@Autowired、@Inject等,同时提供了一个Java知识点PDF大全的资源链接。其中详细介绍了ColorFactoryBean的使用,以及@Autowired和@Inject的区别和用法。此外,还提到了@Required属性的配置和使用。 ... [详细]
  • Activiti7流程定义开发笔记
    本文介绍了Activiti7流程定义的开发笔记,包括流程定义的概念、使用activiti-explorer和activiti-eclipse-designer进行建模的方式,以及生成流程图的方法。还介绍了流程定义部署的概念和步骤,包括将bpmn和png文件添加部署到activiti数据库中的方法,以及使用ZIP包进行部署的方式。同时还提到了activiti.cfg.xml文件的作用。 ... [详细]
  • Servlet多用户登录时HttpSession会话信息覆盖问题的解决方案
    本文讨论了在Servlet多用户登录时可能出现的HttpSession会话信息覆盖问题,并提供了解决方案。通过分析JSESSIONID的作用机制和编码方式,我们可以得出每个HttpSession对象都是通过客户端发送的唯一JSESSIONID来识别的,因此无需担心会话信息被覆盖的问题。需要注意的是,本文讨论的是多个客户端级别上的多用户登录,而非同一个浏览器级别上的多用户登录。 ... [详细]
  • 本文介绍了在开发Android新闻App时,搭建本地服务器的步骤。通过使用XAMPP软件,可以一键式搭建起开发环境,包括Apache、MySQL、PHP、PERL。在本地服务器上新建数据库和表,并设置相应的属性。最后,给出了创建new表的SQL语句。这个教程适合初学者参考。 ... [详细]
  • PHP图片截取方法及应用实例
    本文介绍了使用PHP动态切割JPEG图片的方法,并提供了应用实例,包括截取视频图、提取文章内容中的图片地址、裁切图片等问题。详细介绍了相关的PHP函数和参数的使用,以及图片切割的具体步骤。同时,还提供了一些注意事项和优化建议。通过本文的学习,读者可以掌握PHP图片截取的技巧,实现自己的需求。 ... [详细]
  • 这是原文链接:sendingformdata许多情况下,我们使用表单发送数据到服务器。服务器处理数据并返回响应给用户。这看起来很简单,但是 ... [详细]
  • iOS超签签名服务器搭建及其优劣势
    本文介绍了搭建iOS超签签名服务器的原因和优势,包括不掉签、用户可以直接安装不需要信任、体验好等。同时也提到了超签的劣势,即一个证书只能安装100个,成本较高。文章还详细介绍了超签的实现原理,包括用户请求服务器安装mobileconfig文件、服务器调用苹果接口添加udid等步骤。最后,还提到了生成mobileconfig文件和导出AppleWorldwideDeveloperRelationsCertificationAuthority证书的方法。 ... [详细]
  • 本文介绍了在Mac上安装Xamarin并使用Windows上的VS开发iOS app的方法,包括所需的安装环境和软件,以及使用Xamarin.iOS进行开发的步骤。通过这种方法,即使没有Mac或者安装苹果系统,程序员们也能轻松开发iOS app。 ... [详细]
  • 本文讨论了如何使用Web.Config进行自定义配置节的配置转换。作者提到,他将msbuild设置为详细模式,但转换却忽略了带有替换转换的自定义部分的存在。 ... [详细]
  • 本文介绍了如何使用JSONObiect和Gson相关方法实现json数据与kotlin对象的相互转换。首先解释了JSON的概念和数据格式,然后详细介绍了相关API,包括JSONObject和Gson的使用方法。接着讲解了如何将json格式的字符串转换为kotlin对象或List,以及如何将kotlin对象转换为json字符串。最后提到了使用Map封装json对象的特殊情况。文章还对JSON和XML进行了比较,指出了JSON的优势和缺点。 ... [详细]
  • 本文介绍了Android中的assets目录和raw目录的共同点和区别,包括获取资源的方法、目录结构的限制以及列出资源的能力。同时,还解释了raw目录中资源文件生成的ID,并说明了这些目录的使用方法。 ... [详细]
  • EPPlus绘制刻度线的方法及示例代码
    本文介绍了使用EPPlus绘制刻度线的方法,并提供了示例代码。通过ExcelPackage类和List对象,可以实现在Excel中绘制刻度线的功能。具体的方法和示例代码在文章中进行了详细的介绍和演示。 ... [详细]
author-avatar
依一勇婷16_639
这个家伙很懒,什么也没留下!
PHP1.CN | 中国最专业的PHP中文社区 | DevBox开发工具箱 | json解析格式化 |PHP资讯 | PHP教程 | 数据库技术 | 服务器技术 | 前端开发技术 | PHP框架 | 开发工具 | 在线工具
Copyright © 1998 - 2020 PHP1.CN. All Rights Reserved | 京公网安备 11010802041100号 | 京ICP备19059560号-4 | PHP1.CN 第一PHP社区 版权所有