w ^ritten by Alexander Nnakwue✏️
Introduction
大多数大型科技公司都以各种方式从其用户那里获取数据,并且在大多数情况下,这些数据是原始格式的。 数据以一种可理解且可用的格式,可以帮助推动业务需求。 挑战在于处理数据,并在必要时转换或清除数据以使其有意义。
基本数据流应用程序将数据从源存储桶移动到目标存储桶。 涉及流的更复杂的应用程序会动态执行某些操作,例如更改输出数据的结构或使用新的属性或字段来丰富它。
在本文中,我们将学习如何使用Apache Kafka构建最小的实时数据流应用程序。 该帖子还将介绍以下内容:
- Kafka和ZooKeeper作为我们的工具批量数据处理与存储在本地安装和运行Kafka引导我们的应用程序安装依赖创建一个Kafka主题产生所创建的主题消费一个话题
According to its website, Kafka is an open-source, highly distributed streaming platform. Built by the engineers at LinkedIn (now part of the Apache software foundation), it prides itself as a reliable, resilient, and scalable system that supports streaming events/applications. It is horizontally scalable, fault-tolerant by default, and offers high speed.
Kafka has a variety of use cases, one of which is to build data pipelines or applications that handle streaming events and/or processing of batch data in real-time.
使用Apache Kafka,我们将研究如何构建数据管道来移动批处理数据。 作为一个小示例,我们将模拟在源中生成的大型JSON数据存储。
然后,我们将编写一个生产者脚本,该脚本从A点到本地代理/集群Kafka设置上的特定主题的源中生成/写入JSON数据。 最后,我们将编写一个使用者脚本,该脚本使用指定Kafka主题中存储的数据。
注意:数据转换和/或充实主要是从输入主题中消费以供另一个应用程序或输出主题使用时处理的。这是数据工程中非常常见的场景,因为始终需要清理,转换,聚合甚至重新处理Kafka主题中通常原始和临时存储的数据,以使其符合特定的标准或格式。

Prerequisites
为了使您能够继续学习本教程,您将需要:
- The latest versions of Node.js and npm installed on your machine
- The latest Java version (JVM) installed on your machine
- Kafka installed on your local machine. In this tutorial, we will be running through installing Kafka locally on our machines
- A basic understanding of writing Node.js applications
但是,在继续之前,让我们回顾一下有关Kafka的一些基本概念和术语,以便我们可以轻松地随本教程一起学习。
ZooKeeper
Kafka is highly dependent on ZooKeeper, which is the service it uses to keep track of its cluster state. ZooKeeper helps control the synchronization and configuration of Kafka brokers or servers, which involves selecting the appropriate leaders. For more detailed information on ZooKeeper, you can check its awesome documentation.
Topic
Kafka主题是跨多个Kafka代理的一组分区或组。 为了更清楚地理解,该主题充当集群中流数据的间歇存储机制。 对于每个Kafka主题,我们可以选择设置复制因子和其他参数,例如分区数等。
Producers, consumers, and clusters
生产者是产生数据或将数据写入Kafka经纪人或Kafka主题的客户,更确切地说是。 消费者则读取数据,或者顾名思义,是从Kafka主题或Kafka经纪人那里消费数据。 集群只是一组驱动当前Kafka实例的代理或服务器。

For more detailed information on all these vital concepts, you can check this section of the Apache Kafka documentation.
Installing Kafka
To install Kafka, all we have to do is download the binaries here and extract the archive. We do so by running the following command on our terminal or command prompt:
cd <location-of-downloaded-kafka-binary>
tar -xzf <downloaded-kafka-binary>
cd <name-of_kafka-binary>
的柏油命令提取下载的Kafka二进制文件。 之后&#xff0c;我们导航到Kafka的安装目录。 我们将看到如下所示的所有文件&#xff1a;

注意&#xff1a;Kafka二进制文件可以在我们希望在计算机上下载的任何路径上下载。 另外&#xff0c;在撰写本文时&#xff0c;最新的Kafka版本是2.3.0。
此外&#xff0c;如果我们升级&#xff08;光盘..&#xff09;&#xff0c;我们会找到一个配置 folder inside the downloaded Kafka binary directory. Here, we can 配置ure our Kafka server and include any changes or 配置urations we may want. Now, let’s play along:
cd ..
ls
cd config
ls
nano server.properties

既然我们知道在哪里配置我们的Kafka服务器&#xff0c;就该学习如何使用Kafka。 稍后&#xff0c;我们将了解我们可以重新配置或更新的字段server.properties文件。
In this tutorial, we will be using the kafka-node client library for Node.js. Note that Kafka has other clients for other programming languages as well, so feel free to use Kafka for any other language of your choice.
Kafka to the rescue
由于在本练习中使用的是Node.js&#xff0c;因此我们将从引导具有最小结构的基本应用程序开始。 首先&#xff0c;我们将创建一个新目录来容纳我们的项目并导航到其中&#xff0c;如下所示&#xff1a;
mkdir kafka-sample-app
cd kafka-sample-app
然后&#xff0c;我们可以继续创建一个package.json通过运行文件npm初始化命令。
现在&#xff0c;我们可以按照说明像往常一样设置我们的项目。 我们的package.json完成后&#xff0c;文件应如下所示&#xff1a;
{"name": "kafka-producer_consumer_tutorial","version": "1.0.0","description": "Building a real-time data streaming application pipeline with Apache Kafka","main": "app.js","scripts": {"test": "echo \"Error: no test specified\" && exit 1","start": "node producer.js"},"author": "Alexander Nnakwue","license": "MIT","dependencies": {"dotenv": "^8.2.0","kafka-node": "^4.1.3"}
}
Here we have installed two dependencies we will need later on. To install our kafka-node client, we run npm install kafka-node on the terminal. The documentation for kafka-node is available on npm. The dotenv package is used for setting up environment variables for our app. To install the package, we can run npm install dotenv.
既然我们已经完成了依赖项的安装&#xff0c;我们现在可以继续创建所有必要的文件&#xff0c;如下图所示&#xff1a;

上图显示了我们的应用程序所需的所有必要文件。 让我们看一下每个文件&#xff0c;了解发生了什么。
首先&#xff0c;要从终端手动创建一个新主题&#xff0c;我们可以使用以下命令&#xff1a;
./kafka-topics.sh --create --zookeeper <ZOOKEEPER_URL:PORT> --replication-factor <NO_OF_REPLICATIONS> --partitions <NO_OF_PARTITIONS> --topic <TOPIC_NAME>
请注意&#xff0c;我们不要忘记更新
However, in this tutorial, we have a script that handles that for us. The code for creating a new topic can be found in the createTopic.js file. The code is also shown below:
const kafka &#61; require(&#39;kafka-node&#39;);
const config &#61; require(&#39;./config&#39;);const client &#61; new kafka.KafkaClient({kafkaHost: config.KafkaHost});const topicToCreate &#61; [{topic: config.KafkaTopic,partitions: 1,replicationFactor: 1
}
];client.createTopics(topicToCreate, (error, result) &#61;> {// result is an array of any errors if a given topic could not be createdconsole.log(result, &#39;topic created successfully&#39;);
});
在这里&#xff0c;我们导入Kafka客户端并连接到我们的Kafka设置。 您可能会注意到&#xff0c;我们从未在用例中配置复制因子。 但是&#xff0c;这并不反映实际情况。
在生产用例中&#xff0c;我们可以根据要处理的数据或消息量设置多个Kafka代理。 让我们看看如何在本地设置中完成此任务。
- Navigate to the config directory in our downloaded binary
cd config - Open the Kafka
server.propertiesfile. This file contains all the config for our Kafka server setup. We can open the file using thenano server.propertiescommand - Now, we can create multiple copies of this file and just alter a few configurations on the other copied files. What we mean here is that in the duplicated files, we can go ahead and change some unique fields like the
broker.id,log.dirs, and the broker or host port. For more information on configuring our Kafka setup, you can check the documentation
After creating a topic, we can now produce or write data to it. The code for writing to a topic is found in the producer.js file. The code is shown below:
const Kafka &#61; require(&#39;kafka-node&#39;);
const config &#61; require(&#39;./config&#39;);const Producer &#61; Kafka.Producer;
const client &#61; new Kafka.KafkaClient({kafkaHost: config.KafkaHost});
const producer &#61; new Producer(client, {requireAcks: 0, partitionerType: 2});const pushDataToKafka &#61;(dataToPush) &#61;> {try {let payloadToKafkaTopic &#61; [{topic: config.KafkaTopic, messages: JSON.stringify(dataToPush) }];console.log(payloadToKafkaTopic);producer.on(&#39;ready&#39;, async function() {producer.send(payloadToKafkaTopic, (err, data) &#61;> {console.log(&#39;data: &#39;, data);});producer.on(&#39;error&#39;, function(err) {// handle error cases here})})}
catch(error) {console.log(error);
}};const jsonData &#61; require(&#39;./app_json.js&#39;);pushDataToKafka(jsonData);
在这里&#xff0c;我们导入了kafka-node库&#xff0c;并设置了客户端以接收来自Kafka代理的连接。 建立连接后&#xff0c;我们会将数据生成到指定的Kafka主题。 请注意&#xff0c;在实际应用中&#xff0c;我们应通过调用以下命令来关闭客户端的连接client.close&#xff08;&#xff09;方法。
现在&#xff0c;当我们使用./start.sh命令&#xff0c;将数据写入我们的Kafka主题。
npm start
To read data from the topic, we can use our consumer script in the consumer.js file by running node ./consumer.js. We get the following output:
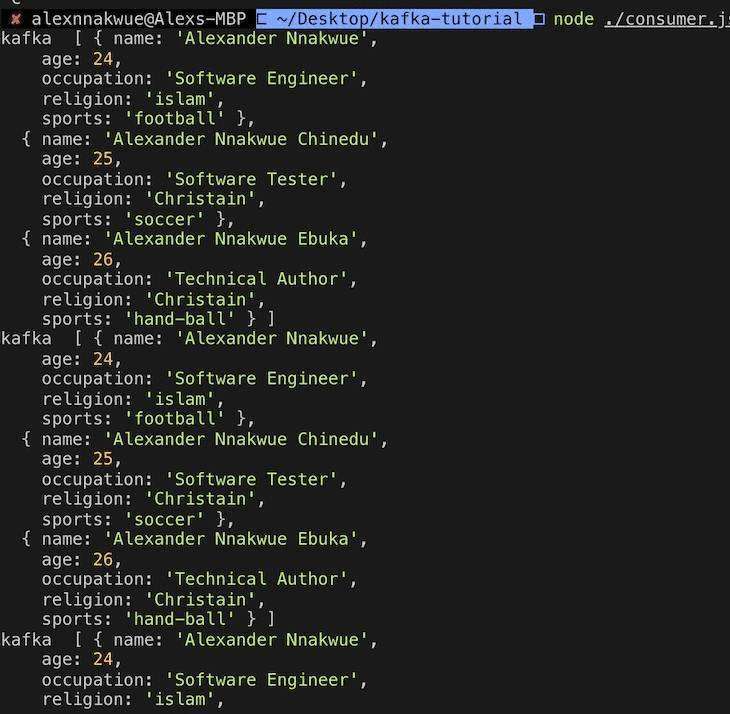
的代码Consumer.js文件也显示如下&#xff1a;
const kafka &#61; require(&#39;kafka-node&#39;);
const config &#61; require(&#39;./config&#39;);try {const Consumer &#61; kafka.Consumer;const client &#61; new kafka.KafkaClient({idleConnection: 24 * 60 * 60 * 1000, kafkaHost: config.KafkaHost});let consumer &#61; new Consumer(client,[{ topic: config.KafkaTopic, partition: 0 }],{autoCommit: true,fetchMaxWaitMs: 1000,fetchMaxBytes: 1024 * 1024,encoding: &#39;utf8&#39;,// fromOffset: false});consumer.on(&#39;message&#39;, async function(message) {console.log(&#39;kafka &#39;,JSON.parse(message.value));})consumer.on(&#39;error&#39;, function(error) {// handle error console.log(&#39;error&#39;, error);});
}
catch(error) {// catch error traceconsole.log(error);
}
在这里&#xff0c;我们连接到Kafka客户端&#xff0c;并使用预定义的Kafka主题进行消费。
注意&#xff1a;一旦完成设置并想要启动我们的应用程序&#xff0c;我们必须首先启动ZooKeeper服务器。 之后&#xff0c;我们可以启动我们的Kafka服务器。 这是因为Kafka依赖ZooKeeper来运行。
要启动ZooKeeper服务器&#xff0c;我们可以从终端运行以下命令&#xff1a;
bin/zookeeper-server-start.sh config/zookeeper.properties
要启动我们的Kafka服务器&#xff0c;我们可以运行&#xff1a;
bin/Kafka-server-start.sh config/server.properties
顺便说一句&#xff0c;我们可以通过运行以下命令来检查代理中可用的Kafka主题的数量&#xff1a;
bin/Kafka-topics.sh --list --zookeeper localhost:2181
最后&#xff0c;我们还可以通过在终端上运行消费者控制台命令来使用Kafka主题中的数据&#xff0c;如下所示&#xff1a;
bin/kafka-console-consumer.sh --bootstrap-server localhost:9092 --topic kafka-example-topic --from-beginning
此外&#xff0c;Kafka提供了一个脚本来手动允许开发人员在其集群上创建主题。 该脚本如下所示&#xff1a;
./kafka-topics.sh --create --zookeeper <ZOOKEEPER_URL:PORT> --replication-factor <NO_OF_REPLICATIONS> --partitions <NO_OF_PARTITIONS> --topic <TOPIC_NAME>
注意&#xff1a;我们需要分别在单独的终端窗口上分别启动ZooKeeper和Kafka服务器&#xff0c;然后才能继续创建Kafka主题。
Finally, the code for this tutorial is available on this GitHub repo. To get a feel of the design philosophy used for Kafka, you can check this section of the documentation. In a future tutorial, we can look at other tools made available via the Kafka API, like Kafka streams and Kafka connect. For an introduction, you can check this section of the documentation.
Summary
总之&#xff0c;Kafka可以充当发布者/订阅者之类的系统&#xff0c;用于构建批处理数据的读写流&#xff0c;就像RabbitMQ一样。 它还可以用于构建高度灵活&#xff0c;可扩展的实时流和处理应用程序。 请注意&#xff0c;可以基于一些预定义的事件即时进行这种流处理。
另外&#xff0c;就像消息传递系统一样&#xff0c;Kafka具有由高度容忍的群集组成的存储机制&#xff0c;这些群集被复制并高度分布。 通过复制&#xff0c;我们意味着数据可以分布在多个不同的群集中&#xff0c;从而使整个链中的数据丢失保持在最低水平。
总体而言&#xff0c;Kafka可以作为独立插件集成到其他系统中。 在这种情况下&#xff0c;它可以根据需要独立缩放。 这意味着我们可以独立扩展生产者和消费者&#xff0c;而不会对整个应用程序造成任何副作用。
最后&#xff0c;我们已经看到构建数据管道涉及将数据从生成它的源点&#xff08;注意这也意味着从另一个应用程序输出的数据&#xff09;移动到需要或使用它的目标点。 通过另一个应用程序。 现在&#xff0c;我们可以继续探索其他更复杂的用例。
In case you might have any questions, don’t hesitate to engage me in the comment section below or hit me up on Twitter.
Ëditor&#39;s note: Seeing something wrong with this post? You can find the correct version here.
Plug: LogRocket, a DVR for web apps
LogRocket is a frontend logging tool that lets you replay problems as if they happened in your own browser. Instead of guessing why errors happen, or asking users for screenshots and log dumps, LogRocket lets you replay the session to quickly understand what went wrong. It works perfectly with any app, regardless of framework, and has plugins to log additional context from Redux, Vuex, and &#64;ngrx/store.
In addition to logging Redux actions and state, LogRocket records console logs, Javascript errors, stacktraces, network requests/responses with headers &#43; bodies, browser metadata, and custom logs. It also instruments the DOM to record the HTML and CSS on the page, recreating pixel-perfect videos of even the most complex single-page apps.
Try it for free.
The post Building a real-time data streaming app with Apache Kafka appeared first on LogRocket Blog.


 京公网安备 11010802041100号