本文章主要是分享如何使用Python从MySQL数据库中面抽取试题,生成的试卷每一份都不一样。
下载地址:https://www.python.org/downloads/windows/
pip installpython-docx==0.8.10
pip installPyMySQL==1.0.2
开发程序前需要先收集试题,本文是将试题收集存放MySQL数据库中,格式如下:
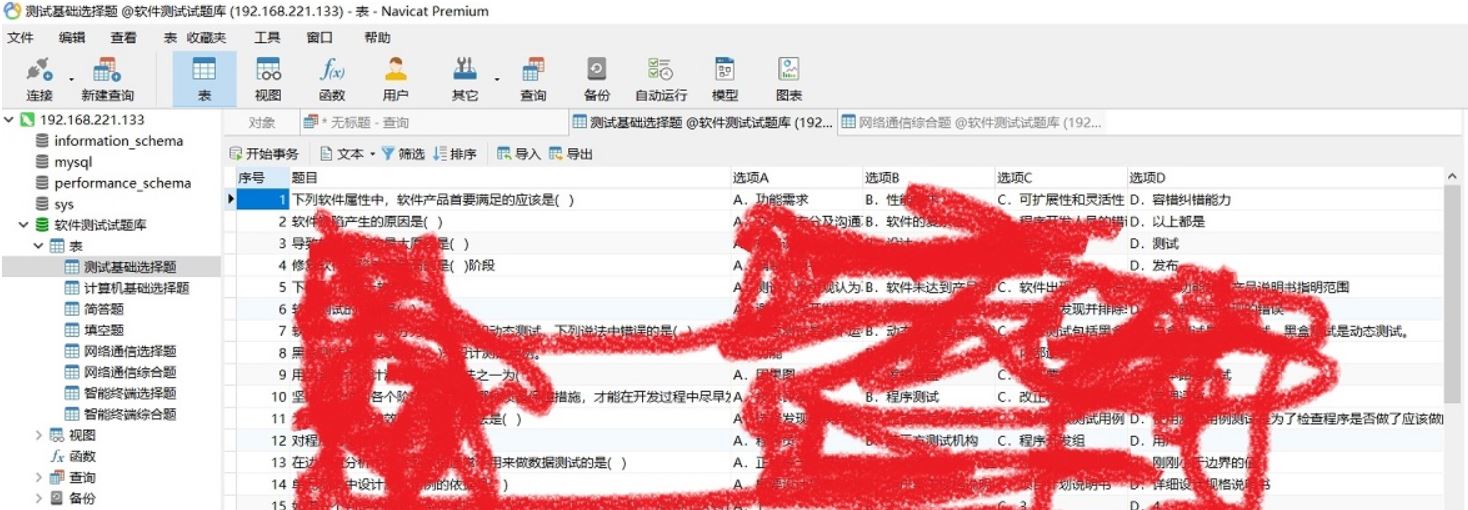
选择题数据库截图:
填空题/解答题/综合题数据库截图:

Python+MySQL随机试卷及答案生成程序.py
# _*_ coding:utf-8 _*_
import random,os,pymysql
from docx import Document
from docx.shared import Inches,Pt
from docx.enum.text import WD_ALIGN_PARAGRAPH,WD_LINE_SPACING
from docx.oxml.ns import qn
from docx.shared import Inches

class SunckSql():
 def __init__(self, host, user, passwd, dbName='', charset='utf8'):
  self.host = host
  self.user = user
  self.passwd = passwd
  self.dbName = dbName
  self.charset = charset

 def connet(self):
  self.db = pymysql.connect(host=self.host, user=self.user, passwd=self.passwd, db=self.dbName,
         charset=self.charset) # 连接数据库
  self.cursor = self.db.cursor() # 获取操作游标

 def close(self):
  self.cursor.close() # 释放游标
  self.db.close() # 关闭数据库连接

 # 查询
 def get_all(self, sql):
  res = None
  try:
   self.connet()
   self.cursor.execute(sql) # 执行sql语句
   res = self.cursor.fetchall() # 返回查询所有结果
  except Exception as e:
   print('查询失败:%s' % e)
  finally:
   self.close()
  return res

 # 增加、删除、修改
 def shell_sql(self, sql):
  "执行sql语句"
  print(sql)
  count = 0
  try:
   self.connet()
   count = self.cursor.execute(sql) # 执行sql语句
   self.db.commit() # 提交
  except Exception as e:
   print('事务提交失败:%s' % e)
   self.db.rollback() # 如果提交失败,回滚到上一次数据
  finally:
   self.close()
  return count

def router_docx(choice1='', choice2='', choice3='', choice5='', choice6='', choice7='',paper_path='',name='1'):
 "生成网络通信方向试题及答案"
 docx1 = Document()
 docx2 = Document()
 docx1.styles['Normal'].font.name = '宋体'         #选择字体
 docx1.styles['Normal']._element.rPr.rFonts.set(qn('w:eastAsia'), '宋体') #默认字体
 docx1.styles['Normal'].font.size = Pt(11)        #默认字号大小
 docx1.styles['Normal'].paragraph_format.space_before = Pt(0)    #默认段前间距
 docx1.styles['Normal'].paragraph_format.space_after = Pt(0)    #默认段后间距
 docx1.styles['Normal'].paragraph_format.line_spacing_rule = WD_LINE_SPACING.ONE_POINT_FIVE #默认单倍行距
 sec = docx1.sections[0]             # sections对应文档中的“节”
 sec.left_margin = Inches(1)            # 设置左页面边距
 sec.right_margin = Inches(1)            #设置右页面边距
 sec.top_margin = Inches(0.5)            # 设置上页面边距
 sec.bottom_margin = Inches(0.5)           #设置下页面边距

 p=docx1.add_paragraph()             #添加段落
 run = p.add_run('软件测试(网络通信)方向试题(%s)' % name)      #使用add_run添加文字
 run.font.name = '微软雅黑'             #设置字体
 run._element.rPr.rFonts.set(qn('w:eastAsia'), '微软雅黑')     #设置字体
 run.font.size = Pt(18)             #字体大小设置
 p.paragraph_format.alignment = WD_ALIGN_PARAGRAPH.CENTER     #段落文字居中设置
 docx1.add_paragraph('【说明】')           # 添加段落文字
 docx1.add_paragraph('1.笔试时间为60分钟。')
 docx1.add_paragraph('2.请将答案写在答题卡上,且不允许在试题卷上做任何涂写和标记。')
 q=docx2.add_paragraph()             #添加段落
 run = q.add_run('软件测试(网络通信)方向试题答案(%s)' % name)     #使用add_run添加文字
 run.font.name = '微软雅黑'             #设置字体
 run._element.rPr.rFonts.set(qn('w:eastAsia'), '微软雅黑')     #设置字体
 run.font.size = Pt(18)             #字体大小设置
 q.paragraph_format.alignment = WD_ALIGN_PARAGRAPH.CENTER     #段落文字居中设置

 p1 = docx1.add_paragraph()
 p1.paragraph_format.space_before = Pt(12)        #设置段前间距
 docx2.add_paragraph('一、选择题')
 run = p1.add_run('一、选择题(每题3分共45分)')
 run.bold = True               # 字体加粗
 list1=random.sample(range(0,len(choice1)-1),3)       #len范围内获取指定的数量
 x=1
 for y in list1:
  docx1.add_paragraph(str(x)+'、'+choice1[y][1])
  docx1.add_paragraph(choice1[y][2])
  docx1.add_paragraph(choice1[y][3])
  docx1.add_paragraph(choice1[y][4])
  p11=docx1.add_paragraph(choice1[y][5])
  p11.paragraph_format.space_after = Pt(12)       #段后间距
  docx2.add_paragraph(str(x)+'、'+choice1[y][6])
  x+=1

 list2=random.sample(range(0,len(choice2)-1),7)
 x=1
 for y in list2:
  docx1.add_paragraph(str(x+3)+'、'+choice2[y][1])
  docx1.add_paragraph(choice2[y][2])
  docx1.add_paragraph(choice2[y][3])
  docx1.add_paragraph(choice2[y][4])
  p11=docx1.add_paragraph(choice2[y][5])
  p11.paragraph_format.space_after = Pt(12)
  docx2.add_paragraph(str(x+3)+'、'+choice2[y][6])
  x+=1

 list3=random.sample(range(0,len(choice3)-1),5)
 x=1
 for y in list3:
  docx1.add_paragraph(str(x+10)+'、'+choice3[y][1])
  docx1.add_paragraph(choice3[y][2])
  docx1.add_paragraph(choice3[y][3])
  docx1.add_paragraph(choice3[y][4])
  p11=docx1.add_paragraph(choice3[y][5])
  p11.paragraph_format.space_after = Pt(12)
  docx2.add_paragraph(str(x+10)+'、'+choice3[y][6])
  x+=1

 p2 = docx1.add_paragraph()
 p2.paragraph_format.space_before = Pt(12)
 docx2.add_paragraph('二、填空题')
 run = p2.add_run('二、填空题(每题3分,共15分)')
 run.bold = True
 list2 = random.sample(range(0, len(choice5)-1), 5)
 i = 1
 for j in list2:
  docx1.add_paragraph(str(i) + '、' + choice5[j][1])
  docx2.add_paragraph(str(i) + '、' + str(choice5[j][2]))
  i += 1

 p3 = docx1.add_paragraph()
 p3.paragraph_format.space_before = Pt(12)
 docx2.add_paragraph('三、简答题')
 run = p3.add_run('三、简答题(每题10分,共20分)')
 run.bold = True
 list3 = random.sample(range(0, len(choice6)-1), 2)
 n = 1
 for m in list3:
  docx1.add_paragraph(str(n) + '、' + choice6[m][1])
  docx1.add_paragraph('\r')
  docx2.add_paragraph(str(n) + '、' + choice6[m][2])
  n += 1

 p4 = docx1.add_paragraph()
 p4.paragraph_format.space_before = Pt(12)
 docx2.add_paragraph('四、综合题')
 run = p4.add_run('四、综合题(共20分)')
 run.bold = True
 list4 = random.randint(0, len(choice7)-1)
 docx1.add_paragraph('1、' + choice7[list4][1])
 docx2.add_paragraph(choice7[list4][2])

 docx1.save(os.path.join(paper_path, '网络通信试题(%s).docx' % name))    #保存试题
 docx2.save(os.path.join(paper_path, '网络通信试题答案(%s).docx' % name))   #保存答案

def android_docx(choice1, choice2, choice4, choice5, choice6, choice8,paper_path,name):
 """生成智能终端方向的试题"""
 docx1 = Document()
 docx2 = Document()
 docx1.styles['Normal'].font.name = '宋体'          #选择字体
 docx1.styles['Normal']._element.rPr.rFonts.set(qn('w:eastAsia'), '宋体')   #默认字体
 docx1.styles['Normal'].font.size = Pt(11)          #默认字号大小
 docx1.styles['Normal'].paragraph_format.space_before = Pt(0)     #默认段前间距
 docx1.styles['Normal'].paragraph_format.space_after = Pt(0)      #默认段后间距
 docx1.styles['Normal'].paragraph_format.line_spacing_rule = WD_LINE_SPACING.ONE_POINT_FIVE #默认单倍行距
 sec = docx1.sections[0]               # sections对应文档中的“节”
 sec.left_margin = Inches(1)              # 设置左页面边距
 sec.right_margin = Inches(1)             #设置右页面边距
 sec.top_margin = Inches(0.5)             # 设置上页面边距
 sec.bottom_margin = Inches(0.5)             #设置下页面边距

 p=docx1.add_paragraph()               #添加段落
 run = p.add_run('软件测试(智能终端)方向试题(%s)' % name)        #使用add_run添加文字
 run.font.name = '微软雅黑'              #设置字体
 run._element.rPr.rFonts.set(qn('w:eastAsia'), '微软雅黑')       #设置字体
 run.font.size = Pt(18)               #字体大小设置
 p.paragraph_format.alignment = WD_ALIGN_PARAGRAPH.CENTER      #段落文字居中设置
 docx1.add_paragraph('【说明】')             # 添加段落文字
 docx1.add_paragraph('1.笔试时间为60分钟。')
 docx1.add_paragraph('2.请将答案写在答题卡上,且不允许在试题卷上做任何涂写和标记。')
 q = docx2.add_paragraph()              # 添加段落
 run = q.add_run('软件测试(智能终端)方向试题答案(%s)' % name)       # 使用add_run添加文字
 run.font.name = '微软雅黑'              # 设置字体
 run._element.rPr.rFonts.set(qn('w:eastAsia'), '微软雅黑')       # 设置字体
 run.font.size = Pt(18)               # 字体大小设置
 q.paragraph_format.alignment = WD_ALIGN_PARAGRAPH.CENTER      # 段落文字居中设置

 p1 = docx1.add_paragraph()
 p1.paragraph_format.space_before = Pt(12)          #设置段前间距
 docx2.add_paragraph('一、选择题')
 run = p1.add_run('一、选择题(每题3分共45分)')
 run.bold = True                 # 字体加粗
 list1=random.sample(range(0,len(choice1)-1),3)
 x=1
 for y in list1:
  docx1.add_paragraph(str(x)+'、'+choice1[y][1])
  docx1.add_paragraph(choice1[y][2])
  docx1.add_paragraph(choice1[y][3])
  docx1.add_paragraph(choice1[y][4])
  p11=docx1.add_paragraph(choice1[y][5])
  p11.paragraph_format.space_after = Pt(12)         #段后间距
  docx2.add_paragraph(str(x)+'、'+choice1[y][6])
  x+=1

 list2=random.sample(range(0,len(choice2)-1),7)
 x=1
 for y in list2:
  docx1.add_paragraph(str(x+3)+'、'+choice2[y][1])
  docx1.add_paragraph(choice2[y][2])
  docx1.add_paragraph(choice2[y][3])
  docx1.add_paragraph(choice2[y][4])
  p11=docx1.add_paragraph(choice2[y][5])
  p11.paragraph_format.space_after = Pt(12)
  docx2.add_paragraph(str(x+3)+'、'+choice2[y][6])
  x+=1

 list3=random.sample(range(0,len(choice4)-1),5)
 x=1
 for y in list3:
  docx1.add_paragraph(str(x+10)+'、'+choice4[y][1])
  docx1.add_paragraph(choice4[y][2])
  docx1.add_paragraph(choice4[y][3])
  docx1.add_paragraph(choice4[y][4])
  p11=docx1.add_paragraph(choice4[y][5])
  p11.paragraph_format.space_after = Pt(12)
  docx2.add_paragraph(str(x+10)+'、'+choice4[y][6])
  x+=1

 p2 = docx1.add_paragraph()
 p2.paragraph_format.space_before = Pt(12)
 docx2.add_paragraph('二、填空题')
 run = p2.add_run('二、填空题(每题3分,共15分)')
 run.bold = True
 list2 = random.sample(range(0, len(choice5)-1), 5)
 i = 1
 for j in list2:
  docx1.add_paragraph(str(i) + '、' + choice5[j][1])
  docx2.add_paragraph(str(i) + '、' + str(choice5[j][2]))
  i += 1

 p3 = docx1.add_paragraph()
 p3.paragraph_format.space_before = Pt(12)
 docx2.add_paragraph('三、简答题')
 run = p3.add_run('三、简答题(每题10分,共20分)')
 run.bold = True
 list3 = random.sample(range(0, len(choice6)-1), 2)
 n = 1
 for m in list3:
  docx1.add_paragraph(str(n) + '、' + choice6[m][1])
  docx1.add_paragraph('\r')
  docx2.add_paragraph(str(n) + '、' + choice6[m][2])
  n += 1

 p4 = docx1.add_paragraph()
 p4.paragraph_format.space_before = Pt(12)
 docx2.add_paragraph('四、综合题')
 run = p4.add_run('四、综合题(共20分)')
 run.bold = True
 list4 = random.randint(0, len(choice8)-1)
 docx1.add_paragraph('1、' + choice8[list4][1])
 docx2.add_paragraph(choice8[list4][2])

 docx1.save(os.path.join(paper_path, '智能终端试题(%s).docx' % name))
 docx2.save(os.path.join(paper_path, '智能终端试题答案(%s).docx' % name))

def main(ip,name,passwd,db_name):
 paper_path = os.path.join(os.path.dirname(os.path.abspath(__file__)), '试卷') #试卷存放路径
 if not os.path.exists(paper_path):
  os.mkdir(paper_path)              #创建试卷文件夹
 my = SunckSql(ip,name,passwd,db_name)           #连接数据库
 choice1 = my.get_all("select * from %s" % '计算机基础选择题')      #查询数据库中的试题
 choice2 = my.get_all("select * from %s" % '测试基础选择题')
 choice3 = my.get_all("select * from %s" % '网络通信选择题')
 choice4 = my.get_all("select * from %s" % '智能终端选择题')
 choice5 = my.get_all("select * from %s" % '填空题')
 choice6 = my.get_all("select * from %s" % '简答题')
 choice7 = my.get_all("select * from %s" % '网络通信综合题')
 choice8 = my.get_all("select * from %s" % '智能终端综合题')
 for i in range(1,4):               #同时生成3份试卷及答案
  router_docx(choice1, choice2, choice3, choice5, choice6, choice7, paper_path, i)
  android_docx(choice1, choice2, choice4, choice5, choice6, choice8, paper_path, i)

if __name__ == "__main__":
 main(ip='数据库ip地址', name='mysql账号', passwd='mysql密码', db_name='软件测试试题库')
到此这篇关于Python+MySQL随机试卷及答案生成程序的文章就介绍到这了,更多相关Python MySQL随机试卷内容请搜索以前的文章或继续浏览下面的相关文章希望大家以后多多支持!


 京公网安备 11010802041100号 | 京ICP备19059560号-4 | PHP1.CN 第一PHP社区 版权所有