【原文链接】Kubersphere----基于现有Kubernetes集群安装最小化Kubersphere
编辑文件 ks-namespace.yaml
apiVersion: v1
kind: Namespace
metadata:name: kubesphere-systemlabels:name: kubesphere-system
然后执行如下命令创建
kubectl apply -f ks-namespace.yaml
编辑sc-rbac.yaml
apiVersion: v1
kind: ServiceAccount
metadata:name: nfs-client-provisionernamespace: kubesphere-system
---
apiVersion: rbac.authorization.k8s.io/v1
kind: ClusterRole
metadata:name: nfs-client-provisioner-cr
rules:- apiGroups: [""]resources: ["persistentvolumes"]verbs: ["get","list","watch","create","delete"]- apiGroups: [""]resources: ["persistentvolumeclaims"]verbs: ["get","list","watch","update"]- apiGroups: ["storage.k8s.io"]resources: ["storageclasses"]verbs: ["get","list","watch"]- apiGroups: [""]resources: ["events"]verbs: ["list","watch","create","update","patch"]- apiGroups: [""]resources: ["endpoints"]verbs: ["create","delete","get","list","watch","patch","update"]
---
apiVersion: rbac.authorization.k8s.io/v1
kind: ClusterRoleBinding
metadata:name: nfs-client-provisioner-crb
subjects:- kind: ServiceAccountname: nfs-client-provisionernamespace: kubesphere-system
roleRef:kind: ClusterRolename: nfs-client-provisioner-crapiGroup: rbac.authorization.k8s.io
执行如下命令创建
kubectl apply -f sc-rbac.yaml
编辑 sc-deployment.yaml 文件,内容如下,这里主要需要注意设置如下位置
apiVersion: apps/v1
kind: Deployment
metadata:name: nfs-client-provisionernamespace: kubesphere-system
spec:replicas: 1selector:matchLabels:app: nfs-client-provisionerstrategy:type: Recreatetemplate:metadata:labels:app: nfs-client-provisionerspec:serviceAccountName: nfs-client-provisionercontainers:- name: nfs-client-provisionerimage: registry.cn-beijing.aliyuncs.com/xngczl/nfs-subdir-external-provisione:v4.0.0env:- name: PROVISIONER_NAMEvalue: nfs-storage-class- name: NFS_SERVERvalue: 192.168.16.40- name: NFS_PATHvalue: /root/data/nfs/storageclassvolumeMounts:- name: nfs-client-rootmountPath: /persistentvolumesvolumes:- name: nfs-client-rootnfs:server: 192.168.16.40path: /root/data/nfs/storageclass
然后执行如下命令部署
kubectl apply -f sc-deployment.yaml
编辑 sc-resource.yaml,内容如下,这里需要注意的是provisioner对应的值应该是步骤1.3中eenv中PROVISIONER_NAME变量设置的值
apiVersion: storage.k8s.io/v1
kind: StorageClass
metadata:name: nfs-storageclass
provisioner: nfs-storage-class
allowVolumeExpansion: true
reclaimPolicy: Retain
然后执行如下命令创建
kubectl apply -f sc-resource.yaml
[root@master kubersphere]# kubectl get sc
NAME               PROVISIONER                    RECLAIMPOLICY   VOLUMEBINDINGMODE      ALLOWVOLUMEEXPANSION   AGE
nfs-storageclass   nfs-storage-class              Retain          Immediate              true                   33s
sc-nexus3          kubernetes.io/no-provisioner   Delete          WaitForFirstConsumer   false                  88d
[root@master kubersphere]#
kubectl patch storageclass nfs-storageclass -p '{"metadata": {"annotations":{"storageclass.kubernetes.io/is-default-class":"true"}}}'
再次查看,可以看到此时已经设置好默认的StorageClass了
[root@master kubersphere]# kubectl get sc
NAME                         PROVISIONER                    RECLAIMPOLICY   VOLUMEBINDINGMODE      ALLOWVOLUMEEXPANSION   AGE
nfs-storageclass (default)   nfs-storage-class              Retain          Immediate              true                   2m6s
sc-nexus3                    kubernetes.io/no-provisioner   Delete          WaitForFirstConsumer   false                  88d
[root@master kubersphere]#
二、部署最小化Kubersphere
curl -L -O https://github.com/kubesphere/ks-installer/releases/download/v3.3.1/cluster-configuration.yamlcurl -L -O https://github.com/kubesphere/ks-installer/releases/download/v3.3.1/kubesphere-installer.yaml
注意这里不需要修改
---
apiVersion: apiextensions.k8s.io/v1
kind: CustomResourceDefinition
metadata:name: clusterconfigurations.installer.kubesphere.io
spec:group: installer.kubesphere.ioversions:- name: v1alpha1served: truestorage: trueschema:openAPIV3Schema:type: objectproperties:spec:type: objectx-kubernetes-preserve-unknown-fields: truestatus:type: objectx-kubernetes-preserve-unknown-fields: truescope: Namespacednames:plural: clusterconfigurationssingular: clusterconfigurationkind: ClusterConfigurationshortNames:- cc---
apiVersion: v1
kind: Namespace
metadata:name: kubesphere-system---
apiVersion: v1
kind: ServiceAccount
metadata:name: ks-installernamespace: kubesphere-system---
apiVersion: rbac.authorization.k8s.io/v1
kind: ClusterRole
metadata:name: ks-installer
rules:
- apiGroups:- ""resources:- '*'verbs:- '*'
- apiGroups:- appsresources:- '*'verbs:- '*'
- apiGroups:- extensionsresources:- '*'verbs:- '*'
- apiGroups:- batchresources:- '*'verbs:- '*'
- apiGroups:- rbac.authorization.k8s.ioresources:- '*'verbs:- '*'
- apiGroups:- apiregistration.k8s.ioresources:- '*'verbs:- '*'
- apiGroups:- apiextensions.k8s.ioresources:- '*'verbs:- '*'
- apiGroups:- tenant.kubesphere.ioresources:- '*'verbs:- '*'
- apiGroups:- certificates.k8s.ioresources:- '*'verbs:- '*'
- apiGroups:- devops.kubesphere.ioresources:- '*'verbs:- '*'
- apiGroups:- monitoring.coreos.comresources:- '*'verbs:- '*'
- apiGroups:- logging.kubesphere.ioresources:- '*'verbs:- '*'
- apiGroups:- jaegertracing.ioresources:- '*'verbs:- '*'
- apiGroups:- storage.k8s.ioresources:- '*'verbs:- '*'
- apiGroups:- admissionregistration.k8s.ioresources:- '*'verbs:- '*'
- apiGroups:- policyresources:- '*'verbs:- '*'
- apiGroups:- autoscalingresources:- '*'verbs:- '*'
- apiGroups:- networking.istio.ioresources:- '*'verbs:- '*'
- apiGroups:- config.istio.ioresources:- '*'verbs:- '*'
- apiGroups:- iam.kubesphere.ioresources:- '*'verbs:- '*'
- apiGroups:- notification.kubesphere.ioresources:- '*'verbs:- '*'
- apiGroups:- auditing.kubesphere.ioresources:- '*'verbs:- '*'
- apiGroups:- events.kubesphere.ioresources:- '*'verbs:- '*'
- apiGroups:- core.kubefed.ioresources:- '*'verbs:- '*'
- apiGroups:- installer.kubesphere.ioresources:- '*'verbs:- '*'
- apiGroups:- storage.kubesphere.ioresources:- '*'verbs:- '*'
- apiGroups:- security.istio.ioresources:- '*'verbs:- '*'
- apiGroups:- monitoring.kiali.ioresources:- '*'verbs:- '*'
- apiGroups:- kiali.ioresources:- '*'verbs:- '*'
- apiGroups:- networking.k8s.ioresources:- '*'verbs:- '*'
- apiGroups:- edgeruntime.kubesphere.ioresources:- '*'verbs:- '*'
- apiGroups:- types.kubefed.ioresources:- '*'verbs:- '*'
- apiGroups:- monitoring.kubesphere.ioresources:- '*'verbs:- '*'
- apiGroups:- application.kubesphere.ioresources:- '*'verbs:- '*'---
kind: ClusterRoleBinding
apiVersion: rbac.authorization.k8s.io/v1
metadata:name: ks-installer
subjects:
- kind: ServiceAccountname: ks-installernamespace: kubesphere-system
roleRef:kind: ClusterRolename: ks-installerapiGroup: rbac.authorization.k8s.io---
apiVersion: apps/v1
kind: Deployment
metadata:name: ks-installernamespace: kubesphere-systemlabels:app: ks-installer
spec:replicas: 1selector:matchLabels:app: ks-installertemplate:metadata:labels:app: ks-installerspec:serviceAccountName: ks-installercontainers:- name: installerimage: kubesphere/ks-installer:v3.3.1imagePullPolicy: "Always"resources:limits:cpu: "1"memory: 1Girequests:cpu: 20mmemory: 100MivolumeMounts:- mountPath: /etc/localtimename: host-timereadOnly: truevolumes:- hostPath:path: /etc/localtimetype: ""name: host-time
注意这里同样不需要做任何修改
---
apiVersion: installer.kubesphere.io/v1alpha1
kind: ClusterConfiguration
metadata:name: ks-installernamespace: kubesphere-systemlabels:version: v3.3.1
spec:persistence:storageClass: "nfs-storageclass" # If there is no default StorageClass in your cluster, you need to specify an existing StorageClass here.authentication:# adminPassword: "" # Custom password of the admin user. If the parameter exists but the value is empty, a random password is generated. If the parameter does not exist, P@88w0rd is used.jwtSecret: "" # Keep the jwtSecret consistent with the Host Cluster. Retrieve the jwtSecret by executing "kubectl -n kubesphere-system get cm kubesphere-config -o yaml | grep -v "apiVersion" | grep jwtSecret" on the Host Cluster.local_registry: "" # Add your private registry address if it is needed.# dev_tag: "" # Add your kubesphere image tag you want to install, by default it's same as ks-installer release version.etcd:monitoring: false # Enable or disable etcd monitoring dashboard installation. You have to create a Secret for etcd before you enable it.endpointIps: localhost # etcd cluster EndpointIps. It can be a bunch of IPs here.port: 2379 # etcd port.tlsEnable: truecommon:core:console:enableMultiLogin: true # Enable or disable simultaneous logins. It allows different users to log in with the same account at the same time.port: 30880type: NodePort# apiserver: # Enlarge the apiserver and controller manager's resource requests and limits for the large cluster# resources: {}# controllerManager:# resources: {}redis:enabled: falseenableHA: falsevolumeSize: 2Gi # Redis PVC size.openldap:enabled: falsevolumeSize: 2Gi # openldap PVC size.minio:volumeSize: 20Gi # Minio PVC size.monitoring:# type: external # Whether to specify the external prometheus stack, and need to modify the endpoint at the next line.endpoint: http://prometheus-operated.kubesphere-monitoring-system.svc:9090 # Prometheus endpoint to get metrics data.GPUMonitoring: # Enable or disable the GPU-related metrics. If you enable this switch but have no GPU resources, Kubesphere will set it to zero.enabled: falsegpu: # Install GPUKinds. The default GPU kind is nvidia.com/gpu. Other GPU kinds can be added here according to your needs.kinds:- resourceName: "nvidia.com/gpu"resourceType: "GPU"default: truees: # Storage backend for logging, events and auditing.# master:# volumeSize: 4Gi # The volume size of Elasticsearch master nodes.# replicas: 1 # The total number of master nodes. Even numbers are not allowed.# resources: {}# data:# volumeSize: 20Gi # The volume size of Elasticsearch data nodes.# replicas: 1 # The total number of data nodes.# resources: {}logMaxAge: 7 # Log retention time in built-in Elasticsearch. It is 7 days by default.elkPrefix: logstash # The string making up index names. The index name will be formatted as ks-
kubectl apply -f  kubesphere-installer.yaml
kubectl apply -f cluster-configuration.yaml
然后可通过如下命令查看安装日志
kubectl logs -n kubesphere-system $(kubectl get pod -n kubesphere-system -l 'app in (ks-install, ks-installer)' -o jsonpath='{.items[0].metadata.name}') -f
如下,表示已经安装成功,而且这里也提示了admin用户以及默认密码
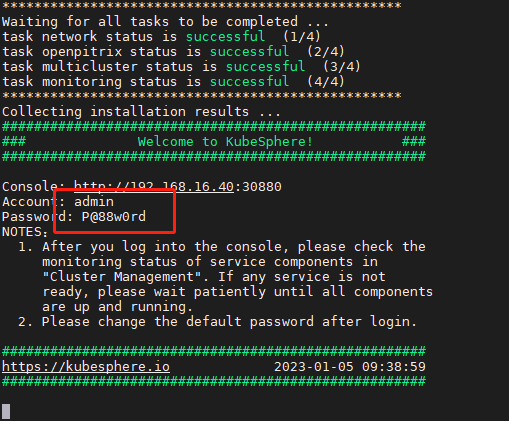
浏览器打开 IP:30880 即可,如下,默认情况下用户名密码:admin/P@88w0rd

然后会提示修改密码,此时设置为自己的密码即可

此时即登录进来了,如下表示已经搭建成功


 京公网安备 11010802041100号 | 京ICP备19059560号-4 | PHP1.CN 第一PHP社区 版权所有