Kotlin1.3开始,协程从experimental变成了release,前些日子看了看简单的用法,今天就从源码的角度来看看Kotlin的协程究竟是怎样形成的.
1.问题看源码要带着问题,我决定从以下三个问题来进行分析
启动一个协程的方法
 GlobalScope.launch { // launch new coroutine in background and continue
        delay(1000L) // non-blocking delay for 1 second (default time unit is ms)
        println("World!") // print after delay
    }
这段代码就是启动一个协程,并启动,延迟1秒后打印world,就从这个launch方法进行切入
public fun CoroutineScope.launch(
    context: CoroutineCOntext= EmptyCoroutineContext,
    start: CoroutineStart = CoroutineStart.DEFAULT,
    block: suspend CoroutineScope.() -> Unit
): Job {
    val newCOntext= newCoroutineContext(context)
    val coroutine = if (start.isLazy)
        LazyStandaloneCoroutine(newContext, block) else
        StandaloneCoroutine(newContext, active = true)
    coroutine.start(start, coroutine, block)
    return coroutine
}
代码很清楚,根据CoroutineStart是不是CoroutineStart.LAZY对象,创建不同的Job实现类,默认我们传入的start参数为CoroutineStart.DEFAULT,这时我们创建的是一个StandaloneCoroutine对象,调用它的start方法启动,然后对它进行返回。
GlobalScope.launch(Dispatchers.Default){
        println("Current thread is ${Thread.currentThread().name}")
        launch {
            delay(1000)
            println("now")
        }
        println("next")
    }
看一下这段代码,这段代码先打印出next,然后延迟1秒钟后打印出now,有没有一种感觉,这像是android里handler的post和postDelay方法。首先看一下delay方法
@InternalCoroutinesApi
public interface Delay {
suspend fun delay(time: Long) {
if (time <= 0) return // don't delay
return suspendCancellableCoroutine { scheduleResumeAfterDelay(time, it) }
}
fun scheduleResumeAfterDelay(timeMillis: Long, continuation: CancellableContinuation
fun invokeOnTimeout(timeMillis: Long, block: Runnable): DisposableHandle =
DefaultDelay.invokeOnTimeout(timeMillis, block)
}
public suspend fun delay(timeMillis: Long) {
if (timeMillis <= 0) return // don't delay
return suspendCancellableCoroutine sc@ { cont: CancellableContinuation
cont.context.delay.scheduleResumeAfterDelay(timeMillis, cont)
}
}
internal val CoroutineContext.delay: Delay get() = get(ContinuationInterceptor) as? Delay ?: DefaultDelay
delay方法在Delay.kt文件里,可以看到,这里定义了一个Delay接口,scheduleResumeAfterDelay是用来重新把任务恢复调度的,invokeOnTimeout显然是调度过程中发现时间到了以后要恢复执行的方法体。Delay是一个接口,看一它的实现类是如何实现scheduleResumeAfterDelay方法的。
internal abstract class EventLoopBase: CoroutineDispatcher(), Delay, EventLoop {
...
override fun scheduleResumeAfterDelay(timeMillis: Long, continuation: CancellableContinuation
schedule(DelayedResumeTask(timeMillis, continuation))
...
先看DelayResumeTask
private inner class DelayedResumeTask(
        timeMillis: Long,
        private val cont: CancellableContinuation
    ) : DelayedTask(timeMillis) {
        init {
            // Note that this operation isn't lock-free, but very short
            cont.disposeOnCancellation(this)
        }
        override fun run() {
            with(cont) { resumeUndispatched(Unit) }
        }
    }
这个类继承自DelayTask,而DelayedTask实现了runnable接口,这里复写了run方法,调用了CancellableContinuation的resumeUndispatched方法。通过方法名可以看出经过等待时间后就会恢复执行。CancellableContinuation的实现类是CancellableContinuationImp跟进去看一看这个类
@PublishedApi
internal open class CancellableContinuationImpl
delegate: Continuation
resumeMode: Int
) : AbstractContinuation
...
override fun completeResume(token: Any) = completeStateUpdate(token as NotCompleted, state, resumeMode)
override fun CoroutineDispatcher.resumeUndispatched(value: T) {
val dc = delegate as? DispatchedContinuation
resumeImpl(value, if (dc?.dispatcher === this) MODE_UNDISPATCHED else resumeMode)
}
...
}
resumeUndispatched方法里调用了resumeImp方法,这是继承自AbstractContinuation的方法
 protected fun resumeImpl(proposedUpdate: Any?, resumeMode: Int) {
        loopOnState { state ->
            when (state) {
                is NotCompleted -> {
                    if (updateStateToFinal(state, proposedUpdate, resumeMode)) return
                }
                is CancelledContinuation -> {
                    /*
                     * If continuation was cancelled, then all further resumes must be
                     * ignored, because cancellation is asynchronous and may race with resume.
                     * Racy exception are reported so no exceptions are lost
                     *
                     * :todo: we should somehow remember the attempt to invoke resume and fail on the second attempt.
                     */
                    if (proposedUpdate is CompletedExceptionally) {
                        handleException(proposedUpdate.cause)
                    }
                    return
                }
                else -> error("Already resumed, but proposed with update $proposedUpdate")
            }
        }
    }
这里会根据不同的状态调用不同的方法.
private fun updateStateToFinal(expect: NotCompleted, proposedUpdate: Any?, mode: Int): Boolean {
...
completeStateUpdate(expect, proposedUpdate, mode)
return true
}protected fun completeStateUpdate(expect: NotCompleted, update: Any?, mode: Int) {
...
dispatchResume(mode)
} private fun dispatchResume(mode: Int) {
if (tryResume()) return // completed before getResult invocation -- bail out
// otherwise, getResult has already commenced, i.e. completed later or in other thread
dispatch(mode)
}internal fun
val delegate = this.delegate
if (mode.isDispatchedMode && delegate is DispatchedContinuation<*> && mode.isCancellableMode == resumeMode.isCancellableMode) {
// dispatch directly using this instance's Runnable implementation
val dispatcher = delegate.dispatcher
val cOntext= delegate.context
if (dispatcher.isDispatchNeeded(context)) {
dispatcher.dispatch(context, this)
} else {
UndispatchedEventLoop.resumeUndispatched(this)
}
} else {
resume(delegate, mode)
}
}
删掉了不相关的代码,只保留dispatch这条主线,相信很容易个看明白最终又把这个任务放回到Dispatcher里面去了。那个else分支的resume其实内部调用的是Continuation.resume扩展方法,最终一样要调用到resumeImpl中,又回到上面已经分析的流程里了,这是处理有Continuation代理的情况。以上就是当delay时间到达后协程是如何重新恢复的。
接下来看一看延时是如何实现的,协程里有个默认的DefaultExecutor线程用来执行协程代码
override fun run() {
        timeSource.registerTimeLoopThread()
        try {
            var shutdownNanos = Long.MAX_VALUE
            if (!notifyStartup()) return
            while (true) {
                Thread.interrupted() // just reset interruption flag
                var parkNanos = processNextEvent()
                if (parkNanos == Long.MAX_VALUE) {
                    // nothing to do, initialize shutdown timeout
                    if (shutdownNanos == Long.MAX_VALUE) {
                        val now = timeSource.nanoTime()
                        if (shutdownNanos == Long.MAX_VALUE) shutdownNanos = now + KEEP_ALIVE_NANOS
                        val tillShutdown = shutdownNanos - now
                        if (tillShutdown <= 0) return // shut thread down
                        parkNanos = parkNanos.coerceAtMost(tillShutdown)
                    } else
                        parkNanos = parkNanos.coerceAtMost(KEEP_ALIVE_NANOS) // limit wait time anyway
                }
                if (parkNanos > 0) {
                    // check if shutdown was requested and bail out in this case
                    if (isShutdownRequested) return
                    timeSource.parkNanos(this, parkNanos)
                }
            }
        } finally {
            _thread = null // this thread is dead
            acknowledgeShutdownIfNeeded()
            timeSource.unregisterTimeLoopThread()
            // recheck if queues are empty after _thread reference was set to null (!!!)
            if (!isEmpty) thread() // recreate thread if it is needed
        }
    }
override fun processNextEvent(): Long {
        if (!isCorrectThread()) return Long.MAX_VALUE
        // queue all delayed tasks that are due to be executed
        val delayed = _delayed.value
        if (delayed != null && !delayed.isEmpty) {
            val now = timeSource.nanoTime()
            while (true) {
                // make sure that moving from delayed to queue removes from delayed only after it is added to queue
                // to make sure that 'isEmpty' and `nextTime` that check both of them
                // do not transiently report that both delayed and queue are empty during move
                delayed.removeFirstIf {
                    if (it.timeToExecute(now)) {
                        enqueueImpl(it)
                    } else
                        false
                } ?: break // quit loop when nothing more to remove or enqueueImpl returns false on "isComplete"
            }
        }
        // then process one event from queue
        dequeue()?.run()
        return nextTime
    }
DefaultExecutor不断获取task并执行,而这些task事件就是存储在_delayed里的,这里可以将_delayed理解为一个队列。简述这两段代码做的事情就是就是死循环遍历task队列该执行的就执行并出队,没到执行时间的就留在队列。
总结一下,协程就是维持了一个类似android Looper和MessageQueuen的东西,将要执行的代码封装成Coroutine放入队列,然后通过循环并根据一定条件不停的取出执行。
回到launch方法
public fun CoroutineScope.launch(
    context: CoroutineCOntext= EmptyCoroutineContext,
    start: CoroutineStart = CoroutineStart.DEFAULT,
    block: suspend CoroutineScope.() -> Unit
): Job {
    val newCOntext= newCoroutineContext(context)
    val coroutine = if (start.isLazy)
        LazyStandaloneCoroutine(newContext, block) else
        StandaloneCoroutine(newContext, active = true)
    coroutine.start(start, coroutine, block)
    return coroutine
}
看一下StandaloneCoroutine的start方法
public fun
initParentJob()
start(block, receiver, this)
}
start(block, receiver, this)调用的就是CoroutineStart里的invoke方法,这里其实是CoroutineStart对操作符进行了复写,并不是递归调用,这个start就是launch方法传进来的,默认是CoroutineStart.DEFAULT,这是一个枚举对象
@InternalCoroutinesApi
public operator fun
when (this) {
CoroutineStart.DEFAULT -> block.startCoroutineCancellable(receiver, completion)
CoroutineStart.ATOMIC -> block.startCoroutine(receiver, completion)
CoroutineStart.UNDISPATCHED -> block.startCoroutineUndispatched(receiver, completion)
CoroutineStart.LAZY -> Unit // will start lazily
}
internal fun
createCoroutineUnintercepted(completion).intercepted().resumeCancellable(Unit)internal fun
is DispatchedContinuation -> resumeCancellable(value)
else -> resume(value)
}
@Suppress("NOTHING_TO_INLINE") // we need it inline to save us an entry on the stack
inline fun resumeCancellable(value: T) {
if (dispatcher.isDispatchNeeded(context)) {
_state = value
resumeMode = MODE_CANCELLABLE
dispatcher.dispatch(context, this)
} else {
UndispatchedEventLoop.execute(this, value, MODE_CANCELLABLE) {
if (!resumeCancelled()) {
resumeUndispatched(value)
}
}
}
}
总之到了这里,就是通过 dispatcher.dispatch(&#8230;)把这个任务分发给线程/线程池去执行了,分发方式根据CoroutineStart对象有关。
3.总结一下上面说了很多源码上的东西,画张图,方便理解
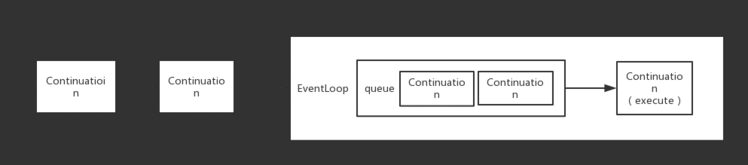 image
image
Continuation存放着协程要执行的代码块,协程要执行时放入EventLoop的队列里,根据一定规则从里面取出Continuation来执行。同时EventLoop里指定了Continuation执行时所在的线程
 image
image
关注我的公众号


 京公网安备 11010802041100号 | 京ICP备19059560号-4 | PHP1.CN 第一PHP社区 版权所有