作者:1凡evan | 来源:互联网 | 2021-09-13 02:31
这篇文章主要介绍了springboot整合JPA过程解析,文中通过示例代码介绍的非常详细,对大家的学习或者工作具有一定的参考学习价值,需要的朋友可以参考下

接下来具体看看是怎么弄的。
1、新建一个springboot项目,选择web、data jdbc、data jpa、mysql driver。
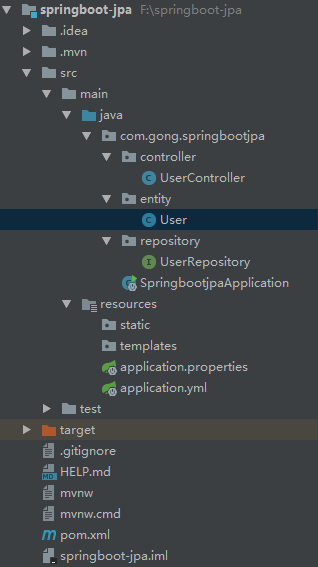
2、建立以下目录及结构:
pom.xml
<&#63;xml version="1.0" encoding="UTF-8"&#63;>

  4.0.0

    org.springframework.boot
    spring-boot-starter-parent
    2.2.4.RELEASE


  com.gong
  springbootjpa
  0.0.1-SNAPSHOT
  springbootjpa
  Demo project for Spring Boot


    1.8


      org.springframework.boot
      spring-boot-starter-data-jdbc


      org.springframework.boot
      spring-boot-starter-data-jpa


      org.springframework.boot
      spring-boot-starter-web


      mysql
      mysql-connector-java
      5.1.41
      runtime


      org.springframework.boot
      spring-boot-starter-test
      test


          org.junit.vintage
          junit-vintage-engine


        org.springframework.boot
        spring-boot-maven-plugin
3、在application.yml中配置连接数据库和jpa相关配置
spring:
 datasource:
  url: jdbc:mysql://192.168.124.22:3306/jpa
  username: root
  password: 123456
  driver-class-name: com.mysql.jdbc.Driver
 jpa:
  hibernate:
   #更新或者创建数据表结构
   ddl-auto: update
  #控制台显示SQL
  show-sql: true
4、新建一个entity包,新建实体类User.java
package com.gong.springbootjpa.entity;


import com.fasterxml.jackson.annotation.JsonIgnoreProperties;

import javax.persistence.*;

//使用JPA注解配置映射关系
@Entity //告诉JPA这是一个实体类(和数据表映射的类)
@Table(name = "tbl_user") //@Table来指定和哪个数据表对应;如果省略默认表名就是user;
@JsonIgnoreProperties(value = {"hibernateLazyInitializer","handler"})
public class User {

  @Id //这是一个主键
  @GeneratedValue(strategy = GenerationType.IDENTITY)//自增主键
  private Integer id;

  @Column(name = "last_name",length = 50) //这是和数据表对应的一个列
  private String lastName;
  @Column //省略默认列名就是属性名
  private String email;

  public Integer getId() {
    return id;
  }

  public void setId(Integer id) {
    this.id = id;
  }

  public String getLastName() {
    return lastName;
  }

  public void setLastName(String lastName) {
    this.lastName = lastName;
  }

  public String getEmail() {
    return email;
  }

  public void setEmail(String email) {
    this.email = email;
  }
}
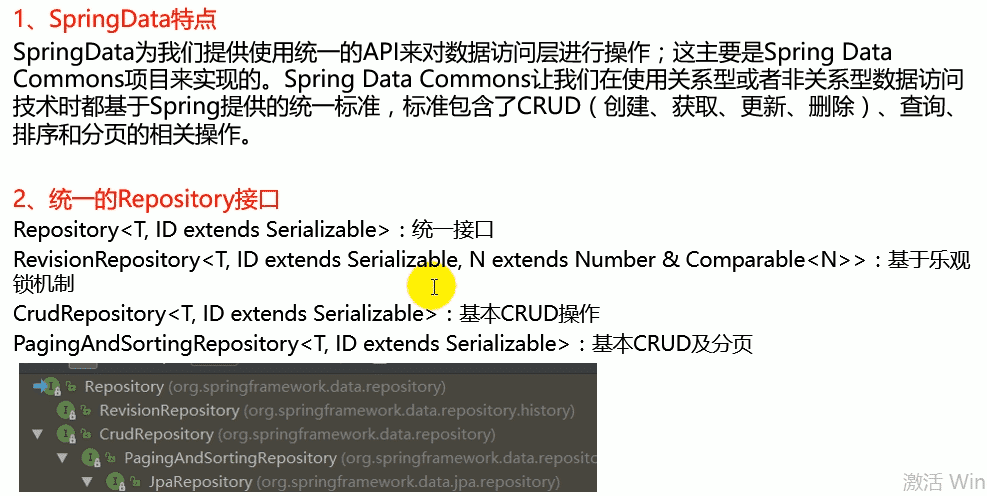
5、新建一个repository包,新建一个UserRepository.java
package com.gong.springbootjpa.repository;

import com.gong.springbootjpa.entity.User;
import org.springframework.data.jpa.repository.JpaRepository;

//继承JpaRepository来完成对数据库的操作,在JdbcRepository中指定实体类,数据库中主键对应的java类型
public interface UserRepository extends JpaRepository {
}
6、新建一个controller包,新建一个UserController.java
经过上述配置之后,我们就可以直接利用UserRepository中的一些方法进行数据库的操作啦,是不是很方便。
package com.gong.springbootjpa.controller;

import com.gong.springbootjpa.entity.User;
import com.gong.springbootjpa.repository.UserRepository;
import org.springframework.beans.factory.annotation.Autowired;
import org.springframework.web.bind.annotation.GetMapping;
import org.springframework.web.bind.annotation.PathVariable;
import org.springframework.web.bind.annotation.RestController;

@RestController
public class UserController {

  @Autowired
  UserRepository userRepository;

  @GetMapping("/user/{id}")
  public User getUser(@PathVariable("id") Integer id){
    User user = userRepository.getOne(id);
    return user;
  }

  @GetMapping("/user")
  public User insertUser(User user){
    User save = userRepository.save(user);
    return save;
  }

}
7、启动服务器
插入一条数据:

查询一条数据:

以上就是本文的全部内容,希望对大家的学习有所帮助,也希望大家多多支持。


 京公网安备 11010802041100号