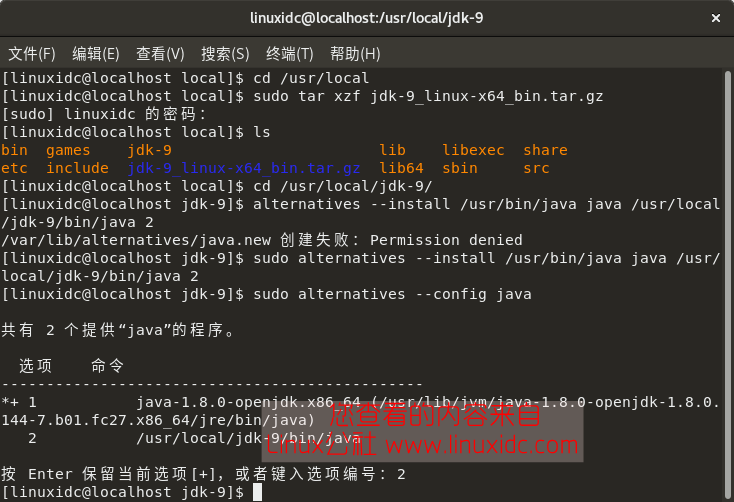
之前在centos上安装过,很顺利,不过今天在fedora 17上安装oracle,不过不是很顺利,记录下,以便同仁们参考
这其中主要有以下问题
一、交换空间问题(其实在安装系统的时候可以指定)
可以使用free -d查看空间大小
Linux增加swap空间
1、 创建文件
Dd if=/dev/zero of=/tmp/swapfile bs=1M count=1024
创建一个类型为swap的file,大小为1024M、
2、 转换为swap并且激活文件
mkswap 将/tmp/swapfile转换为swap格式
mkswap /tmp/swapfile
激活文件
/usr/sbin/swapon swapfile
3、 开机启动—编辑文件?/etc/fstab,追加
/tmp/swapfile none Swap sw,pri=3 0 0
删除swap
1、/usr/sbin/swapoffswapfile
2、编辑/etc/fstab文件,去掉此Swap文件
二、安装包问题,
很多安装包已经安装,就忽略了不过过后还有一个安装包提示不行,就是libstdc的包没过去,耽搁了一阵,因为系统自带的包和oracle不兼容导致,
最后从网上下载了一个ftp://rpmfind.net/linux/Mandriva/official/2010.0/x86_64/media/contrib/release/libstdc++5-3.3.6-4mdv2009.0.x86_64.rpm
解压了下通过了,解压方法,rpm2cpio xxxxx.rpm |cpio -idmv
三、提示什么agent nmhs 错误文件ins_emagent.mk,查看日志也无非都是错误一大堆
打开并编辑MK_EMAGENT_NMECTL 后边追加一个-lnnz11即可
以下是官方参考文档
Download the Oracle software using one of the two link below. If you have access to My Oracle Support (MOS), then it is better to download the 11.2.0.3 version.
Unzip the files.
unzip linux.x64_11gR2_database_1of2.zip
unzip linux.x64_11gR2_database_2of2.zip
You should now have a single directory called "database" containing installation files.
The "/etc/hosts" file must contain a fully qualified name for the server.
For example.
127.0.0.1       localhost localhost.localdomain localhost4 localhost4.localdomain4
192.168.0.191   fedora17.localdomain  fedora17
Oracle recommend the following minimum parameter settings.
fs.aio-max-nr = 1048576
fs.file-max = 6815744
kernel.shmall = 2097152
kernel.shmmax = 536870912
kernel.shmmni = 4096
kernel.sem = 250 32000 100 128
net.ipv4.ip_local_port_range = 9000 65500
net.core.rmem_default = 262144
net.core.rmem_max = 4194304
net.core.wmem_default = 262144
net.core.wmem_max = 1048586
The current values can be tested using the following command.
/sbin/sysctl -a | grep
Add or amend the following lines in the "/etc/sysctl.conf" file.
fs.aio-max-nr = 1048576
fs.file-max = 6815744
kernel.shmall = 2097152
kernel.shmmax = 536870912
kernel.shmmni = 4096
# semaphores: semmsl, semmns, semopm, semmni
kernel.sem = 250 32000 100 128
net.ipv4.ip_local_port_range = 9000 65500
net.core.rmem_default=262144
net.core.rmem_max=4194304
net.core.wmem_default=262144
net.core.wmem_max=1048586
Run the following command to change the current kernel parameters.
/sbin/sysctl -p
Add the following lines to the "/etc/security/limits.conf" file.
oracle              soft    nproc   2047
oracle              hard    nproc   16384
oracle              soft    nofile  1024
oracle              hard    nofile  65536
Add the following line to the "/etc/pam.d/login" file, if it does not already exist.
session required pam_limits.so
Disable secure linux by editing the "/etc/selinux/config" file, making sure the SELINUX flag is set as follows.
SELINUX=disabled
If SELinux is disabled after installation, the server will need a reboot for the change to take effect.
If you have installed the suggested package groups during the installation, the majority of the necessary packages will already be installed. The following packages are listed as required, including the 32-bit version of some of the packages. The commented out packages should be installed already.
#yum install binutils
#yum install compat-libstdc++-33
yum install compat-libstdc++-33.i686
#yum install elfutils-libelf
yum install elfutils-libelf-devel
#yum install gcc
#yum install gcc-c++
#yum install glibc
#yum install glibc.i686
#yum install glibc-common
#yum install glibc-devel
#yum install glibc-headers
yum install glibc-devel.i686
yum install ksh
yum install libaio
yum install libaio.i686
yum install libaio-devel
yum install libaio-devel.i686
#yum install libgcc
#yum install libgcc.i686
#yum install libstdc++
yum install libstdc++.i686
#yum install libstdc++-devel
#yum install make
#yum install numactl
yum install numactl-devel
yum install sysstat
yum install unixODBC
yum install unixODBC.i686
yum install unixODBC-devel
yum install unixODBC-devel.i686
Create the new groups and users.
groupadd oinstall
groupadd dba
groupadd oper
groupadd asmadmin

useradd -g oinstall -G dba,oper,asmadmin oracle
passwd oracle
Note. We are not going to use the "asmadmin" group, since this installation will not use ASM.
Create the directories in which the Oracle software will be installed.
mkdir -p /u01/app/oracle/product/11.2.0/db_1
chown -R oracle:oinstall /u01
chmod -R 775 /u01
Login as root and issue the following command.
xhost +
Edit the "/etc/redhat-release" file replacing the current release information "Fedora release 17 (Beefy Miracle)" with the following.
redhat release 5
Login as the oracle user and add the following lines at the end of the ".bash_profile" file.
# Oracle Settings
TMP=/tmp; export TMP
TMPDIR=$TMP; export TMPDIR

ORACLE_HOSTNAME=fedora17.localdomain; export ORACLE_HOSTNAME
ORACLE_UNQNAME=DB11G; export ORACLE_UNQNAME
ORACLE_BASE=/u01/app/oracle; export ORACLE_BASE
ORACLE_HOME=$ORACLE_BASE/product/11.2.0/db_1; export ORACLE_HOME
ORACLE_SID=DB11G; export ORACLE_SID
ORACLE_TERM=xterm; export ORACLE_TERM
PATH=/usr/sbin:$PATH; export PATH
PATH=$ORACLE_HOME/bin:$PATH; export PATH

LD_LIBRARY_PATH=$ORACLE_HOME/lib:/lib:/usr/lib; export LD_LIBRARY_PATH
CLASSPATH=$ORACLE_HOME/JRE:$ORACLE_HOME/jlib:$ORACLE_HOME/rdbms/jlib; export CLASSPATH

if [ $USER = "oracle" ]; then
  if [ $SHELL = "/bin/ksh" ]; then
    ulimit -p 16384
    ulimit -n 65536
  else
    ulimit -u 16384 -n 65536
  fi
fi
Log into the oracle user. If you are using X emulation then set the DISPLAY environmental variable.
DISPLAY=:0.0; export DISPLAY
Start the Oracle Universal Installer (OUI) by issuing the following command in the database directory.
./runInstaller
Proceed with the installation of your choice. You can see type of installation I performed by clicking on the links below to see screen shots of each stage. When installing 11.2.0.1, the prerequisites checks will list a number of packages as missing, but these can be ignored as we have installed newer versions. For 11.2.0.3, only the "pdksh" package will be listed as missing, which can be ignored because we installed the "ksh" package instead. The emagent will fail to link and produce an error message. When this happens, either fix it, or click the "Continue" button and the installation will complete.
Edit the "/etc/redhat-release" file restoring the original release information.
Fedora release 17 (Beefy Miracle)
Edit the "/etc/oratab" file setting the restart flag for each instance to 'Y'.
DB11G:/u01/app/oracle/product/11.2.0/db_1:Y


![Ubuntu 9.04中安装谷歌Chromium浏览器及使用体验[图文]](https://img1.php1.cn/3cd4a/24bf4/61b/c175cc0fe1277527.jpeg)


 京公网安备 11010802041100号 | 京ICP备19059560号-4 | PHP1.CN 第一PHP社区 版权所有