二维码(Quick Response Code,简称QR Code)是由水平和垂直两个方向上的线条设计而成的一种二维条形码(barcode)。可以编码网址、电话号码、文本等内容,能够存储大量的数据信息。自iOS 7以来,二维码的生成和读取只需要使用Core Image框架和AVFoundation框架就能轻松实现。在这里,我们主要介绍二维码的读取。关于二维码的生成,可以查看使用CIFilter生成二维码文章中的介绍。

1 二维码的读取
读取二维码也就是通过扫描二维码图像以获取其所包含的数据信息。需要知道的是,任何条形码(包括二维码)的扫描都是基于视频采集(video capture),因此需要使用AVFoundation框架。
扫描二维码的过程即从摄像头捕获二维码图像(input)到解析出字符串内容(output)的过程,主要是通过AVCaptureSession对象来实现的。该对象用于协调从输入到输出的数据流,在执行过程中,需要先将输入和输出添加到AVCaptureSession对象中,然后通过发送startRunning或stopRunning消息来启动或停止数据流,最后通过AVCaptureVideoPreviewLayer对象将捕获的视频显示在屏幕上。在这里,输入对象通常是AVCaptureDeviceInput对象,主要是通过AVCaptureDevice的实例来获得,而输出对象通常是AVCaptureMetaDataOutput对象,它是读取二维码的核心部分,与AVCaptureMetadataOutputObjectsDelegate协议结合使用,可以捕获在输入设备中找到的任何元数据,并将其转换为可读的格式。下面是具体步骤:
1、导入AVFoundation框架。
#import
2、创建一个AVCaptureSession对象。
AVCaptureSession *captureSession = [[AVCaptureSession alloc] init];
3、为AVCaptureSession对象添加输入和输出。
// add input
NSError *error;
AVCaptureDevice *device = [AVCaptureDevice defaultDeviceWithMediaType:AVMediaTypeVideo];
AVCaptureDeviceInput *deviceInput = [AVCaptureDeviceInput deviceInputWithDevice:device error:&error];

[captureSession addInput:deviceInput];

// add output
AVCaptureMetadataOutput *metadataOutput = [[AVCaptureMetadataOutput alloc] init];
[captureSession addOutput:metadataOutput];
4、配置AVCaptureMetaDataOutput对象,主要是设置代理和要处理的元数据对象类型。
dispatch_queue_t queue = dispatch_queue_create("MyQueue", NULL);
[metadataOutput setMetadataObjectsDelegate:self queue:queue];
[metadataOutput setMetadataObjectTypes:@[AVMetadataObjectTypeQRCode]];
需要注意的是,一定要在输出对象被添加到captureSession之后才能设置要处理的元数据类型,否则会出现下面的错误:
Terminating app due to uncaught exception 'NSInvalidArgumentException', reason: [AVCaptureMetadataOutput setMetadataObjectTypes:] Unsupported type found - use -availableMetadataObjectTypes'
5、创建并设置AVCaptureVideoPreviewLayer对象来显示捕获到的视频。
AVCaptureVideoPreviewLayer *previewLayer = [[AVCaptureVideoPreviewLayer alloc] initWithSession:captureSession];
[previewLayer setVideoGravity:AVLayerVideoGravityResizeAspectFill];
[previewLayer setFrame:self.view.bounds];
[self.view.layer addSublayer:previewLayer];
6、给AVCaptureSession对象发送startRunning消息以启动视频捕获。
[captureSession startRunning];
7、实现AVCaptureMetadataOutputObjectsDelegate的captureOutput:didOutputMetadataObjects:fromConnection:方法来处理捕获到的元数据,并将其读取出来。
- (void)captureOutput:(AVCaptureOutput *)output didOutputMetadataObjects:(NSArray<__kindof AVMetadataObject *> *)metadataObjects fromConnection:(AVCaptureConnection *)connection
{
 if (metadataObjects != nil && metadataObjects.count > 0) {
  AVMetadataMachineReadableCodeObject *metadataObject = metadataObjects.firstObject;
  if ([[metadataObject type] isEqualToString:AVMetadataObjectTypeQRCode]) {
   NSString *message = [metadataObject stringValue];
   [self.label performSelectorOnMainThread:@selector(setText:) withObject:message waitUntilDone:NO];
  }
 }
}
需要提醒的是,由于AVCaptureMetaDataOutput对象代理的设置,该代理方法会在setMetadataObjectsDelegate:queue:指定的队列上调用,如果需要更新用户界面,则必须在主线程中进行。
2 应用示例
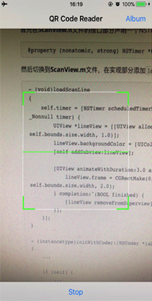
下面,我们就做一个如下图所示的二维码阅读器:

其中主要实现的功能有:
由于二维码的扫描是基于实时的视频捕获,因此相关的操作无法在模拟器上进行测试,也不能在没有相机的设备上进行测试。如果想要查看该应用,需要连接自己的iPhone设备来运行。
2.1 创建项目
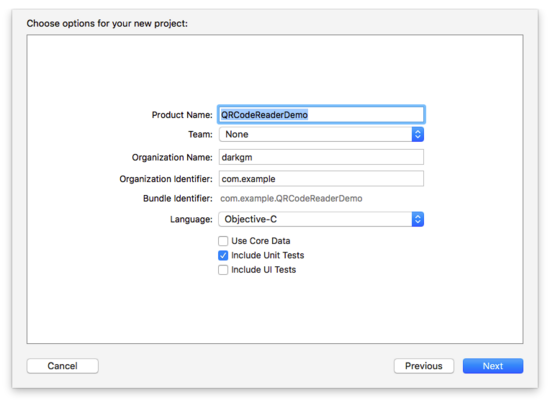
打开Xcode,创建一个新的项目(File\New\Project...),选择iOS一栏下的Application中的Single View Application模版,然后点击Next,填写项目选项。在Product Name中填写QRCodeReaderDemo,选择Objective-C语言,点击Next,选择文件位置,并单击Create创建项目。
2.2 构建界面
打开Main.storyboard文件,在当前控制器中嵌入导航控制器,并添加标题QR Code Reader:

在视图控制器中添加ToolBar、Flexible Space Bar Button Item、Bar Button Item、View,布局如下:
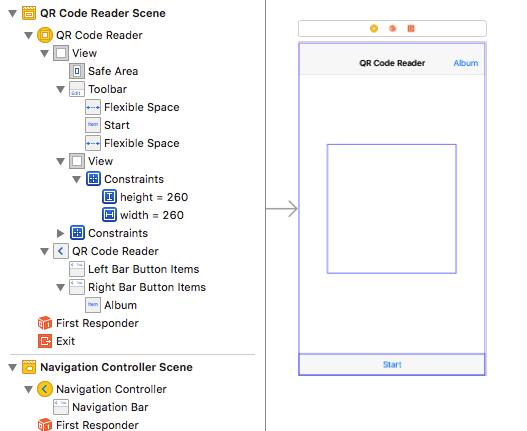
其中,各元素及作用:
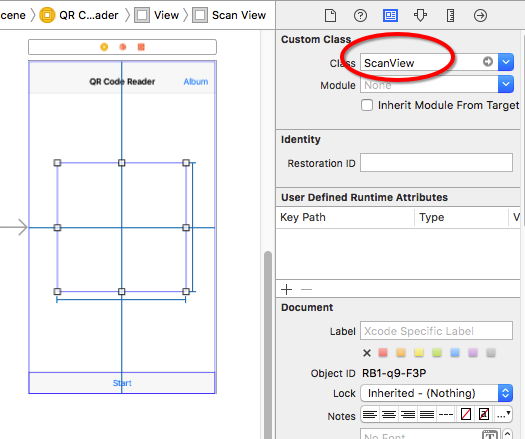
创建一个名为ScanView的新文件(File\New\File…),它是UIView的子类。然后选中视图控制器中间添加的View,将该视图的类名更改为ScanView:
打开辅助编辑器,将storyboard中的元素连接到代码中:

注意,需要在ViewController.m文件中导入ScanView.h文件。
2.3 添加代码
2.3.1 扫描二维码
首先在ViewController.h文件中导入AVFoundation框架:
#import
切换到ViewController.m文件,添加AVCaptureMetadataOutputObjectsDelegate协议,并在接口部分添加下面的属性:
@interface ViewController ()// properties @property (assign, nonatomic) BOOL isReading; @property (strong, nonatomic) AVCaptureSession *captureSession; @property (strong, nonatomic) AVCaptureVideoPreviewLayer *previewLayer;
在viewDidLoad方法中添加下面代码:
- (void)viewDidLoad
{
 [super viewDidLoad];

 self.isReading = NO;
 self.captureSession = nil;
}
然后在实现部分添加startScanning方法和stopScanning方法及相关代码:
- (void)startScanning
{
 self.captureSession = [[AVCaptureSession alloc] init];

 // add input
 NSError *error;
 AVCaptureDevice *device = [AVCaptureDevice defaultDeviceWithMediaType:AVMediaTypeVideo];
 AVCaptureDeviceInput *deviceInput = [[AVCaptureDeviceInput alloc] initWithDevice:device error:&error];
 if (!deviceInput) {
  NSLog(@"%@", [error localizedDescription]);
 }
 [self.captureSession addInput:deviceInput];

 // add output
 AVCaptureMetadataOutput *metadataOutput = [[AVCaptureMetadataOutput alloc] init];
 [self.captureSession addOutput:metadataOutput];

 // configure output
 dispatch_queue_t queue = dispatch_queue_create("MyQueue", NULL);
 [metadataOutput setMetadataObjectsDelegate:self queue:queue];
 [metadataOutput setMetadataObjectTypes:@[AVMetadataObjectTypeQRCode]];

 // configure previewLayer
 self.previewLayer = [[AVCaptureVideoPreviewLayer alloc] initWithSession:self.captureSession];
 [self.previewLayer setVideoGravity:AVLayerVideoGravityResizeAspectFill];
 [self.previewLayer setFrame:self.view.bounds];
 [self.view.layer addSublayer:self.previewLayer];

 // start scanning
 [self.captureSession startRunning];
}

- (void)stopScanning
{
 [self.captureSession stopRunning];
 self.captureSession = nil;

 [self.previewLayer removeFromSuperlayer];
}
找到startStopAction:并在该方法中调用上面的方法:
- (IBAction)startStopAction:(id)sender
{
 if (!self.isReading) {
  [self startScanning];
  [self.view bringSubviewToFront:self.toolBar];
  [self.startStopButton setTitle:@"Stop"];
 }
 else {
  [self stopScanning];
  [self.startStopButton setTitle:@"Start"];
 }

 self.isReading = !self.isReading;
}
至此,二维码扫描相关的代码已经完成,如果想要它能够正常运行的话,还需要在Info.plist文件中添加NSCameraUsageDescription键及相应描述以访问相机:

需要注意的是,现在只能扫描二维码但是还不能读取到二维码中的内容,不过我们可以连接设备,运行试下:

2.3.2 读取二维码
读取二维码需要实现AVCaptureMetadataOutputObjectsDelegate协议的captureOutput:didOutputMetadataObjects:fromConnection:方法:
- (void)captureOutput:(AVCaptureOutput *)output didOutputMetadataObjects:(NSArray<__kindof AVMetadataObject *> *)metadataObjects fromConnection:(AVCaptureConnection *)connection
{
 if (metadataObjects != nil && metadataObjects.count > 0) {
  AVMetadataMachineReadableCodeObject *metadataObject = metadataObjects.firstObject;
  if ([[metadataObject type] isEqualToString:AVMetadataObjectTypeQRCode]) {
   NSString *message = [metadataObject stringValue];
   [self performSelectorOnMainThread:@selector(displayMessage:) withObject:message waitUntilDone:NO];

   [self performSelectorOnMainThread:@selector(stopScanning) withObject:nil waitUntilDone:NO];
   [self.startStopButton performSelectorOnMainThread:@selector(setTitle:) withObject:@"Start" waitUntilDone:NO];
   self.isReading = NO;
  }
 }
}

- (void)displayMessage:(NSString *)message
{
 UIViewController *vc = [[UIViewController alloc] init];

 UITextView *textView = [[UITextView alloc] initWithFrame:vc.view.bounds];
 [textView setText:message];
 [textView setFont:[UIFont preferredFontForTextStyle:UIFontTextStyleBody]];
 textView.editable = NO;

 [vc.view addSubview:textView];

 [self.navigationController showViewController:vc sender:nil];
}
在这里我们将扫码结果显示在一个新的视图中,如果你运行程序的话应该可以看到扫描的二维码内容了。
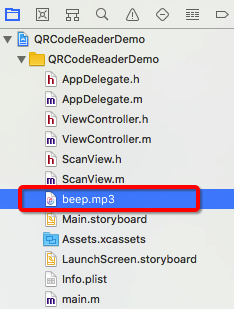
另外,为了使我们的应用更逼真,可以在扫描到二维码信息时让它播放声音。这首先需要在项目中添加一个音频文件:
然后在接口部分添加一个AVAudioPlayer对象的属性:
@property (strong, nonatomic) AVAudioPlayer *audioPlayer;
在实现部分添加loadSound方法及代码,并在viewDidLoad中调用该方法:
- (void)loadSound
{
 NSString *soundFilePath = [[NSBundle mainBundle] pathForResource:@"beep" ofType:@"mp3"];
 NSURL *soundURL = [NSURL URLWithString:soundFilePath];
 NSError *error;

 self.audioPlayer = [[AVAudioPlayer alloc] initWithContentsOfURL:soundURL error:&error];

 if (error) {
  NSLog(@"Could not play sound file.");
  NSLog(@"%@", [error localizedDescription]);
 }
 else {
  [self.audioPlayer prepareToPlay];
 }
}

- (void)viewDidLoad
{
 ...
 [self loadSound];
}
最后,在captureOutput:didOutputMetadataObjects:fromConnection:方法中添加下面的代码来播放声音:
- (void)captureOutput:(AVCaptureOutput *)output didOutputMetadataObjects:(NSArray<__kindof AVMetadataObject *> *)metadataObjects fromConnection:(AVCaptureConnection *)connection
{
 if (metadataObjects != nil && metadataObjects.count > 0) {
  AVMetadataMachineReadableCodeObject *metadataObject = metadataObjects.firstObject;
  if ([[metadataObject type] isEqualToString:AVMetadataObjectTypeQRCode]) {
   ...
   self.isReading = NO;

   // play sound
   if (self.audioPlayer) {
    [self.audioPlayer play];
   }
  }
 }
2.3.3 设置扫描框
目前点击Start按钮,整个视图范围都可以扫描二维码。现在,我们需要设置一个扫描框,以限制只有扫描框区域内的二维码被读取。在这里,将扫描区域设置为storyboard中添加的视图,即scanView。
在实现部分找到startReading方法,添加下面的代码:
- (void)startScanning
{
 // configure previewLayer
 ...

 // set the scanning area
 [[NSNotificationCenter defaultCenter] addObserverForName:AVCaptureInputPortFormatDescriptionDidChangeNotification object:nil queue:[NSOperationQueue mainQueue] usingBlock:^(NSNotification * _Nonnull note) {
  metadataOutput.rectOfInterest = [self.previewLayer metadataOutputRectOfInterestForRect:self.scanView.frame];
 }];

 // start scanning
 ...
}
需要注意的是,rectOfInterest属性不能在设置 metadataOutput 时直接设置,而需要在AVCaptureInputPortFormatDescriptionDidChangeNotification通知里设置,否则 metadataOutputRectOfInterestForRect:方法会返回 (0, 0, 0, 0)。
为了让扫描框更真实的显示,我们需要自定义ScanView,为其绘制边框、四角以及扫描线。
首先打开ScanView.m文件,在实现部分重写initWithCoder:方法,为scanView设置透明的背景颜色:
- (instancetype)initWithCoder:(NSCoder *)aDecoder
{
 self = [super initWithCoder:aDecoder];

 if (self) {
  self.backgroundColor = [UIColor clearColor];
 }

 return self;
}
然后重写drawRect:方法,为scanView绘制边框和四角:
- (void)drawRect:(CGRect)rect
{
 CGContextRef cOntext= UIGraphicsGetCurrentContext();

 // 绘制白色边框
 CGContextAddRect(context, self.bounds);
 CGContextSetStrokeColorWithColor(context, [UIColor whiteColor].CGColor);
 CGContextSetLineWidth(context, 2.0);
 CGContextStrokePath(context);

 // 绘制四角:
 CGContextSetStrokeColorWithColor(context, [UIColor greenColor].CGColor);
 CGContextSetLineWidth(context, 5.0);

 // 左上角:
 CGContextMoveToPoint(context, 0, 30);
 CGContextAddLineToPoint(context, 0, 0);
 CGContextAddLineToPoint(context, 30, 0);
 CGContextStrokePath(context);

 // 右上角:
 CGContextMoveToPoint(context, self.bounds.size.width - 30, 0);
 CGContextAddLineToPoint(context, self.bounds.size.width, 0);
 CGContextAddLineToPoint(context, self.bounds.size.width, 30);
 CGContextStrokePath(context);

 // 右下角:
 CGContextMoveToPoint(context, self.bounds.size.width, self.bounds.size.height - 30);
 CGContextAddLineToPoint(context, self.bounds.size.width, self.bounds.size.height);
 CGContextAddLineToPoint(context, self.bounds.size.width - 30, self.bounds.size.height);
 CGContextStrokePath(context);

 // 左下角:
 CGContextMoveToPoint(context, 30, self.bounds.size.height);
 CGContextAddLineToPoint(context, 0, self.bounds.size.height);
 CGContextAddLineToPoint(context, 0, self.bounds.size.height - 30);
 CGContextStrokePath(context);
}
如果希望在扫描过程中看到刚才绘制的扫描框,还需要切换到ViewController.m文件,在startStopAction:方法中添加下面的代码来显示扫描框:
- (IBAction)startStopAction:(id)sender
{
 if (!self.isReading) {
  ...
  [self.view bringSubviewToFront:self.toolBar]; // display toolBar
  [self.view bringSubviewToFront:self.scanView]; // display scanView
  ...
 }
 ...
}
现在运行,你会看到下面的效果:

接下来我们继续添加扫描线。
首先在ScanView.h文件的接口部分声明一个NSTimer对象的属性:
@property (nonatomic, strong) NSTimer *timer;
然后切换到ScanView.m文件,在实现部分添加loadScanLine方法及代码,并在initWithCoder:方法中调用:
- (void)loadScanLine
{
 self.timer = [NSTimer scheduledTimerWithTimeInterval:3.0 repeats:YES block:^(NSTimer * _Nonnull timer) {
  UIView *lineView = [[UIView alloc] initWithFrame:CGRectMake(0, 0, self.bounds.size.width, 1.0)];
  lineView.backgroundColor = [UIColor greenColor];
  [self addSubview:lineView];

  [UIView animateWithDuration:3.0 animations:^{
   lineView.frame = CGRectMake(0, self.bounds.size.height, self.bounds.size.width, 2.0);
  } completion:^(BOOL finished) {
   [lineView removeFromSuperview];
  }];
 }];
}

- (instancetype)initWithCoder:(NSCoder *)aDecoder
{
 ...

 if (self) {
  ...
  [self loadScanLine];
 }

 ...
}
然后切换到ViewController.m文件,在startStopAction:方法中添加下面代码以启用和暂停计时器:
- (IBAction)startStopAction:(id)sender
{
 if (!self.isReading) {
  ...
  [self.view bringSubviewToFront:self.scanView]; // display scanView
  self.scanView.timer.fireDate = [NSDate distantPast]; //start timer
  ...
 }
 else {
  [self stopScanning];
  self.scanView.timer.fireDate = [NSDate distantFuture]; //stop timer
  ...
 }

 ...
}
最后,再在viewWillAppear:的重写方法中添加下面代码:
- (void)viewWillAppear:(BOOL)animated
{
 [super viewWillAppear:animated];

 self.scanView.timer.fireDate = [NSDate distantFuture];
}
可以运行看下:
2.3.4 从图片解析二维码
从iOS 8开始,可以使用Core Image框架中的CIDetector解析图片中的二维码。在这个应用中,我们通过点击Album按钮,从相册选取二维码来解析。
在写代码之前,需要在Info.plist文件中添加NSPhotoLibraryAddUsageDescription键及相应描述以访问相册:

然后在ViewController.m文件中添加UIImagePickerControllerDelegate和UINavigationControllerDelegate协议:
在实现部分找到readingFromAlbum:方法,添加下面代码以访问相册中的图片:
- (IBAction)readingFromAlbum:(id)sender
{
 UIImagePickerController *picker = [[UIImagePickerController alloc] init];
 picker.delegate = self;
 picker.sourceType = UIImagePickerControllerSourceTypePhotoLibrary;
 picker.allowsEditing = YES;

 [self presentViewController:picker animated:YES completion:nil];
}
然后实现UIImagePickerControllerDelegate的imagePickerController:didFinishPickingMediaWithInfo:方法以解析选取的二维码图片:
- (void)imagePickerController:(UIImagePickerController *)picker didFinishPickingMediaWithInfo:(NSDictionary*)info { [picker dismissViewControllerAnimated:YES completion:nil]; UIImage *selectedImage = [info objectForKey:UIImagePickerControllerEditedImage]; CIImage *ciImage = [[CIImage alloc] initWithImage:selectedImage]; CIDetector *detector = [CIDetector detectorOfType:CIDetectorTypeQRCode context:nil options:@{CIDetectorAccuracy:CIDetectorAccuracyLow}]; NSArray *features = [detector featuresInImage:ciImage]; if (features.count > 0) { CIQRCodeFeature *feature = features.firstObject; NSString *message = feature.messageString; // display message [self displayMessage:message]; // play sound if (self.audioPlayer) { [self.audioPlayer play]; } } }
现在可以运行试下从相册选取二维码来读取:
上图显示的是在模拟器中运行的结果。
至此,我们的二维码阅读器已经全部完成,如果需要完整代码,可以下载QRCodeReaderDemo查看。
以上就是本文的全部内容,希望对大家的学习有所帮助,也希望大家多多支持。


 京公网安备 11010802041100号 | 京ICP备19059560号-4 | PHP1.CN 第一PHP社区 版权所有