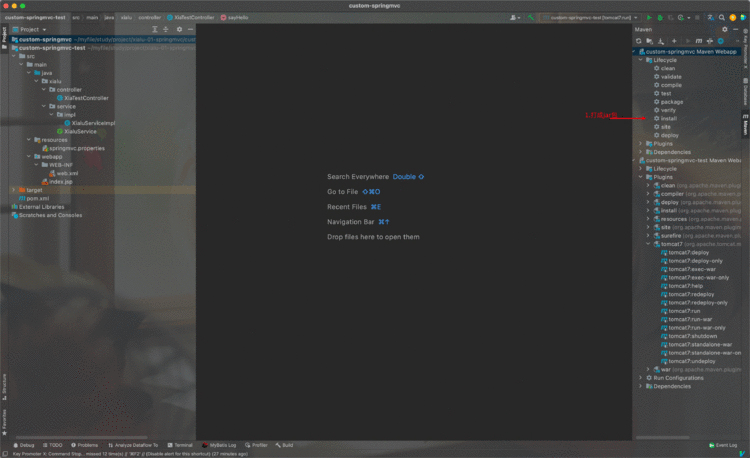
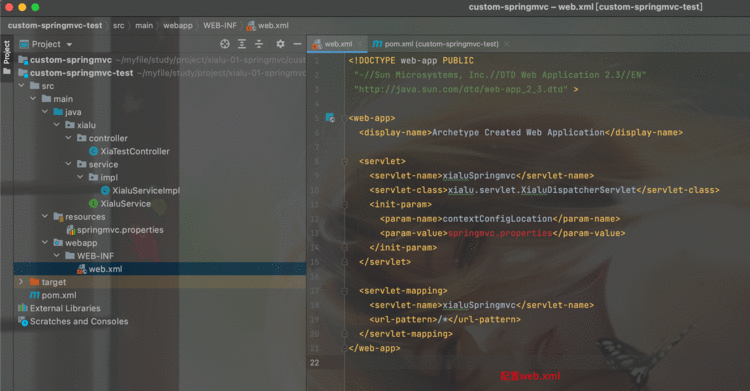
回顾Spring MVC学习笔记一,使用spingmvc的主要流程分为:
根据上面的步骤自定义sprngmvc的开发流程可以分为以下流程:
因为springmvc学习记录一有写过,这里就不再重复记录:https://www.jianshu.com/writer#/notebooks/50462304/notes/89366803/preview
@Autowired
@Target(ElementType.FIELD)
@Retention(RetentionPolicy.RUNTIME)
@Documented
public @interface Autowired {
    String value() default "";
}
@Controller
@Target(ElementType.TYPE)
@Retention(RetentionPolicy.RUNTIME)
@Documented
public @interface Controller {
    String value() default "";
}
@RequestMapping
@Target({ElementType.METHOD, ElementType.TYPE})
@Retention(RetentionPolicy.RUNTIME)
@Documented
public @interface RequestMapping {
    String value() default "";
}
@Service
@Target(ElementType.TYPE)
@Retention(RetentionPolicy.RUNTIME)
@Documented
public @interface Service {
    String value() default "";
}
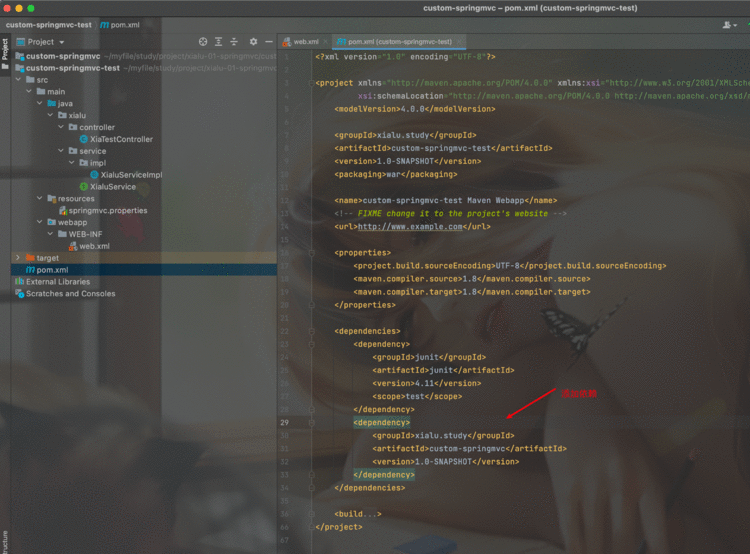
4.0.0xialu.studycustom-springmvc1.0-SNAPSHOTjarcustom-springmvc Maven Webapphttp://www.example.comUTF-888junitjunit4.12testjavax.servletjavax.servlet-api3.1.0provided准备完成
public class XialuDispatcherServlet extends HttpServlet {

    private XialuConfig xialuConfig;
    private ApplicationContext context;
    private List handlerMappings;

    @Override
    public void init(ServletConfig config) {
        /**
         * 1.加载web.xml,解析springmvc.properties.
         */
        this.xialuCOnfig= XialuConfig.newInstance();
        xialuConfig.parseConfig(config);

        /**
         * 2.扫描包路径,初始化Bean.
         */
        this.cOntext= ApplicationContext.newInstance(xialuConfig.getProperties().getProperty("xialuPackage"));
        /**
         * 初始化处理映射器,并完成注册.
         */
        this.handlerMappings = HandlerMappingBuilder.newInstance(this.context).build();
    }


    @Override
    protected void doGet(HttpServletRequest req, HttpServletResponse resp) throws ServletException, IOException {
        doPost(req, resp);
    }


    @Override
    protected void doPost(HttpServletRequest req, HttpServletResponse resp) throws ServletException, IOException { }

}
public class XialuConfig {

    private Properties properties = new Properties();

    /**
     * 实例化.
     *
     * @return
     */
    public static XialuConfig newInstance() {
        return new XialuConfig();
    }

    /**
     * 解析配置文件.
     *
     * @param config
     */
    public void parseConfig(ServletConfig config) {

        try {
            /**
             *加载web.xml,解析springmvc.properties.
             */
            String cOntextConfigLocation= config.getInitParameter("contextConfigLocation");

            InputStream resourceAsStream = this.getClass().getClassLoader().getResourceAsStream(contextConfigLocation);

            properties.load(resourceAsStream);
        } catch (IOException e) {
            e.printStackTrace();
        }
    }

    public Properties getProperties() {
        return properties;
    }
}
public class BeanDefinition {

    /**
     * 类全限定名.
     */
    private Class> aClass;

    /**
     * 实例化.
     *
     * @return
     */
    public static BeanDefinition newInstance() {
        return new BeanDefinition();
    }

    public Class> getaClass() {
        return aClass;
    }

    public void setaClass(Class> aClass) {
        this.aClass = aClass;
    }

}
public class ApplicationContext {

    private List beanDefinitiOns= new ArrayList();
    private Map singletOnObjects= new HashMap();

    public ApplicationContext(String packagePath) {
        /**
         * 扫描加载Beandifinition.
         */
        doScanner(packagePath);
        /**
         * 实例化.
         */
        doInstance();
        /**
         * 实现依赖注入.
         */
        doDI();
    }

    /**
     * 实例化.
     *
     * @param packagePath
     * @return
     */
    public static ApplicationContext newInstance(String packagePath) {
        return new ApplicationContext(packagePath);
    }

    /**
     * 扫描包路径,加载BeanDifinition.
     *
     * @param packagePath
     */
    private void doScanner(String packagePath) {
        URL url = getClass().getClassLoader().getResource(packagePath.replaceAll("\.", "/"));
        File dir = new File(Objects.requireNonNull(url).getFile());
        for (File file : Objects.requireNonNull(Objects.requireNonNull(dir).listFiles())) {
            if (file.isDirectory()) {
                doScanner(packagePath + "." + file.getName());
            }
            if (file.isFile()) {
                String className = packagePath + "." + file.getName().replace(".class", "");
                try {
                    Class> aClass = Class.forName(className);
                    BeanDefinition beanDefinition = BeanDefinition.newInstance();
                    beanDefinition.setaClass(aClass);
                    beanDefinitions.add(beanDefinition);
                } catch (ClassNotFoundException e) {
                    e.printStackTrace();
                }
            }
        }
    }

    private void doInstance() {
        Optional.ofNullable(beanDefinitions).ifPresent(difinitions -> {
            difinitions.forEach(beanDefinition -> {
                try {
                    Class> aClass = beanDefinition.getaClass();
                    if (aClass.isAnnotationPresent(Controller.class)) {
                        /**
                         * 类名称。
                         */
                        String simpleName = aClass.getSimpleName();
                        /**
                         * 首字母小写的类。
                         */
                        String lowerName = getLowerName(simpleName);
                        /**
                         * 放入单例池。
                         */
                        Object obj = aClass.newInstance();
                        singletonObjects.put(lowerName, obj);

                    } else if (aClass.isAnnotationPresent(Service.class)) {

                        Service service = aClass.getAnnotation(Service.class);
                        /**
                         * 获取beanName.
                         */
                        String beanName = Optional.ofNullable(service.value()).filter(value -> !"".equals(value)).orElseGet(
                                () -> getLowerName(aClass.getSimpleName()));
                        /**
                         * 放入单例池.
                         */
                        singletonObjects.put(beanName, aClass.newInstance());
                        /**
                         * 如果实现了接口,需要以接口的全限定名为beanName放入单例池一份.
                         */
                        Class>[] interfaces = aClass.getInterfaces();
                        if (interfaces != null && interfaces.length != 0) {
                            for (Class> anInterface : interfaces) {
                                /**
                                 * 放入单例池.
                                 */
                                singletonObjects.put(anInterface.getName(), aClass.newInstance());
                            }
                        }
                    }
                } catch (Exception e) {
                    e.printStackTrace();
                }
            });
        });
    }

    /**
     * 实现依赖注入.
     */
    private void doDI() {
        Optional.ofNullable(singletonObjects).filter(map -> !map.isEmpty()).ifPresent(map -> {
            map.values().stream().distinct().collect(Collectors.toList()).forEach(value -> {
                Field[] declaredFields = value.getClass().getDeclaredFields();
                for (Field field : declaredFields) {
                    field.setAccessible(true);
                    if (field.isAnnotationPresent(Autowired.class)) {
                        Autowired autowired = field.getAnnotation(Autowired.class);
                        String beanName = Optional.ofNullable(autowired.value())
                                .filter(name -> !"".equals(name)).orElseGet(() -> field.getType().getName());
                        try {
                            field.set(value, singletonObjects.get(beanName));
                        } catch (IllegalAccessException e) {
                            e.printStackTrace();
                        }
                    }
                }
            });
        });
    }

    /**
     * 获取首字母小写的单词.
     *
     * @param name
     * @return
     */
    private String getLowerName(String name) {

        String lowerCase = String.valueOf(name.charAt(0)).toLowerCase();
        String lowerName = lowerCase + name.substring(1);

        return lowerName;
    }

    public  Map getSingletonObjects() {
        return singletonObjects;
    }
}
public class HandlerMapping {

    private Object controller;
    private Map paramIndexMap;
    private Method method;
    private Pattern pattern;

    public HandlerMapping(Object controller, Method method, Pattern pattern) {
        this.cOntroller= controller;
        this.method = method;
        this.pattern = pattern;
        this.paramIndexMap = new HashMap();
    }

    public Object getController() {
        return controller;
    }

    public Map getParamIndexMap() {
        return paramIndexMap;
    }


    public Method getMethod() {
        return method;
    }

    public Pattern getPattern() {
        return pattern;
    }

}
public class HandlerMappingBuilder {

    private List handlerMappings;
    private ApplicationContext context;
    private final String EMPTY = "";

    public HandlerMappingBuilder(ApplicationContext context) {
        this.handlerMappings = new ArrayList();
        this.cOntext= context;
    }

    public static HandlerMappingBuilder newInstance(ApplicationContext context) {
        return new HandlerMappingBuilder(context);
    }

    public List build() {
        /**
         * 获取单例池.
         */
        Map objectMap = context.getSingletonObjects();
        if (!objectMap.isEmpty()) {
            for (Object obj : objectMap.values()) {
                if (obj.getClass().isAnnotationPresent(Controller.class)) {
                    /**
                     * 获取请求url.
                     */
                    String baseUrl = Optional.ofNullable(obj.getClass().getAnnotation(RequestMapping.class))
                            .map(RequestMapping::value).orElse(EMPTY);
                    Optional.ofNullable(obj.getClass().getMethods()).ifPresent(methods -> {
                        for (Method method : methods) {
                            if (method.isAnnotationPresent(RequestMapping.class)) {

                                String methodUrl = Optional.ofNullable(method.getAnnotation(RequestMapping.class))
                                        .map(RequestMapping::value).orElse(EMPTY);

                                /**
                                 * /xialu/hello.
                                 */
                                String requestUrl = baseUrl + methodUrl;

                                HandlerMapping handlerMapping = new HandlerMapping(obj, method, Pattern.compile(requestUrl));

                                /**
                                 * 封装参数位置,方便后续填充参数。(这里只处理HttpServletRequest,HttpServletReponse,基本数据类型等入参)
                                 */
                                Parameter[] parameters = method.getParameters();
for (int i = 0; i 这一步需要在最开始实现的DispatchServlet的doPost方法中添加逻辑
public class HandlerUtil {


    private HandlerUtil() {
    }

    public static Optional getHandlerMappint(List maps, String url) {
        /**
         * 遍历查找是否有匹配的处理器映射器.
         */
        for (HandlerMapping map : maps) {
            if (map.getPattern().matcher(url).matches()) {
                return Optional.ofNullable(map);
            }
        }
        return Optional.empty();
    }
}
   @Override
    protected void doPost(HttpServletRequest req, HttpServletResponse resp) throws ServletException, IOException {
        /**
         * 获取处理器映射器.
         */
        Optional mappingOptiOnal= HandlerUtil.getHandlerMappint(this.handlerMappings, req.getRequestURI());
        mappingOptional.ifPresent(handlerMapping -> {
            /**
             * 获取方法需要的参数类型数组.
             */
            Class>[] parameterTypes = handlerMapping.getMethod().getParameterTypes();
            /**
             * 创建参数数组.
             */
            Object[] argArr = new Object[parameterTypes.length];
            /**
             * 获取请求参数.
             */
            Map parameterMap = req.getParameterMap();
            /**
             * 封装请求参数.
             */
            for (Map.Entry entry : parameterMap.entrySet()) {
                /**
                 * 因为req获取到的值是数组形式,需要自己转换成合适的格式.
                 */
                String value = Arrays.stream(entry.getValue()).collect(Collectors.joining(",", "", ""));
                /**
                 * 获取参数位置索引,并完成参数填充.
                 */
                Optional.ofNullable(handlerMapping.getParamIndexMap().get(entry.getKey())).ifPresent(index -> argArr[index] = value);
                Integer reqIndex = handlerMapping.getParamIndexMap().get(req.getClass().getSimpleName());
                Optional.ofNullable(reqIndex).ifPresent(index -> argArr[index] = req);
                Integer respIndex = handlerMapping.getParamIndexMap().get(resp.getClass().getSimpleName());
                Optional.ofNullable(respIndex).ifPresent(index -> argArr[index] = resp);
            }
            try {
                /**
                 * 反射调用方法.
                 */
                handlerMapping.getMethod().invoke(handlerMapping.getController(), argArr);
            } catch (Exception e) {
                e.printStackTrace();
            }
        });
    }


 京公网安备 11010802041100号 | 京ICP备19059560号-4 | PHP1.CN 第一PHP社区 版权所有