Theoretical explanation and a real-life example
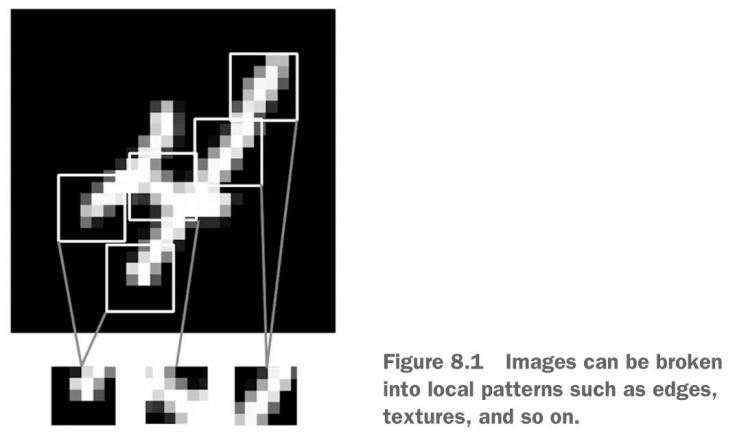
Convolutional neural networks (CNNs) are commonly used in data science domain especially for computer vision and image classification tasks. Consider an image classification task. Images consist of pixels which are represented with numbers. In the convolution layer of CNNs, filters (or feature detectors) are applied to the image to extract distinctive features of the image by preserving the spatial relationships among pixels.
Convolution operation is done as follows:
We have a 10×10 image and a 3×3 filter. Filter, starting from the yellow-marked position, scans through the image and creates a feature map. At each step, the dot product of image pixels and filter is calculated and the resulting scalar is put in the corresponding position of the feature map.
Strideparameter controls the movement of the filter. When the stride is 1, the filter moves 1 pixel at each time.
The goal of the filter is to preserve the spatial relationships of a pixel so it needs to see the pixels on the left, right, up, and bottom. Therefore, with a 3×3 filter, we start with the pixel on the second row and second column. The pixels on the first and last row as well as the ones on the first and last column cannot be a part of the feature map because they do not have up, bottom, right or left neighbors.
This is the reason why the resulting feature map is 8×8. If we apply a 5×5 filter, the feature map becomes 6×6.
If we want to preserve the pixels on the borders, we can use padding and add zeros around the image.
In a convolution layer, not just one filter is used. Many different filters are applied to the image. Each filter is aimed to capture a different feature such as edges, horizontol lines and so on.
Images are highly non-linear so we need to increase the non-linearity in convolution layer. In the convolution layer, rectifier function is applied to increase the non-linearity in the image. Rectifier function acts as an additional filter to break up linearity.
Then we have Pooling layer which reduces the size of the feature maps while maintaining the preserved features of the image.
In the pooling layer, a box with a specified size is captured and the maximum value in that box is taken. This is maximum pooling. We can also take the sum or mean of values in the box. This box scans through the entire feature map. The picture above represents the max pooling layer with a 2×2 box so the size of the feature map reduced to 4×4.
The advantages of pooling:
In a convolutional neural network, there are multiple convolution and pooling layers depending on the complexity of the task.
Now, we need to flatten pooled feature maps in order to feed them to a fully connected layer. After the flattening step, the structure of the remaining part of a convolutional neural network is just like a feed-forward neural network. Flattening step is very simple.
The resulting array after flattening is used as the input to a Dense layer. The pooled feature maps are flattened and fed through a dense layer. Typical structure of a convolutional neural network is:
Please note that subsampling is used for pooling. This convolutional neural network has two convolution layers and two pooling layers.
Let’s go through a real example.
We will use images of motorcycles and airplanes from Caltech101 dataset. It is a great dataset to train and test a CNN. Many thanks to the community who prepared and let us use this dataset.
We will use Keras which is a high-level deep learning library built on TensorFlow. Let’s start with basic imports:
import numpy as np
import tensorflow as tftf.__version__
'2.2.0-rc3'
We will be using google colab environment for this task. I saved the images to my google drive. In order to directly access the files in the drive from colab, we just need to import drive:
from google.colab import drive
drive.mount('/content/gdrive')
This will prompt us to approve by copy-pasting a link. Then we can easily access the files in the google drive.
Let’s check a couple of images using matplotlib:
import matplotlib.pyplot as plt
import matplotlib.image as mpimg%matplotlib inline
Images are just arrays of numbers in 2D (black and white) and 3D (colored). We should also check the structure of an image in addition to seeing how it looks.
img = mpimg.imread('/content/gdrive/My Drive/airplane_motorbike/train/airplanes/image_0001.jpg')type(img)
numpy.ndarrayimg.shape
(164, 398, 3)
The first two dimensions show the size of the grid of pixels and the third dimension is indicating if it is colored or grayscale. So this image is a colored 164×398 pixels image. If the last dimension is 1, then the image is grayscale. Let’s see how it looks:
imgplot = plt.imshow(img)
Let’s also see an image of a motorbike:
img2 = mpimg.imread('/content/gdrive/My Drive/airplane_motorbike/train/motorbikes/image_0001.jpg')print(img2.shape)
(161, 262, 3)imgplot = plt.imshow(img2)
You may have noticed the number of pixels are different. The shape of the motorbike image is (161, 262, 3) but the shape of airplane image is (164, 398, 3). The images have to be in the same shape to be used in a CNN. We can manually adjust the sizes but it is a tedious task.
We can use ImageDataGenerator which is an image preprocessing class of Keras. We just need to organize images in a folder structe and ImageDataGenerator will handle the rest:
ImageDataGenerator generates batches of tensor image data with real-time data augmentation. ImageDataGenerator creates many batches of the images by applying random selections and transformations (such as rotating and shifting) in batches. So it increases the diversity of the dataset. Data augmentation increases the diversity of data which is very useful especially when the number of images is limited. Increasing the diversity of the dataset helps to get more accurate results and also prevents the model from overfitting.
The images are in the “airplanes” and “motorbikes” folders. I put 640 images of each category in train folder and 160 images in validation folder. Let’s implement ImageDataGenerator objects for both training and validation:
from tensorflow.keras.preprocessing.image import ImageDataGeneratorimport os
We first create ImageDataGenerator objects for train and validation sets:
We pass in rescale parameter to normalize the values in the pixels in [0,1] range. Normalization of data is an essential practice in neural networks.
Then we indicate the path to the files that contain images:
Then we create train and validation generators:
We used flow_from_directory method. Another option is to use flow method. The details of each method are explained in detail in keras documentation .
Let’s go over the parameters. The first one is the file path which we already created in the previous step. Target_size indicates the size of resulting images. Train and validation generators will resize all images to 150×150 pixels. Batch_size is the number of images in a batch. The class_mode is binary since we have two classes. As we can see in the output, there are 1280 images in train folde and 320 in validation folder belonging to 2 classes.
It is time to build our model:
We have 3 convolution layers and a pooling layer right after each convolution layer. In the first convolution layer, we define the number of filters and the filter size. I choose to use 16 filters with a size of 3×3. Then we define the activation function which is relu. For the first convolution layers ,we also need to define the input_shape because the model will not know the size of our images. For pooling layer, we only need to specify the size of box used for pooling.
We follow the same procedure for the other convolutional layers. The only difference is that we do not have to specify the input shape because the model will know the input from the output of previous layer.
Input_shape is required only for the first convolution layer.
Then we have flatten layer to flatten pooled feature maps. Flattened feature maps are fed to a Dense layer. Then we have an output layer.
It is important to note that there is not a strict rule to determine number of filters, filter size, number of neurons in a layer and so on. The values for these parameters are adjusted with experience or trial and error. You can adjust and try different values.
We have just built a CNN model. To see an overview of the model using summary method:
model.summary()
The size of input images are 150×150. We used 3×3 filters so the size of feature maps are 148×148. The size is reduced to half in the first pooling layer. At each convolution-pooling layer pair, the size is reduced but features in the images are preserved. In this model, we have more than 2 million parameters to train which is a lot. This is a simple image classification task. Imagine the number of parameters to train the model used in very complex tasks.
Now it is time to compile the model:
We need to specify the loss function , optimizer and a metric for evaluating the performance. For loss function, binary_crossentropy can be used since this is a binary classification task. There are many optimizers available in Keras , RMSprop and Adam optimizers are commonly used. The metric we are using is accuracy.
We finished preprocessing of images, built the model and compiled it. Now we can fit data to the model and train it:
We use the ImageDataGenerator objects that we created earlier as training and validation sets. Steps_per_epoch parameter is number of images divided by the batch size. Validation_steps is calculated similarly using number of images in validation set and batch size. An epoch is done when the model goes through the entire traning set. I use 5 epochs but you can change it to see how it affects the accuracy. Let’s see the results:
The model has 99.69% accuracy on training set and 99.37% accuracy on test set which is a great result. Please keep in mind that this is a simple image classification task. We will deal with much more complicated tasks. However, the way to build the network and logic behind is the same. Thus, if we learn the basics well, we can easily adopt to more complicated tasks.
以上就是本文的全部内容,希望本文的内容对大家的学习或者工作能带来一定的帮助,也希望大家多多支持 我们
![[大整数乘法] java代码实现](https://img1.php1.cn/3cd4a/24c6f/9f3/0133bb25da242824.jpeg)


 京公网安备 11010802041100号 | 京ICP备19059560号-4 | PHP1.CN 第一PHP社区 版权所有